Labels

BASS (50) COMPRESSION (32) DRUMS (45) EFFECTS (49) EQUALIZATION (30) GUITAR (112) HOME RECORDING (95) IMPULSES (21) INTERVIEWS (19) KARAOKE (1) LIVE (10) MASTERING (61) MIDI (21) MIXING (179) REVIEWS (156) SAMPLES (69) SONGWRITING (19) SYNTH (3) VOCALS (31)
Showing posts with label DRUMS. Show all posts

Saturday, February 18, 2023

How to mic a drumkit with snare top and bottom (part 2/2)


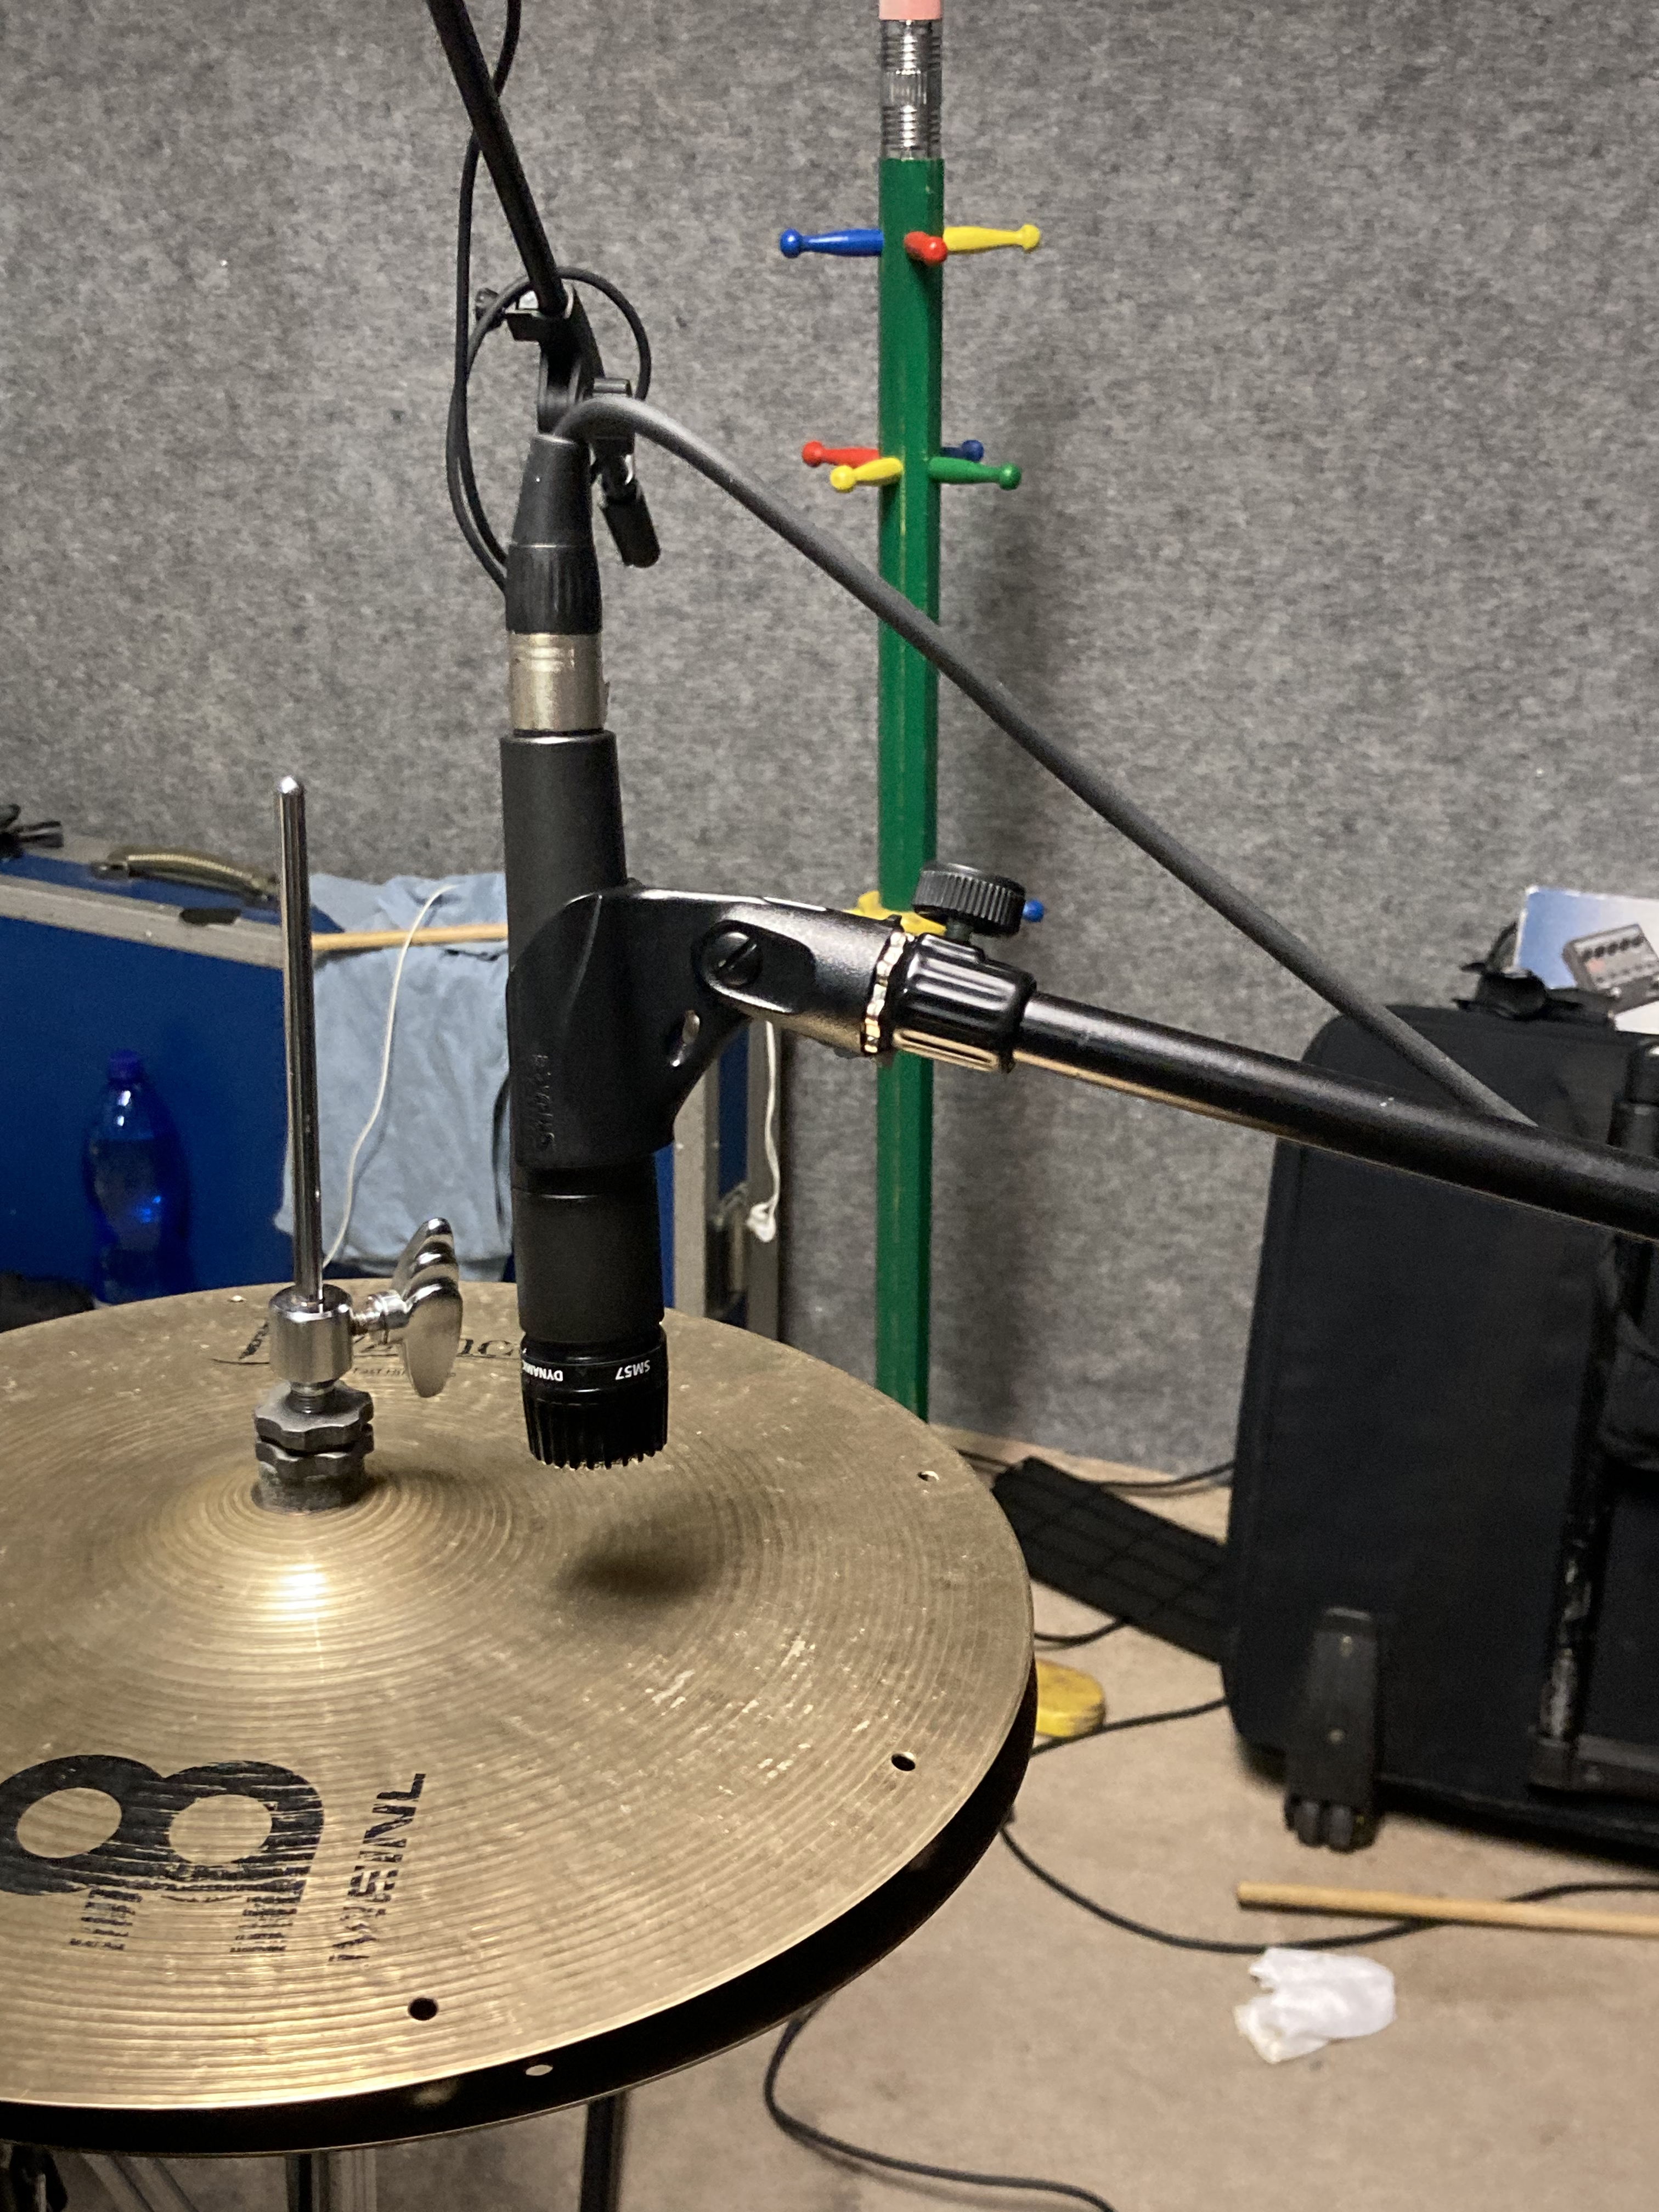
Moving to the cymbals, let's start from the hi-hat: I have used a dynamic mike (a Shure SM57), but in other occasions I've used also a microcondenser: the microcondenser sounds even better, but it has more bleed issues, so it depends on the genre, on how strong the drummer hits it and so on. 
For the positioning, I have chosen to place it on the opposite side of the snare and in vertical, to try to reduce the bleed. 


These last 3 pics are all for the last element: the overhead microphones. I have used those 2 microcondenser mikes to pick up the cymbals in the 2 sides of the drumkit, pointing left and right according to the position of the drummer, and directing them towards the center of the cymbal group, with the right microphone that picks up also the ride.

The final result was quite clean, and it offered me some good material to work on, especially the snare.

Let me know what do you think about this microphoning technique in the comments below! 

Thanks to my friend Zoltan for the pics!


CLICK HERE FOR PART 1/2


Become fan of this blog on Facebook! Share it and contact us to collaborate!!

Saturday, February 11, 2023

How to mic a drumkit with snare top and bottom (part 1/2)


Hello everyone and welcome to this week's article!

Today we're going to see a method to record a drumkit slightly different from the version proposed in our main "How to mic a drumkit" article, and somehow this can be considered also a more advanced version of it: we're going to see how to microphone a drumkit with 8 mikes, but with 2 toms instead of 3 (including the floor tom) and using 2 microphones for the snare: one for the top and one for the bottom. In this article I will elaborate also a bit more regarding the mic positioning.


Let's start with the kick: this time I did not push the mic too deep, trying to get close to the beater: I've realized that the low end generated by the proximity effect is higher than the "click" of the beater I wanted to catch, so I backed the microphone leaving it half inside the hole and half out (yes, it sounds like a horrible pun, but there's nothing I can do about it :D): this way the lows are under control and the microphone picks up better also the top end, the result is a more balanced and usable tone.


Moving to the toms, this is something I've tried to apply the same principle to the toms and to the snare: to try to aim the mike towards a point close to the border of the shell, because pointing towards the center makes the tone too dark, but if you aim too much to the border you get too much ring, so you need to try until you find the right balance between the ring and a nice, full but bright tom sound (this applies also to the floor tom). Also, don't forget that since usually dynamic microphones are cardioids, it's good to point the back of the microphone towards the loudest cymbals, because the back of the microphone is the part that picks up less sound, so it will limit the bleed.


Finally, talking about the snare, as you can see from the pic, I've decided to use a Shure Beta58a for the top and a Shure SM57 for the bottom, trying to create a 90 degrees angle. 
Both microphones were pointing towards a similar spot, like the one for the toms: close to the border, but not to the point that it picks up too much ring note, if the ring was too strong, I was moving the snare top mike 1cm more towards the center, until eventually I've found the sweet spot.
In this case the snare top mike takes the body of the snare sound and some ring, while the snare bottom one is aimed to pick up the top end, the grainier, more explosive part of the tone. 
This way we have a lot of flexibility when creating our snare tone during the mixing phase.


CLICK HERE FOR PART 2/2


Become fan of this blog on Facebook! Share it and contact us to collaborate!!

Saturday, December 17, 2022

How to randomize the velocity of a drum sampler to make it more realistic


Hello and welcome to this week's article!

Today we're talking a bit more in depth about a topic we have already mentioned in our article about MIDI dynamics: the fastest way to make more realistic a MIDI drum track, by randomizing the velocity.

One of the many parameters you can assign to a MIDI note is the Velocity: it's a value from 0 to 127 (like the other MIDI parameters) and it is meant to mimic the natural strength variations in our playing; 
basically it represents how soft or hard we hit a note, that can be a keyboard or any other instrument.

Now, when talking about virtual drumkits, nowadays there are on the market very extensive drum libraries, that arrive to dozens of Gb in size, and the larger is the library the more samples there are, also for a single drum part: a single snare, for example, can have 15, or even 25 velocity layers, that represent various intensities a drummer can hit it.

The more the velocity layers the more the sampler will sound realistic when playing it live, but even if we are writing down the drum MIDI parts note by note with the mouse, modifying the velocity it's quite important to make the drums sound less robotic, to the point that some drum sampler have also a "humanizer" function inside that randomizes a bit the dynamic variations in strenght of the hits.

Some DAW have directly the humanize function, for example in Studio One you just highlight the MIDI part you want to make more realistic, right click and you can choose "Humanize" or "Humanize Less" to reduce the effect, but the humanize function will also slightly move the MIDI notes in timing, so if you want only to randomize the velocity you need, while the same notes are still selected, to pull down the Action menu again and select Restore Timing.

In other DAW, where no humanize function is available instead, you can usually choose the MIDI part and under the Velocity section there should be a randomize velocity function that lets you dial in a minimum and maximum value, and the notes will be with a randomized velocity within that range.
What range to choose? It depends on 2 things: the genre (if the dynamic excursion is huge, like there are press roll parts, it's better to randomize them separately or write them note by note) and the number of velocity layers in the sampler. If you have some pre-made MIDI groove for that specific sampler you can load some and take note of the minimum and maximum velocity of each drum part, so you can be sure that the range you enter will have samples available, otherwise you can be conservative and choose quite a narrow range, in the area that sounds better to your ears (for example 70 to 90, or 80 to 100).


Become fan of this blog on Facebook! Share it and contact us to collaborate!!

Saturday, July 30, 2022

How to do drum replacement/layering in Studio One without 3rd party plugins

 Hello everyone and welcome to this week's article!

Today we're going to see how to make drum replacement in Studio One without using 3rd party plugins!

Drum replacement has always been a very sensitive topic among musicians: some love it, many hates it, but the truth that every mix engineer knows is that they are very important, almost essential to any modern rock, pop or metal production.
In order to do it there are many ways, for example by using drum replacement plugins like Slate Trigger, Aptrigga, Addictive Trigger and so on, but today I would like to focus on a technique that is available (as far as I know) only in Studio One and that makes drum replacement (or anyway turning any rhytmical source into a MIDI) very fast and without using 3rd party plugins, just follow these 5 steps:


1) Choose the track you want to replace (or layer) with samples, for example an acoustic snare or kick track, and from the top toolbar click on the Q icon, this will open a sub-menu in which you need to click on "groove" to open a field that will analyze your track.


2) Drag and drop the desired track in the groove analysis field, it will detect all the peaks in the track and mark them.


3) click on the "Audio Bend" icon on top and it will show you more tools to adjust, from there go on the "threshold" one and adjust it until only (or mostly) the kick hits (if we're replacing a kick track) are detected (because usually with the basic setting it's so sensible that it will mark also for example the snare bleed in the kick microphone).


4) When you are satisfied with the peak detection create a new Instrument Track in Studio One, and load there for example your sampler or virtual drumset, and from the groove analyzer field you can drag and drop directly a MIDI of the detected hits into your new instrument track.

5) The final step is to assign the right sound to the MIDI and clean up the track, eliminating the remaining unwated hits, adjusting the velocity and if necessary by moving the whole MIDI track few milliseconds back, if you hear some slight delay.

Voilà! 
You will have a nice MIDI replica of your acoustic track, that you can use to layer new sounds on top of it or to replace it altogether.

I hope this was helpful!


Become fan of this blog on Facebook! Share it and contact us to collaborate!!

Saturday, March 23, 2019

How to record a song part 2/6: drums!


Hello everyone and welcome to this week's article!
Once our project is ready to record, we need to start from the foundations of our song, which for a rock/metal song is the rhythmic section, and the first instrument to record of the rhythmic section is the drums.

Now we need to setup the tempo track, which will contain the metronome of our song, with all the necessary variations. The click, in case we are recording acoustic drums, will be sent via headphones to the drummer in order to make him follow a reference that will be the same for all the other instruments.

How will we record our drums?
Will we use a Midi virtual drumkit? In this case we will need to write every single midi note in the piano roll and to adjust the velocity and the other parameters in order to make the drum sampler sound as realistic as possible (click here for a dedicated article about velocity and the other midi parameters).
Alternatively to writing manually the Midi notes, they can also be acquired by using an electronic drumkit or by applying triggers to a real drumset (click here for a dedicated article).

Will we use a real drumset?
Then, according to how many microphones we have, we can use different techniques.
If we have only 2 microphones the best method is the one described in this article.

If we have more inputs in our audio interface instead, we can close mike every drum part.
Here is an article about how to microphone all the single parts of a drumset, and here is another one specific on how to microphone the cymbals.

Finally, here is an article with various microphone setups arranged by genre.

It's important to say that a drumkit can be also recorded both with microphones and triggers in order to add sampled drum sounds on top of the acoustic ones later, or to replace entirely some drum part that did not come out well; this gives us also a lot of flexibility in terms of editing.


CLICK HERE FOR PART 1/6: PREPARATION!

CLICK HERE FOR PART 3/6: BASS!

CLICK HERE FOR PART 4/6: GUITARS!

CLICK HERE FOR PART 5/6: VOCALS!

CLICK HERE FOR PART 6/6: KEYBOARDS AND EXTRA ARRANGEMENTS!


Become fan of this blog on Facebook! Share it and contact us to collaborate!!

Saturday, January 5, 2019

How to mix a song with free plugins part 1/5: Drums!


Hello and welcome to this week's article!
This time we're going to embark to a pretty huge topic that will touch many of the article already present on this blog, but with this I'm going to try and make order to what I've learned in the past few years and share some extra tip with you.
In order to obtain the maximum from this serie of articles please follow the hyperlinks, they all lead to in depth articles dedicated to the various topics.

The mixing process of an album is almost a philosophical project: it consists into gathering together a puzzle with a million pieces (songwriting, recordings of all instruments...) that would have no meaning on their own and carefully combine them in order to make a vision that until now is only in the head of the artist into a form that anyone can enjoy.
The process can be long and complicated, and it requires first of all order in our head: to help making order we have broken it down into one chapter for each instrument, in order to cover as many topics as possible.
Even before starting putting together our project it's important that we have clear in mind the focus of our mix (click here for a dedicated article): this will be the north start that will guide us through the mix, and will give us a direction towards where the overall sound should aim.

Let's start by assuming that we have a good song, and that this song has been recorded properly: we start with the project preparation phase (click here for a very detailed article), and once we have all the tracks in order, the project tidy and color coded, we make sure that the gain staging is correctly set to make sure that no track (nor the master fader) peaks above -12db.

I suggest to start with a mix bus compressor (click here for a dedicated article) in the master bus set very gently (2:1 to 4:1 ratio, the more dynamic and aggressive the genre, the higher the ratio), and lower the threshold knob until you see you are shaving off not more than a couple of db of peak: this move seems useless at the beginning, but it will add a little of energy to the mix, will help the instruments to glue better together and will allow us to push less with the compressors in the individual tracks, which is usually more noticeable and can be less pleasant.
Moving on with the mix we'll be introducing also all the other instruments, and gradually the general volume will be increasing: we need to lower the faders of the individual instruments in order to make sure that we we'll be still shaving off not more than 2db with the M.B.C., and not peak above -12.
This will be a good way to keep under control the gain staging and the headroom, we're going to need it in the mastering phase.

The general rule is that a mix is made of many 1% moves that all must go towards the direction of achieving an euphonic final result: you can try and experiment with all the crazy plugins and processors you want, but after each move you must always a/b with the plugin on and off (using a reference track at every step to see whether we are going in the right direction): if the sound gets better, leave it, if it doesn't add anything or it makes it worse, remove it. Sometimes less is more.

Now let's start with the drums, the pulsating heart of our song: if we get this right, we are already halfway there.
Are we using a drum sampler? Is the drum sampler featuring pre-processed sounds? 
In this case we need to spend most of our attention to which samples to use: carefully go through you whole library of drum samplers and individual samples to find the perfect snare, the perfect kick and so on, because once they are there, there is very little room for mixing, since the samples are already processed.
You can find many free and paid drum samplers on this blog by simply typing drum sampler in the search engine.
Once we have our ideal drum sound we need to work with the integrated mixer of our drum samper to make the levels, and we could probably add some high-passed reverb through an fx track (we can high pass the reverb to make sure it affects only from a certain part of our sound up) from 200hz to 1000hz up (this way we will avoid the sample to get too dark and boomy), and to carefully introduce some of it into the snare, toms and cymbal tracks to make them feel like they are being played in the same room.
Usually with pre-processed samples there is no need for extra eq and compression.

This is a good moment to hear the aid that the bus compressor is giving us: try to playback the drum track and turn it on and off from the master bus: you will notice that there is an 1% increase of fatness and roundness to the sound, and this is just one of the many 1% a mix is made of.
If the sound instead starts pumping (meaning that when a loud sound like a snare is played the other ones lowers in volume) it means we need to lower the compressor.

Are we instead using real drum sounds or non processed samples? 
Then we need to follow the steps of our in depth drum mixing guide.


CLICK HERE FOR PART 2: BASS!

CLICK HERE FOR PART 3: GUITARS!

CLICK HERE FOR PART 4: VOCALS!

CLICK HERE FOR PART 5: KEYBOARDS AND EXTRA ARRANGEMENTS!


Become fan of this blog on Facebook! Share it and contact us to collaborate!! 

Saturday, June 23, 2018

Everything you need to know about drum triggers PART 2/2


CLICK HERE FOR PART 1/2


Now that we know the basic concepts behind a drum trigger let's try to understand its practical applications:

- Live environment: a drumset can be triggered entirely (except for the cymbals) or partially (for example just the kick or the kick and the snare) to make the sound cut through the mix better, and send the samples from the drum module to the mixer.
This way the sound engineer can use the samples and the microphoned drum parts the same way as they were all microphoned, with all the perks of the samples: more clarity, less dynamic range (usually drum modules features also effects like compressor, reverb...), and so on.
As in all environments, it is very important that the hits acquired from the trigger are received correctly from the drum module by setting the sensitivity, and if necessary, adjusting the pressure of the trigger on the drum skin.

- Studio environment: this is the environment in which drum triggers shines the most.
A recording engineer can record a whole drumset both with microphones and triggers, and decide during the mixing phase what part to use natural, what part to use triggered and what part in which to use a blend between microphone and sample (except for cymbals, which is better to keep acoustic because they are the drum part that result more "fake" when sampled).
Here the setup is crucial: the trigger must be placed correctly, not too tight because it would interpret hard hits like double hits, not to loose from the skin because it wouldn't notice the lightest touches, and the sensitivity must be carefully tuned in the drum module.
Once everything is set, the drumset will be recorded both acoustically and in a Midi track in the computer, and the mix engineer will be able to easily edit the Midi by removing doubles, reducing or evening out the dynamic range, quantizing, snapping to grid, "reintroducing humanity", or even rewriting certain parts.
This is very useful if the drummer is not very good and if the microphoned part is so bad that can't be fixed, but also just to add a sample on top of the microphoned drum part, if needed.
Finally, if we don't have triggers, we can always put a sample on top of a microphoned drum part by using a drum replacer.

- Home practice environment: there are electonic drum kits, usually pretty small and foldable like the one depicted in this article, that features skins made to reduce the sound to the minimum to not bother anyone in the house, and these drum parts (included the rubber "cymbals") have a trigger inside of them, so that the drummer can connect them to a drum module and play with the headphones (sometimes also playing along with a song). This is a very useful home solution for those who doesn't have a rehearsals room, the drum parts offers a feeling similar to a real drum skin in terms of "bounce" of the drum sticks and it can be used also for recording drum parts.


CLICK HERE FOR PART 1/2


Become fan of this blog on Facebook! Share it and contact us to collaborate!!

Saturday, June 16, 2018

Everything you need to know about drum triggers PART 1/2


Hello everyone and welcome to this week's article!
Today we are going to talk about a topic very sensitive among drummers: drum triggers!

Why did I say this topic is sensitive among drummers? Because a drum trigger is a tool that takes a drum hit and turns it into a Midi impulse and sends it to a drum module (or to a computer with a drum VstI), so that we can replace the original drum sound with a pre recorded drum sample or with any other sound we want, and being Midi we can also quantize and manipulate the impulse in everywhich way possible.

Drum triggers started to be popular thanks to heavy metal music in the early '90s (especially with bands like Pantera), a moment in time in which music productions demanded more and more clarity, especially to make the super fast kick drum parts pop out of a dense mix with a lot of snap.
For these parts a normal microphone didn't seem to be enough, so the producers started to trigger the kick and replace the original sound with a very clicky one, capable of cut through everything and be very audible.
With time the bands started to use triggers for all drum parts for reasons that went also beyond the sound: to make drum editing way easier, and to even out the dynamics; today, especially in pop, rock and heavy metal is quite hard to hear a totally acoustic drum sound, as most of the songs features samples or a blend between samples and the acoustic sound (to make the sound a bit more natural).

This led to the paradox that often we can hear in an album an extremely complex drum part played perfectly, and then when we go to see the band live we realize the drummer would never be able to play it the same way it appears on the record.
This lack of "humanity" in modern day drums is perceived similarly to the "loudness war": since everyone is editing and quantizing the hell out of their drum tracks, the listener's ear is by now used to that super perfect performance, and the bands that does not edit and quantize to perfection will sound like the drummer performance is sloppy, and nobody wants to sound sloppy.
This led to an odd detachment between the record performance and the live one for most of the bands, as anyone can notice going to a live gig.

Going back to the main topic, a drum trigger comes usually in the form of a clip that gets attached to each drum part except the cymbals (but if we want we can trigger also just the kick, or only snare and kick and so on), then the trigger is connected to a drum module with normal jacks, and the drum module will interpret the signals received from the trigger and apply a pre recorded sample to the hits.
The "replaced" drum sound will then be sent via the output jack to the mixer and it can be used both live or in a recording session.


CLICK HERE FOR PART 2/2


Become fan of this blog on Facebook! Share it and contact us to collaborate!!

Saturday, January 27, 2018

How to mix acoustic drums with samples


Hello and welcome to this week's article!
Today we are going to add another chapter in our drum production serie of articles:

- How to turn drums into midi

- How to mix rock/metal drums

- How to use Drumagog and other drum replacers

- How to use Superior Drummer or Slate Drums sounds in our acoustic drumset


And the topic of today is about how to mix an acoustic drumset using also drum samples to achieve better results.
Let's start by assuming you have read all the articles linked above, so I won't repeat anything, and let's assume that we have a good multitrack project, with decent takes, without too much mic bleed, and that the drum tracks have already been edited. Everything must be ready to mix.
Sometimes when we are in this phase we will realize that the sound is not optimal (maybe because we have used a 100€ all included mic set of 8 microphones, for a value of 12,5€ a microphone), and even if we eq and compress the hell out of each track, literally to the extreme, the result will be extremely poor.

In this case we can use drum replacers to take our acoustic track and add a drum sample on top (or to completely replace it).
In this example we are using Addictive Trigger, which can be downloaded in trial version Here, but we could use any other drum replacer, such as Drumagog, Slate Trigger, Aptrigga etc, the result is the same.

What we need to do is to load an instance of Addictive trigger in the insert of, for example, our kick track, and as a first step adjust the input gain and the sensitivity until we are sure that only the kick hits are catched by the drum replacer. This means that we need to cut out the snare bleed by narrowing down the "scope" of the trigger, until all snare hits are out. (On a side note, some drum replacer after this adjustment lets us also export a midi file with the hits detected, if we want to play them with a drum Vsti).

Now we can choose a kick snare from the list of the available ones (or use the samples of our drum Vsti as explained in one of the articles linked on top), and the idea is to choose the closest one to our ideal, final sound, in order to get there with as few moves as possible. In this phase is good to a/b constantly with our favourite reference track in order to not lose objectivity.
Once we have found the sound we need, we can decide how much to blend it with the original tone, for example 50% to retain some of the original sound, or 100% to completely replace it. Now some drum replacer offers tools to mix the sample directly in the box, otherwise you will need to process it externally, adding comp, eq etc in the vst chain (keeping in mind that doing this way, the processors will effect both the acoustic part and the triggered one, so if we are blending the sampled sound with the original one we might want first to process the acoustic part, and then to add the drum replacer at the end of the chain).

I have used the example of the kick because it is a quite difficult drum part to get properly without expensive gear, so it's the drum part that gets replaced more often, but usually the best results are achieved when adding some sample to basically all drum parts (except the cymbals), and blending everything tastefully.

The same process explained for the kick can therefore be repeated with snare and toms, if needed, and this technique is used by most of the modern studios, since it's a powerful, flexible tool.

Hope this was helpful!


Become fan of this blog on Facebook! Share it and contact us to collaborate!!

Sunday, August 21, 2016

The Focus of our Mix (a 5 points list)


Hello and welcome to this week's article!
Today we are going to talk about "the big picture", in facts often sound engineers are detail oriented nerds which focuses their attention on one detail at the time and refine it to perfection, and sometimes they can get to a point in which they lose a holistic view of the mix, for example after hours spent working on a synth sound.
The result is that when the producer hears a mix he focuses on certain things that the final listener won't even notice, and he could lose the general view of how is the song perceived.

This small list is useful to "keep the eyes on the ball", since the listener hears the complete song, not the single parts, so we will try to break down the elements that usually are more noticed in a mix, so that we will know where to put most of our efforts.
Notice that this list applies for rock, metal, punk, funk and most of pop music, but there are other genres completely different in which these rules don't apply, because they would make the song excessively rhythm based (es. jazz), so use it at your own risk.


1) Snare sound: the snare sound is the business card of the song.
It's the first thing that gets to the ear of the listener, because it is made, along with vocals, to resonate exactly in the most audible frequences for the human ear.
The snare sound alone can decide the genre of a song, imagine the typical reggae snare of the Bob Marley albums, the dry and snappy sound of the electronic dance music one, the shotgun sound of 80s rock or the acoustic vibe of '60s and '70s rock snare.
If the snare sound is botched, the WHOLE song will sound amateur, or unpleasant, even if the listener can't recognize why, so make sure to nail it.
Click here for an article about mixing drums.

2) Low end (kick and bass): this is the punch of the song, and one the core elements that makes the difference between a very amateur recording and a professional one, because to be nailed it requires expensive monitors and use of metering tools that usually amateur mix engineers doesn't consider important.
If we get right the balance both in levels and in frequences of the rhythm section, which is the whole drumset (especially the balance between snare and kick) and the bass we have done most of the mix, because the whole song will sound balanced and the listener will focus on the content, the music, which is our main objective.
Bass and kick should go as in sinergy as possible, and this assumes we have good tracks, played in time and well arranged, and the frequences should be complementary each other when mixing, so that the "house" we are building has strong foundations.

3) Vocals: Once we have a solid rhythmic section we must focus on vocals, because (unless we are mixing some swedish nineties death metal song) it will be the thing that will make the listener press play on our track.
If the vocals are bad, either because the singer is bad or because we have recorded or mixed him poorly, the song will be a failure, so we must treat it very carefully, considering that 70% of a vocal track happens during tracking; after that we can embellish it with reverb, delay, autotune, but if a vocal take sucks it cannot un-suck, so grab your best microphone, your best preamp, your best patience and record the track again if it doesn't sound perfect, because even if the song will be perfectly produced, if the vocal sucks, noone will ever want to listen to it.

4) Accompainment (guitars, piano...): now we must take care of everything is around the voice, such as guitars, or synths, or anything else, and we do it after drums and vocals, otherwise we would not be willing to sacrifice frequences or modify the perfect sound we have found to make room to drums and vocals. Keep your eyes on the ball guys!

5) Additional arrangement: This last element (such as adding small details like handclaps on snare here and there, some extra effect to underline a certain word, some lo-fi stop and go, automations etc), should be done once we have our general mix finished, and these details will be the candies we will throw to the listener to rise the attention when we are afraid he would get distracted, or to draw it towards a particular element of the song.
Use them with parsimony though, because otherwise if the song is too full of these tricks the listener will stop paying attention to them!


Become fan of this blog on Facebook! Share it and contact us to collaborate!!

Saturday, June 25, 2016

How to record and mix a drumset with 2 microphones (with video sample)! PART 2/2


Hello everyone and welcome to this week's article!
Last week we have seen how I have recorded a drumset using only two dynamic microphones, now we will take a look on the way I have processed the signal.
This time, with the exception of Jst Finality, I have fiddled only with the Presonus Studio One 3 bundled plugins, trying to achieve a mono drum sound with enough punch and separation to be understandable in a rock mix.

Starting with the KICK track,  I have opened as you can see some preset to see how they sounded, but eventually I have modified them all in order to fit them in my mix.
The first plugin of the chain was a Gate, to try to isolate the kick from the rest of the drumset.
The second plugin is a Compressor, with a quite strong setting in order to keep the sound stable and consistent.
The third plugin is a Peak Limiter, and I am using it to fatten the kick, make it sound more "round" and even more stable.
The fourth plugin is an Eq (in this case to be precise it's a channel strip in which I have deactivated the compression section), with whom I've tried to emphasize the attack of the kick while reducing the boominess.


Moving to the SNARE track, which actually can be more considered the "rest of the drumset" track, I obviously have not used a gate, because I needed all the drum parts together in this track.
The first plugin is a Compressor, set strong enough to make all the drum parts (even the farthest ones) be audible without compromising the sound of the snare, which is the closest drum part to the microphone.
The second plugin is an Eq (actually also in this case a channel strip with the compressor section deactivated) with a boost in the high area to help the cymbals and the "air" of the snare to come through.
The third plugin is a Peak Limiter, to help furthermore the less audible drum parts to be heard and to add some fatness to the general sound.
The last plugin is a Reverb, just to add a pinch of space to the whole track.

As you can see the plugins are more or less the same for both tracks, it's the way I have used them that is quite different, since they needed totally different tweakings to obtain totally different results, but I think it's an interesting example of how just basic tools like Eq and Compression can help us in solving the tone problems of raw tracks and turn them into a more coherent mix.

Here you can here the result of this rehearsal (it's 2 guitar tracks, the drumset and some keyboard track), let us know in the comments section what you think about our method of recording and mixing a drumset with just 2 dynamic microphones!

CLICK HERE FOR PART 1/2


Become fan of this blog on Facebook! Share it and contact us to collaborate!!
Friday, June 17, 2016

How to record and mix a drumset with 2 microphones (with video sample)! PART 1/2


Hello everyone and welcome to this week's article! 
In these first summer weeks, as I have written also in our Facebook Page, it is going to be a bit harder for me to post with regularity since first I went for a holiday, next I'm going to move in another country for work, so I apologize in advance if this will cause a slowing down in my posts for a while.
...Anyway, I have today accepted the challenge of helping some friend of mine to record a scratchtape with one prog-metal song they are writing, and doing it all with two directional, dynamic microphones, no virtual instrument. 
We have started trying some of the most common dual miking drum recording technique that can be found online: 
- the one with one mike outside the bass drum and one vertically set 1,5mt from the drumset, towards the center
- the one with one mike pointing to the kick drum beater and one above the shoulder of the drummer
- the one with just two overheads
...and so on.


Eventually I've come to the conclusion that in our case the best thing to do was putting one mike inside the bass drum very close to the point where the beater hits and another one next to the snare drum, between the hi hat and the toms.

This way I've been able to record two decent mono tracks that were tracking evenly the whole drumset (except the floor tom that unavoidably sounded lower than the rest of the set, but still clearly audible), and the result was surprisingly good: in the next part of the tutorial I will also post the mp3 and explain the way I've mixed it.

By the way we have used the same microphone (a Shure Sm58) also to record the amp, a Mesa Boogie Studio 22+ combo using the single microphone technique, and we will use it for vocals too.


CLICK HERE FOR PART 2/2


Become fan of this blog on Facebook! Share it and contact us to collaborate!!

Saturday, June 4, 2016

HOW TO TURN AUDIO DRUMS INTO MIDI! (a guide for dummies)


Hello and welcome to this week's article!
In this article we are going to discover an interesting way to use our drum replacers, such as ApTrigga or Drumagog (click here to discover what they are).

Let's imagine one of these 3 scenarios (but there may be many others): 

1) we have a set of not so good drum microphones and no trigger but we would like to record the performance of our drummer and give it a good sound.

2)  we want to record our drummer in acoustic but at the same time we want the editing flexibility of a MIDI track.

3) we want to keep our acoustic drum tracks, but at the same time we want to add drum samples to fatten the sound.
In all these three situations we need first to load a drum replacer on each track we want to turn into a MIDI (for example one for the snare and one for the kick track), and then set it (usually with the threshold control) in a way that lets it detect only the transient of the drum part we need (and ignores the bleed of the other drum parts). 
With the Velocity control (or equivalent), instead, we will set the dynamic range that our drum replacing software will translate from the audio track to the MIDI one.
Last, we must tell our drum replacer also to which note of the piano roll send the impulse, in order to avoid sending a snare inpulse in the kick key (which is usually C1) or vice versa.


Now we can create a MIDI track for each drum part we need (for example one for the snare and one for the kick) and choose as input source for the MIDI track the drum replacer of the desired drum part (es. Drumagog).

Now if we arm the MIDI track and press Record, it should play the whole song and record in the MIDI track (or tracks) all the impulses taken from the drum replacer software, so that at the end of the song we'll have a MIDI track with all the kick hits and another one with all the snare hits (obviously kick and snare are just an example, we could choose to trigger only the toms and it would be identical).

Now we can reunite all those MIDI tracks in one single MIDI, so that we'll need just one drum sampler to play the whole set, thus saving resources; in order to obtain this we can drag and drop the various MIDI tracks into one, being careful of having them starting all at the same point.
Once we have our "MIDI drum track" reconstructed with all the parts (in some Daw we're gonna need to use the Paste tool to merge the tracks) we need we can load our favourite Drum sampler and choose a sound we like.

The last operation is (if we feel we need it) to Edit our MIDI drum track to perfection, correcting timing errors, the strenght of the hits and so on.

Hope this was helpful!


Become fan of this blog on Facebook! Share it and contact us to collaborate!!

Saturday, July 18, 2015

How to Use Pre-Recorded Backing Tracks Live 3/3


Hello and welcome to this week's article!
Today we're going to see a third and last way of using backing track, with the support of Francesco Ferrini of Fleshgod Apocalypse.

This method it's the most complex and the one which requires more hardware, but it is the most professional we can use in order to manage stage monitoring and use backing tracks.

First off all instruments (microphones, Pods, and so on) goes into a rack with several inputs, and this rack goes into a splitter. One "copy" of the outputs goes to the stage box, and from there to the external mixer, another "copy" goes to the audio interface.

Their interface (a Motu with 8 independent outputs) has a software called Cue Mix, which is a virtual mixer that manages the various inputs and outputs (as almost all audio interface have), and from there they can create a mix for each band member, and each mix will go, through one of the independent ouputs, to the in ear monitor of each band member.
Why do they use CueMix instead of doing everything directly with Cubase?
For 2 reasons:
1) CueMix has no latency, unlike Cubase
2) Because it's a better way to manage the mix that each band member wants in their in-ear monitor.

Then the band has a session of Cubase with the whole setlist, the tempo track with the metronome of each song and the backing tracks; they send the click and backing tracks through the Cubase Sends to each output of the Audio Interface without passing through Cue Mix. 

Why are those relatives mixes from Cubase passing through the Sends and not through the Master Out? Simple: because they want the metronome only in the relative mixes that will go to the in ear monitors of the band member, but only the backing track must pass through the master, and from there to the mixer, the metronome must obviously not be heard by the audience!

Finally, always with the Midi Automations of Cubase, the band controls also the patches of the Pod Hd that they use for guitars, for example to switch automatically at the right time from Rhythm patch to Solo patch, they also control the Co2 Geysers, the Strobo Lights and so on...

...but this is another topic!


Hope this was Helpful!


CLICK HERE FOR PART 1 OF 3 

CLICK HERE FOR PART 2 OF 3


Become fan of this blog on Facebook! Share it and contact us to collaborate!!

Saturday, July 11, 2015

How to Use Pre-Recorded Backing Tracks Live 2/3


Hello and welcome to this week's article!
Last week we have seen how to use a backing track on a live context, but this time we must take a look on HOW to make this backing track, to load on the drummer's mp3 player.

Let's load up on our favourite DAW a project and create a midi track and and some audio one.

The audio tracks should be in mono, since only one channel of the mixer will go to the PA.
We should set the tempo track properly, with the right metronome and checking out for tempo changes inside the same tracks, leaving 8 metronome hits before the actual starting of the song, so that the drummer can hear 4 hits, then give the other band members the other 4, and then start the song.

First we make the tempo track, then we create in the midi track an event, of the lenght of the whole song, and we insert the metronome writing the midi part, with the beats and the accents, using a sound that will be easily recognizable by the drummer, even when playing live.

About the audio tracks, we will have to make a mix with all the things we want to have in the base, for example backing vocals, vocal harmonies, orchestral sections, and so on, and to make sure everything is perfectly on time with the click.

When it's time to export we must keep the audio tracks central so that the sound goes evenly both on the left and right channels, while the click part must be all panned LEFT, so in the mixer we will send the left channel on the drummer's headphones and the right channel on the P.A., and the audience will not hear the click, only the backing track.

My suggestion is to use a limiter to make the final volume even among all songs, and to make sure that all songs not only have the same levels, but also the metronome on the same side!! :)


CLICK HERE FOR PART 1 OF 3 

CLICK HERE FOR PART 3 OF 3


Become fan of this blog on Facebook! Share it and contact us to collaborate!!

Saturday, July 4, 2015

How to Use Pre-Recorded Backing Tracks Live 1/3


Hello and welcome to this week's article!
This time we will talk about LIVE music, and how to integrate pre-recorded music (like orchestral parts, or backing vocals) with a real band, making sure everything is on time.

There are actually 2 methods, today we will see the easiest one, which does not involve the use of a computer, but lets us only have backing tracks in mono.

what we need is:

- an Mp3 Player (or a smartphone put in airplane mode) with the backing tracks inside

- a Y stereo minijack cable (a cable that takes the stereo sound from the mp3 player and splits it into 2 mono sounds, one with the left track and one with the right track).


- 2 adaptors from minijack to normal jack, to connect the aforementioned cable to the mixer


- a mixer, with at least 2 channels, as the one depicted on the first photo

- one jack with a jack connector on one side and an xrl to the other, to connect the mixer to the PA, usually through the channel box.

- a pair of headphones for the drummer

Once we have all these tools ready, we need obviously a backing track on our device, with on the left side the metronome track and the backing track, and on the right side just the backing track (of course you can switch them if you need, the important is that all tracks have the metronome on the same side.
Now we can connect the stereo cable to our mp3 player and send the Left Track (the one with the metronome too) in the first channel of the mixer, and the Right Track (the one without the metronome) in the second channel, as you can see from our Routing Scheme below:


In the 2 channels of our mixer now we must pan the left track full left and the right track full right in order to avoid the metronome to spill from the other track into the channel box.

Now we can connect on the left mono output the drummer's headphones, so that he can choose the song with the mp3 player and adjust the volume of the base with the mixer, and the right mono output of the mixer to the channel box, using the jack with one regular jack connector on one side (the mixer side) and the xrl connector on the other (for the channel box side). If we are connecting into another mixer without passing through a channel box, much probably we can use a regular jack.


CLICK HERE FOR PART 2 OF 3 

CLICK HERE FOR PART 3 OF 3


Become fan of this blog on Facebook! Share it and contact us to collaborate!!

Saturday, June 6, 2015

HOW TO MIX A LIVE BAND (a guide for dummies) 4/4


Hello and welcome to this last part of our super basic tutorial about how to mix a live band in a small gig!

In the latest part we have seen basically every aspect of a mixer, every aspect but the Aux Sends one, which we are going to analyze today.
The Auxiliary Send (Aux Send) is an additional output of the mixer that lets us do another mix, different by the one that goes into the PA, and that we can use for other purposes, for example to send it to the stage monitors.

The band in the stage plan example on the first part of our article has 3 monitors: one for the drummers and 2 for the other band members, covering the left and the right side of the stage.
in the picture above we have 2 aux sends, but usually 12 channels mixers have 3 of them.
So how do we do our relative mix? If we have the aux pots on each channel at noon, the guys on stage will hear by the monitors basically the same mix that can be heard outside, but usually they will want a different mix, because there are things that they need to hear to play better, and others which are less useful and can be eliminated, plus keep in mind that usually with cheap mixers and monitors it's better to send a maximum of 3 or 4 channels per monitor, to make sure the monitor will reproduce them loud and clear without distorting.


An example of monitor mix, always referring to the band in the first part of this tutorial, could be the following:

Aux 1: Left monitor (as seen from the point of view of the drummer): Vocals, keyboards, snare, kick.

Aux 2: Drummer monitor: Vocals, guitar, keyboards, bass

Aux 3: Right monitor: Vocals, the other guitar (or the keyboard), snare, kick

in order to obtain this we will close all aux knobs on the mixer, then open just the Aux 1 pot on Vocal, Keyboard, Snare and Kick, choosing the level according to the volume they need,
then repeat the same procedure with the Aux 2 Pot and the Aux 3, sending only the requested channels to each monitor.
Usually during the soundcheck the sound engineer asks the band to play a part of a song and adjusts the aux sends accordingly, until everyone can hear everything decently.
Once the stage monitors are set in a stable way, the sound engineer can make the last touches to balance everything, keeping in mind that additional modifications will need to be made when the room will be full of people, because the venue responds differently according to the people inside.

Some last suggestion about how to mix a live band:

- If present, the High Pass Filter button is a good way to clean up the low end from unwanted resonating frequences. It can be used basically on each channel, with the exception of Bass and Kick Drum.

- Try to push each sound with the eq slighly towards its place in the mix, for example you can lower a bit the lows on a guitar track and add some grit on the highs, or carve some mids out of toms, remove some highs on a bass track or boost some mids on vocals, but don't exaggerate, and remember that a sligh cut sounds usually better than a sligh boost.


Additional ways to use an Aux Send:

- It can be used to go to external processors, such as a Compressor, or an Fx unit, and then the signal can be routed to the Aux in (sometimes called Aux Return) to be blended with the original one.

- It can be used also to go to a recording machine, like a computer, if there aren't other dedicated outs in the mixer.


Well, the tutorial is over, I hope it was helpful, leave comments below if you have some other tip to share!


CLICK HERE FOR PART 1 OF 4!

CLICK HERE FOR PART 2 OF 4!

CLICK HERE FOR PART 3 OF 4!


Become fan of this blog on Facebook! Share it and contact us to collaborate!!

Saturday, May 30, 2015

HOW TO MIX A LIVE BAND (a guide for dummies) 3/4


Hello and welcome to the third part of this week's article!
Last week we have seen how to make the gain staging for microphone inputs, today we will talk about the last 2 channels of  our mixer, that we have reserved for "keyboards - d.i.".

If we have a keyboard, it's much likely that it will have a left and right output, so we must connect them to a d.i. box to balance the signal, and from there go into the channel box, this way we will be able to control both left and right channels on the mixer, but if the keyboard player has more outputs, he will need an additional mixer to connect all of them, make a "keyboard submix", and from the stereo output go to the d.i. box, and from them to the channel box and to our mixer.

Since we have only 2 channels for quite a wide array of things left, we need to be creative: if the band has some pre-recorded base we should treat it the same way we could treat keyboards, or if they use both things, we will have to dedicate a single mono channel to keyboards and the other one to the base. The gain staging procedure it's the same explained in the part 2 of this guide, with the addition that usually d.i. boxes have a db attenuation switch, if the signal it's too loud, and a ground/lift switch, to move if there is some hum.
Notice that often the last channels of a mixer also feature a stereo input, which means 2 jack inputs controlled by the same fader; this way is also possible to connect both left and right keyboard channels to our stereo channel.
Obviously if we don't have d.i. instruments, we can still treat the last 2 channels of our mixer as all the others, to control microphoned instruments.


Group channel tracks and Fx tracks: on some mixer there are faders (in this example we're talking about the 2 blue ones at the bottom right of the mixer) that can control a full group of other tracks, so basically we can apply to a live environment the same rules we have seen for group tracks and fx tracks used on a DAW, when mixing (Click here for a dedicated article).
If the mixer has this feature (like this one on the photo, which has 2 group tracks), each one of the 12 channels will have 3 selections, near each fader: Mix, Group1 and Group2.
If we choose Mix, this channel will be routed straight to the stereo mix, so its final volume will be only decided by the Master Fader.
If we choose a Group instead (for example we can send all vocals on Group1 and all guitars on Group2), we will be able to control all the vocal tracks submix with the "Group1" fader and all guitars submix with the "Group2" fader, and obviously both these groups are controlled by the Master Fader, anyway.
Fx Track: this track it's represented in the mixer on our example by the only white fader.
On this track we can choose an effect or a combination of effects (for example Reverb + Delay), and decide the amount of effect to apply, then on the single channels we can choose the amount of signal from the single tracks that should be fed to the Fx track, and with the Fx track fader we can decide how much effected signal should be send to the Master Fader, or to a Group Track, and to the various Aux Sends.

For example I can choose to set the fx control on the vocal track on 5/10. This means that half of the dry signal of the vocal track will be sent into the fx track, and will be effected; then with the fader control of the fx track, I can decide the level of this effected part of the signal to send to the stereo mix, or to a group, or to an auxiliary send.


CLICK HERE FOR PART 1 OF 4!

CLICK HERE FOR PART 2 OF 4!

CLICK HERE FOR PART 4 OF 4!


Become fan of this blog on Facebook! Share it and contact us to collaborate!!