Labels

BASS (50) COMPRESSION (32) DRUMS (45) EFFECTS (49) EQUALIZATION (30) GUITAR (112) HOME RECORDING (95) IMPULSES (21) INTERVIEWS (19) KARAOKE (1) LIVE (10) MASTERING (61) MIDI (21) MIXING (179) REVIEWS (156) SAMPLES (69) SONGWRITING (19) SYNTH (3) VOCALS (31)
Showing posts with label MIXING. Show all posts

Saturday, April 1, 2023

NAM: Neural Amp Modeler, what is it and how does it work.


Hello everyone and welcome to this week's article!

This time we're going to talk about a free amp profiler that's being developed by Steven Adkinson, and it's a software that is currently under development but it can already work decently and has seen the birth of a huge internet community (here).

NAM is an amp simulator which features the most common controls and an IR loader, but that bases its uniqueness on the fact that you can load into it models which are snapshots of real rigs (in a way similar to what IK Multimedia Tonex and Kemper profiling amp do).

Which are the differences between NAM and the other profilers? The difference is the fact that this one is in beta, is has a less polished interface and still needs some refinment, but the fact that it's free and that has a sound quality that has nothing to envy to the other profilers makes up for everything!

What's the different from an amp simulator and an amp profiler? An amp simulator emulates the way a circuit reacts, while a profiler takes a test tone and makes it pass through a real rig (which can be an amp, or a pedal, or even hardware mixing outboard) and tries to recreate how the hardware reacts adapting these cues to its structure, with results usually more true-to-life than the regular simulators. 
I am not sure if I have explained it with the correct words, but the result is that profilers are in the last few months disrupting the amp sim scene which has been dominating the last 20 years, and in the case for example of NAM there is a large community online which is sharing its captures (hundreds!) and you can download them freely and try them out: some are good, some are bad, but it's really amazing to see all this ferment around this tool, and really all you need to do is to install the Vst (which can be downloaded here), load it in your DAW, add a cabinet simulator, load the model you want from those you downloaded and treat it like any other amp sim.

Now let's see toghether if you have a real amp, for example a tube head, and you want to create a profile of it, what to do (you can see more also on this video):  

- first off setup your computer for reamping (you'll need to connect your audio interface to the input of your amp via a reamp box, click here for a dedicated guide).

- download the training wav file here, create a new project in your DAW at 24bit 48khz and load this file into a mono track.

- reamp the training file through your rig and record the resulting output file into a new mono track, which will basically be the training file which has passed through your amp and has acquired all the characteristics, for example of the overdrive channel.

- Normalize and export the reamped file (exactly of the same lenght of the training file) in mono at 24bit and 48khz and rename it "output.wav".

- go to this page and upload the output.wav file and the training wav file in the root folder on the left as per the image in the point of the arrow 1 (click on the pic to enlarge it):
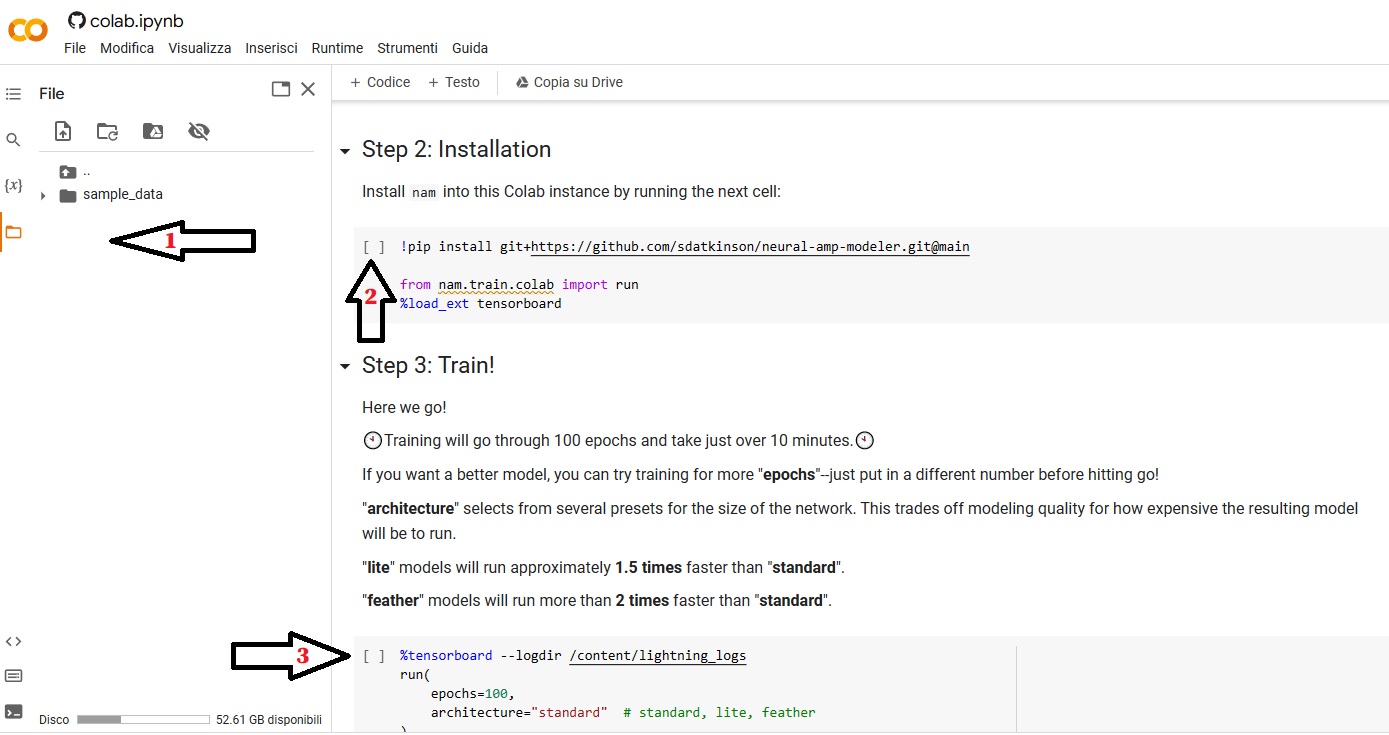

- once the files are uploaded click on the space between the brackets pointed by the arrow 2, it will start loading and this will take around 10 seconds.

- once the loading part is completed click on the space between the brackets pointed by the arrow 3, and it will start loading again. This process can take some time, around 10 minutes, but at the end if everything went according to the plan you will receive an output file into a folder indicated at the end of the process. You can download this output file (with the extension .NAM) and load it directly into the plugin, and if everything went well you will have a faithful replica of your amp!

What do you think of this plugin? Do you think amp profilers will completely replace the amp sim world?

Let us know in the comments below!


Become fan of this blog on Facebook! Share it and contact us to collaborate!!

Saturday, November 19, 2022

Track Grouping Cheatsheet


Hello everyone and welcome to this week's article!
Today we're going to check out a visual representation of the track grouping of an average project, I have borrowed the idea from a similar cheatsheet I've found posted from a user (thank you, Toby!) on the URM Academy Facebook page, but I have modified it a bit according to my workflow and naming conventions.
I consider this visual representation an useful tool because it tidies up the concepts we have been already analyzing in detail in our home recording main article, and in our project preparation one.

Let's start by saying that this picture is by no mean a fixed rule, you can modify it according to your workflow, remove and add all the tracks/groups you need etc, but it could be considered as a solid starting point if you're new in mixing a project with with a full rock band and don't know where to start. 

Let's begin from the left, here you have all the individual tracks: almost all of them are routed into subgroups and/or groups, this is made to make you process the tracks in groups, if possible, thus saving time and computer resources (as opposed to processing them individually), and when you have your sounds right and the relative balance within the group, you can literally just move the group faders to balance the main parts of the mix among them (eventually balancing only the drums, bass, guitars, vocals, synths and fx groups, just 6 faders, is much easier and gives us a much better perspective once the ground work is done).

Why the Sub Drops etc... track is alone and goes straight into the Stereo Out? Because we don't want it to be part of the "Fake Master", we don't want all the low end of these tracks to hijack completely the buss comp creating a horrible pump effect. Eventually some pump effect can still appear when this track will reach the limiter, and we will have to be good in finding the right volume for it to arrive to the limiter without creating problems.

I hope this was helpful!


Become fan of this blog on Facebook! Share it and contact us to collaborate!!
 

Saturday, October 8, 2022

Pre fader listen vs post fader listen


Hello and welcome to this week's article!

Today we're going to check out an important concept which is part of a proper gain staging setup, a simple check that will save us from having unwanted distortion into our tracks, the pre fader listen!.

By default, all the DAWS are set on post fader metering, meaning that if we are moving the volume fader in one channel, the meter of that channel (and the stereo buss) will rise or reduce accordingly.

The problem is that if the volume fader has as consequence the rise of the volume until a track clips, we don't know whether that channel, that recorded track with all the plugins processing it, is really already in distortion (or if it's too low in volume) BEFORE moving the volume fader (in that case we will have to check out whether there is some plugin that is clipping the signal or if the actual track is clipping).

To solve this problem we can choose in the DAW options (basically in every DAW) pre fader listen (something that is present also in many physical mixers), which swaps the position of the volume fader and the meter in single tracks or in the whole mixer.

What does this mean practically? It means that the volume fader still does its job, raising and lowering the volume, but the meter will keep showing us, regardless of the volume we decided, how hot is the audio track before entering in the volume fader, and whether the signal is already in clip or not (sometimes for example it's already in clip because the track is passing through some plugin, like some Compressor which maybe has a little too much make up gain).

By verifying the input and output level of all tracks (and therefore of all plugins on each track) we can make sure no track is clipping, and this is essential to perform a proper gain staging, thus having a perfeclty clear song.

One final note: press only one PFL button at a time, otherwise the meter will show the combination of all the active channels and plugins (in the stereo buss) and you won't know which one is too high or too low.

I hope this was helpful!


Become fan of this blog on Facebook! Share it and contact us to collaborate!! 

Saturday, September 24, 2022

Sidechain EQ: what it is and when to use it


Hello everyone and welcome to this week's article!

This time we're going to use sidechain in a different way than the most common one, the sidechain compression that we have already covered in this article: we're going to see what happens when applying the sidechain to an equalization.

With the term "sidechain" we define an interdependence between a trigger event (for example a kick hit) and an effect (usually a compressor that lowers the volume of another track for few instants), for instance in a song in which there is a synth pad, every time a kick hits, a sidechain compressor could lower the pad volume creating an artistic "vacuum" effect on the synth, like in the min. 1.43 of the song "Follow me" by Muse.

The "ducking" effect (that's how it's called), it's a creative choice that's functional to the arrangement of the song, but there are other instances in which a mix engineer would simply need to carve a little bit of room and avoid frequency masking in a very dense mix (for example one that is very fast or with many layers) without producing an effect that would take the attention of the listener away from the arrangement.

In this case, more than a compressor that would affect the whole tone, it's better to use an equalizer or a multiband compressor, because in this case one could clear a little bit of space just in the exact area in which we want for example our kick drum to cut the mix more clearly, without touching anything else.

How do we do it? In the Studio One interface (but surely it's very similar also in all the other DAWs) we need to load the eq or the multiband compressor in the insert of the track we want to affect (usually synths or bass guitar, but it could be really anything) and click on the sidechain button on top (as in the picture in this article), then in the track that should trigger the effect (for example the kick track) we click on the "+" button next to "sends" and there we'll see a menu with all the effects with the sidechain function active.
From there is sufficient to choose the eq or multiband compressor we've loaded on the other track and every time there will be a sound in this "trigger track", the eq or multiband compressor will activate simultaneously in the other, and in this case it will lower the eq in the other track, in the area of our choice, which should be the same that we want to emphasize in our "trigger" track;
for example if the kick track we are using is covered by the bass in the low end, for example in the 100hz area, we can sidechain an eq that every time the kick hits, it will lower 2 or 3 db exactly in that area of the bass track.

This way the kick will be more prominent, but without us boosting it and without ruining the balance of the song.


Become fan of this blog on Facebook! Share it and contact us to collaborate!!

Saturday, September 17, 2022

The bass dual track mixing technique


Hello everyone and welcome to this week's article!

Today we're going to check our more in depth one of the techniques already explained in our more general "how to mix a good rock/metal bass" article, the most popular one: the dual track mixing technique.

This technique consists basically in having 2 tracks of the same bass take, they can be either the recording of a bass d.i. duplicated in 2 independent tracks, or 2 microphoned tracks, pointing to different parts of the cabinet (one needs to capture the high end and one the low end of the bass tone).

On the individual tracks, narrow down the eq of the low-end track by using a lo-pass filter from 500hz down (you can use also a hi-pass from 40hz up if you feel like you need to clean also some low end rumble), and on the high-end track use a low pass filter from 7khz down and a high pass from 500hz up.

Now that we have our 2 tracks nice and separated in terms of eq we can use any type of distortion we want in the high end track, for example an amp simulator (some also like to use very nasty metal amp sims for guitar to add grit to this track), and in the low-end track we should add a nice broadband compression to start making the low end stable, by reducing 2/3db of gain.

Once the 2 tracks are properly processed it's time to balance them in volume (it's likely that we will have to put the high end track quite lower than the low end one, because of its capacity of be more ear-piercing.

Now that the 2 tracks are well blended together is time to route them into a group track and load in this track an eq to sculpt the sound, if we need it (for example some like to cut a bit around the 300hz area to remove a bit of low-mids mud and to boost a bit around 920hz to add some nasal tone), then we can load a multiband compressor, with 2 bands that should be matching the frequency areas of the 2 tracks, so that we can shave off some other unwanted fluctuation in dynamics without changing the general tone, because if we would use the same compression settings for both tracks there's a chance that what sound good for one of the 2 tracks would have unwanted results for the other.
Bear in mind that the low end track already has a bit of compression, so we should keep it in mind when applying this second compression to the low end track (so let's be less aggressive with the gain reduction than we would if there was just one compressor), and that in the distorted track the gain as well acts a bit as compressor.

Finally we need to make the bass tone rock solid, stable on its railway in which it needs to stay in terms of volume and dynamics, and in order to do so we nee to load a limiter (or a maximizer) and push it until we reach 3db of gain reduction (click here for an article on how to keep the Bass stable with a Limiter).
Once you find the right setting to keep the bass track tamed and stable all the time, you can basically use the output ceiling of your limiter as volume knob, and in order to dial the right level it's important to connect it with the kick drum, as explained in this article.

I hope this was helpful!


Become fan of this blog on Facebook! Share it and contact us to collaborate!!

Saturday, September 10, 2022

Using a VU meter for better low end balance


Hello and welcome to this week's article!

Today we are going to see a trick used to have a visual reference to improve how the low end in our mix will translate from our DAW to any other source.

Let's start by saying that we're going to need a VU meter, a metering plugin that recreates the one of an analog mixer (or a real analog one), and by specifying that 0db in the VU meter equals to -18db in the fader of our DAW.

Now that we have clear this concept, let's get to business: 
The idea is to get right the balance between the kick and the bass, and then to balance all the rest of the mix around these 2 elements.

Let's start by loading the VU meter in the Stereo Buss and by setting at zero the kick and bass faders. The first thing to do is to play the kick track (or group of tracks) and raise the gain until it peaks at -3db on the VU meter.
Now it's time to bring in the Bass: let's raise the gain until the peak of Bass and Kick combined reaches 0db in the VU meter (when they play together).

Why 3db of difference? Because if you would duplicate the kick track and play the 2 kick tracks together there would be a 3db in volume increase. By making sure the bass adds 3db to the total, means that the bass is equal in volume to the kick, balanced, and that if we mix the rest of the instruments around this equilibrium there's a good chance that our mix will translate better in the real world.

Once the 2 tracks are connected, you can raise and lower them in volume together to fit them in the mix but try to keep the same proportion, so that the equilibrium remains stable.

I hope this was helpful!


Become fan of this blog on Facebook! Share it and contact us to collaborate!!

Saturday, August 13, 2022

How to keep the bass stable with a limiter


Hello everyone and welcome to this week's article!

Today we are going a little more in depth in the topic of mixing with a limiter, and this article should be taken as an expansion of our "Should I put a limiter on each single track when I mix?" discussion.

My conclusion today of this whole discussion is that depends on the genre. 
There are genres in which the instruments with the biggest dynamic excursion (which are usually bass, vocals, maybe cymbals, clean or acoustic guitars and acoustic instruments in general), those in which the performer can really choose to play some part extremely quiet and extremely hard can use some track limiting, while in other genres like extreme metal, in which there is already a lot of distortion (which acts as natural compressor), drum samples etc, this is less useful and you can stick also just with the compression.

Let me elaborate more: 

If you have a song in which in the first half the singer sings with just a whisper and in the second half sings one octave higher, with very loud peaks, the first thing to do is to do some clip gain, then when the volumes are more or less consistent you can put some compression to make the track more coherent, and finally, since maybe in the highest and loudest parts there might remain some loud peak, instead of manually lowering every peak you can put a limiter with a threshold set only to check those, and bring them down.
In this case the limiter acts as final wall for the peaks that are so loud that still can't be properly tamed by a compressor, because if you would set the compressor hard enough to stop them, it would harm the rest of the vocal track, and the same concept applies to any other instrument.

The trick therefore, if you still hear some part in some track that is popping out too much, is first to try to see if you can solve in some other way, for example sometimes in palm mutings the low-end recoil can be solved simply lowering the bass on the amp or moving the microphone a couple of cm back from the speaker, but if you can't solve, the limiter with a high threshold, set just to stop those occasional peaks, can be a solution, just don't overdo it, like leaving it with a threshold that keeps it active all the time, or you will damage the sound of your instrument.

I hope this was helpful! 


Become fan of this blog on Facebook! Share it and contact us to collaborate!!

Saturday, July 30, 2022

How to do drum replacement/layering in Studio One without 3rd party plugins

 Hello everyone and welcome to this week's article!

Today we're going to see how to make drum replacement in Studio One without using 3rd party plugins!

Drum replacement has always been a very sensitive topic among musicians: some love it, many hates it, but the truth that every mix engineer knows is that they are very important, almost essential to any modern rock, pop or metal production.
In order to do it there are many ways, for example by using drum replacement plugins like Slate Trigger, Aptrigga, Addictive Trigger and so on, but today I would like to focus on a technique that is available (as far as I know) only in Studio One and that makes drum replacement (or anyway turning any rhytmical source into a MIDI) very fast and without using 3rd party plugins, just follow these 5 steps:


1) Choose the track you want to replace (or layer) with samples, for example an acoustic snare or kick track, and from the top toolbar click on the Q icon, this will open a sub-menu in which you need to click on "groove" to open a field that will analyze your track.


2) Drag and drop the desired track in the groove analysis field, it will detect all the peaks in the track and mark them.


3) click on the "Audio Bend" icon on top and it will show you more tools to adjust, from there go on the "threshold" one and adjust it until only (or mostly) the kick hits (if we're replacing a kick track) are detected (because usually with the basic setting it's so sensible that it will mark also for example the snare bleed in the kick microphone).


4) When you are satisfied with the peak detection create a new Instrument Track in Studio One, and load there for example your sampler or virtual drumset, and from the groove analyzer field you can drag and drop directly a MIDI of the detected hits into your new instrument track.

5) The final step is to assign the right sound to the MIDI and clean up the track, eliminating the remaining unwated hits, adjusting the velocity and if necessary by moving the whole MIDI track few milliseconds back, if you hear some slight delay.

Voilà! 
You will have a nice MIDI replica of your acoustic track, that you can use to layer new sounds on top of it or to replace it altogether.

I hope this was helpful!


Become fan of this blog on Facebook! Share it and contact us to collaborate!!

Saturday, July 16, 2022

How to create manually the glitch effect on guitars, vocals etc...


Hello and welcome to this week's article!

Today we're going to talk about a mixing topic which can be applied to any type of wave source and that, if used with parsimony, can become a powerful arrangement tool to make the track more interesting.
The "glitch" effect simulates a digital artifact of any kind (usualy the fast repetition in loop of a small soundbyte), and it's used widely in rock, pop, metal, hip hop and electronic music (for example it can be heard in the song Sex, Death and Money by Alice Cooper) as icing on the top of a cake which must already be good, to make it even better.

In order to make a glitch effect of repetition, which is the most common, you need to start with quantization, so take a small slice of the guitar track (or both if we're applying it to the rhythm ones), set the quantization to 32nds and just repeat the slice for i.e. a couple of measures (16 times, for example) and push play.

The sound will be the typical one of the reading error of a cd player, and this is just the basic version of this effect.
Now we can get creative: try to quantize slices twice as long to 16th of note (instead of 32nd) to see if they sound better, or create a rhytmical pattern, for example a 3 slice repetitions, 1 empty slice, other 3 repetitions and so on, and in this the limit is really just the imagination.

So far we have mentioned only taking one slice and repeating it, but if we have for example a riff of 4 chords, we can also simply REMOVE one or more slices, rhytmically, from the track, to create a "stutter effect", or use repetitively the same single slice per chord, or we can even change the quantization from one measure to another and move from 16ths of note to 32nds, to add even more movement.

Finally, it's time to talk about automations: with these, you can take your glitched section and automate on it one or more effects in order to give it even more character.
You can apply on it obviously any kind of effect, but our suggestion is to try one of these 2 (or both):

- a pitch shift, or tempo shift effect, that makes the pitch go down fast during for example the final part of the glitch.

- a bit crusher that goes from 0 to 100 during the glitch, to make it sound like it's deteriorating during the repetitions.

Let us know if you use other cool glitch effects!


Become fan of this blog on Facebook! Share it and contact us to collaborate!!

Saturday, July 2, 2022

Avoid snake oil and use only stuff you understand!


Hello and welcome to this week's article!

Today's article is a bit different from the usual, and it can be considered as a prosecution of our article about mixing only with stock plugins.

Mixing and mastering is a process that can be stressful at times, but it's also a moment of discovery and of creativity, in seeing the artist's vision coming together in the form of music that can be enjoyed by everyone. 
It's a process of discovery when putting together the pieces of the musical puzzle and fitting them until the picture is clear, but there is also discovery in trying every time new ways to improve and obtain better results, and this involves studying, reading, trying all the new plugins or hardware processors that we can, and all the time there is something new and more shiny that comes out.

Trying new stuff is part of the fun, in the end, but if I've learned anything in these years that I've been writing this blog, is that almost nothing is a real game changer, and that around 70% of what is advertised as a better version of what you already have brings an improvement as noticeable as "the emperor's new clothes".

Sure, there are a few game changers, for example the Neural Dsp plugins really brought the amp modeling a step forward, or Oeksound Soothe made eliminating unwanted resonances fast and easy, but besides these rare cases, there are so many good and cheap (or free, or stock) plugins out there that it's really hard to justify the real need of buying a new one, except for really just have a new toy to play with.

What I'm trying to say is that unless you're really looking for something specific that you don't have, buying a new compressor or a new equalizer most likely won't bring a real improvement in what you're currently using, and after trying so many plugins you get to a point in which you have a superficial knowledge of many of them, but you don't really know any of them very well, and this is one of the differences between an amateur and a professionist: a professionist usually has his experience built upon having something that he trusts, and he used it 1000 times, until he got to know all the ins and outs of every unit in the chain and how to obtain the best from each one of them.

The ideal point would be to choose for example a quality compressor, a quality eq, a quality delay and so on and to use them consistently until we get to a point in which we know exactly what settings are the ideal ones for our signal chain/gain staging, so that we can just plug and play, saving time and not having to do hours of trial and error looking for the right setting.

In conclusion I would suggest you, if you are at the peak of your gear acquisition syndrome, to try to stop buying anything for like 3 months and force yourself only to use what you have, I guarantee you that at the end of the third month you will have reach a level of knowledge of your plugins (or hardware processors) that will allow you to obtain results that you wouldn't have thought possible at the beginning of the trimester.
Most importantly, you might come to realize that a lot of the things advertised as "the next plugin you absolutely need" are not real game changers, in facts, most of them are what can be defined as "snake oil". 


Become fan of this blog on Facebook! Share it and contact us to collaborate!!

Saturday, June 18, 2022

How to remove fizziness from distorted guitars using a multiband compressor


Hello and welcome to this week's article!

Today we're going to tackle a problem that is typical of distorted guitars, but that can be applied to anything distorted, from a bass to a synth: the excessive high-end fizz, which often can be very bothering, especially if we're using an amp simulator with a lot of gain.

The problem with fizz, that buzzing, harsh part of the sound that hides between the presence area (2k to 8k) and the high end (10k to 12k) is the fact that it's quite hard to pinpoint exactly by doing frequency hunting, because we can can take down some notch here and there, but the fizz can remain pervasively a bit everywhere, and if we take down the whole area the tone loses presence and bite, disappearing in the mix.

How do we solve? The ideal is to change tone until we find one that gets us 80% there, so that we are happy also without doing acrobacies, but this is a privilege that not all mix engineers can have, and sometimes we're forced to work with guitar tracks which are already processed, and sounds super fizzy.

First the highest part of the fizz we can roll it off with a low pass filter set to 10-12k to taste, until we get rid only of the useless part, but then when we arrive to the part from 2k to 8/10k we need to adopt a different strategy, or we'll murder the good part of our tone trying to clean it.

Then when it's time to find the fizz in the presence area, we need to take a Multiband compressor and create just a band between 2k and 3k, just to start, and in this it would be VERY useful if we had a solo function to hear only the affected part, then we start move this band left and right listening to the band in solo until we find exactly the part in which there is the "bulk" of the harshness.

Once the area is perfectly set, we need to set the comp with a fast attack and fast release, and then just take down the threshold until we hear some gain reduction in that area; now we need to hear it in context, so listen to the tone (not just to the compressed band) and raise or lower the threshold according to how much fizziness you want to remove. 

Finally, if we have a lot of palm mutes we can also create a band between 65hz and 250hz to tame the low end recoil (thus freeing up headroom), so that we'll clean up the guitar even more with just one plugin.


Become fan of this blog on Facebook! Share it and contact us to collaborate!!

Saturday, April 9, 2022

What is the right buffer size to record and to mix?


Hello and welcome to this week's article!

This article is a look more in depth to a topic that we have already seen here: buffer size and latency.

Basically the idea is to record at lower buffer size and mix at higher buffer size.

Why? Because the lower the buffer size, the lower the latency, therefore if you are using for example a virtual amplifier it will sound more "real" under your fingers, but it will be heavier on the CPU, while with a higher buffer size there will be more latency, but if you're mixing this is not a problem: it doesn't matter if it takes even half a second or more between when you press play and when the reproduction starts.
When playing, instead, having half a second of delay between when you play and when you hear it makes it literally impossible to play an instrument.

Is there a sweet spot between the settings? It depends on 2 factors: 

1) how powerful the computer is

2) how heavy is your session: the more plugins you have, the harder it will be for the CPU to process everything in real time.

That's why it's suggested to use different settings when recording and when mixing: when mixing you can keep it around the maximum settings (1024, or 2048), which makes the project a lot less CPU intensive.
When recording, instead, the aim is to keep the latency at around 10ms or less, and usually this is a setting that you can obtain with 128 or 256 buffer size. 
There is no real need to get too low, like 64 or lower, because this way unless the project is basically empty, you can start experiencing clicks and pops here and there, because the CPU struggles too much.

And you? What buffer size do you use when mixing and mastering?


Become fan of this blog on Facebook! Share it and contact us to collaborate!!

Saturday, March 26, 2022

The focus of our mix part 2


Hello and welcome to this week's article!

Today we're going to elaborate more on a topic we have already started talking about here: The Focus of our mix!

Let's start by saying that if we have applied the 5 rules of the first article we will already know what is the focus of our mix, whether it's the vocals, the drums, the guitars, the synths etc... 
Once we have a mix that satisfies us we need to make 2 more trials to check the balance of our mix:

1) Check the mix in mono: maybe the mix sounds incredibly well in your 1000 bucks monitors and headphones, but you need to imagine that roughly half of the listeners will listen to it in less than ideal conditions, like from the mono speaker of the phone, and you need to be ready to spot all the possible problems (for example something hard panned that disappears or that makes some weird interaction with the other instruments or loses balance.

2) Check the mix at minimum volume: now it's the time of the trial by fire, we need to listen to the mix with the volume at the minimum, when it's barely understandable. 
What are the instruments that stand out the most? Are they the ones that we expected? If they are not, we need to eq the things we want in spotlight better, moving them towards the most audible frequency area (2khz to 5khz) and carving space in the other instruments.
I remember in the past I have listened to some death metal song that at normal volume was sounding decent, then lowering the volume we realized that basically only the kick remained audible, so the sound guy had to rebalance things a bit, and this way he freed up a lot of headroom for the other instruments without sacrificing too much the perceived kick volume at normal levels.

3) Once the focus of your mix is established, work your way backwards: once you have clear where you want the attention of your listener to go, you need to put the chosen instrument under the spotlight, and make room both in terms of volume and eq through the other ones, according to your priority list; don't let the audience focus on a useless cowbell while in the background the singer is singing the most beautiful melody of all times!


Saturday, February 19, 2022

Volume inconsistency: solve it with the clip gain/event gain tool


Hello and welcome to this week's article!

Today we are going to talk about an ongoing topic, the one of gain staging, and the problem we're going to tackle is the one of the volume inconsistency.

When recording an instrument with high dinamic excursion (mainly vocals, for example), the professional recording engineers usually make the signal pass through a minimum of processing to make sure it arrives in the daw in such an optimal condition that it will already sound decent and require less mixing/digital processing, and usually we're talking about a little bit of compression (just to shave off a couple of db to reduce the difference between the loudest and the quietest parts), a little bit of de-essing and a high pass filter to rolloff the unnecessary subsonics; this is usually done in hardware preamps or good mixing boards.

Unfortunately in the world of home recording a good hardware compressor is not always at hand, and the vocals are recorded directly in the input of the audio interface, and often the level of the interface is set in order not to clip, so the engineer asks to the singer "scream as loud as you can", adjusts the volume so that it doesn't clip and leave it like that for the whole recording session. 

This leads to a HUGE dynamic excursion, to the point that in the same track there will be parts inaudible (and invisible graphically) and others that will take all the headroom possible, and we will have to compress the s*** out of the track to obtain a little bit of consistency in volume, with the downside that when the compression is too strong it unavoidably will end up coloring/deteriorating our track a lot.

How to solve this problem? It's easy, with a tool called Clip Gain (in some DAW, for example in Pro Tools) or Event Gain (in Studio One):  it consists in cutting the track in sections with the same gain and adjusting them, by raising the parts that are too quiet and lowering those which are too loud in order to make them more consistent, so that when the track will hit the compressor it will do its job in a clean and pleasant way.

In order to change the event gain you need to click and hold the little square in the upper middle part of the event and drag it up or down to add or remove gain.

This operation belongs more to the Editing phase than to the mixing one, and it's somehow a bit boring and long, but believe me, if you arrive to the mixing phase with a volume that is consistent throughout the track before reaching the compressor, it will make a world of difference, also because riding the volume, which is something that was done before the existence of compression to keep the volume stable, is actually a cleaner way to set the right gain rather than compressing, and this is just a way to do it not in real time. 

I hope this was helpful!


Become fan of this blog on Facebook! Share it and contact us to collaborate!!

Saturday, December 25, 2021

How to mix a doubled vocal recording


Hello and welcome to this week's article!

Today we're going to talk about a common practice when recording vocals: if we want to put emphasis for example on a chrorus or on a verse part but we don't want to make it stand out too much using some vocal harmony, we can simply record twice the same vocal part (from the same singer) and play the 2 tracks together.

When is this used? It's a technique used to thicken the vocal part, raising it in volume and giving it a "Chorus-like" effect  but more realistic, less cold than a chorus, and it's very popular especially in genres like rap or death metal.

This technique is used also for another purpose: to hide the imprecisions, in facts usually for example when singing a melody, if one of the 2 vocal tracks is slightly out of tune it's likely that the other one is better, and in the mix of the 2, the perception is that the good one prevails.

Talking about tuning, we can use this technique instead of autotuning our vocal track, but if we really need to autotune it, it's better to do it only on the worst of the 2 tracks, because if we would do it on both the result would sound a bit too "robotic" and noticeable.

When mixing these 2 vocals I suggest to route them in a single vocal buss and treat them as they were one single voice, so they should share eq and compression, but the level of the individual tracks may vary according to your taste (just consider that if one of the 2 is too low compared to the other one, though, the comp woud probably not affect it).

At the end of the chain then we can put a Limiter with as ceiling the maximum level reachable from the main vocal track, so that the final result will be a thicker vocal line but the volume will remain consistent, considering that otherwise the volume might double in some parts since the gain would build up in some frequency area.

I hope this was helpful!


Become fan of this blog on Facebook! Share it and contact us to collaborate!!

Saturday, November 27, 2021

How guitar amp, stompbox and cabinet simulators affect the harmonics of a tone


Hello everyone and welcome to this week's article!


Today's topic has been suggested me by my friend Carlo from Ignite Amps, and it involves using a spectrum analysis tool to see the changes that occur in our tone with the various types of plugin that can be used in our guitar chain.

The first picture, the one on top, is a sine wave generated from Presonus Studio One, the most neutral sound I could come up with, and in this second image we can see what happens if we pass it through an overdrive (the Ignite Tyrant Screamer, the settings of all the plugins are at noon): you can see the solid state style distortion produced, which creates harmonics in a regular, repetitive way.


In this third picture we see our sine wave passing through a tube power amp simulator (the Ignite TPA-1), notice that the harmonic increase is not as dramatic as per the overdrive, but this addition makes the tone warmer and fuller thanks to the tube emulation.


In the fourth picture, the one below, you can see what happens if we pass our sine wave through a preamp, the Ignite NRR-1; here we can see a more noticeable change, especially in the high end.


In this fourth picture you can see the result of summing up the overdrive, the preamp and the power amp: the harmonics add up, and if you look closely for example you can see graphically the overdrive ones and the preamp ones.


Finally one of the most important steps, which once again changes dramatically the tone: the cabinet simulator (in this case Lancaster Audio Pulse, using its stock IR):  the change is significant, because the IR applies its own EQ curve, in this case lowering the high end and gives the tone its final touch in order to sound realistic.


Obviously I have used a sine wave because it's easier to show graphically, if you will repeat this experiment using your guitar tone it will look different, but I have made this article to focus on two things: the importance of a power amp, compared to when someone puts a virtual preamp directly into a cabinet simulator, and to show how drastic are the changes performed by the cabinet simulator.

I hope this helps!

Saturday, August 15, 2020

How to remove breath from a vocal track (and what is a Debreath plugin)


Hello and welcome to this week's article!
Today we are talking about a type of plugin which is very useful when mixing vocals (click here for a dedicated article), and which is closely related to a Deesser: the Debreath.

A Debreath plugin is a plugin that, as the name suggests, analyzes a vocal track, identifies the parts in which the singer is breathing in the air, isolates them and eliminates them through a compressor/gate, similarly to what a Deesser does.

This leads us to a background choice: is it really necessary to use it?
It depends on the singer or on the style. Personally, for certain heavy genres I tend not to eliminate too much the air inspiration, because it can give a sense or realism and preparation to a scream, but for less sonically busy genres this can become bothering, especially if the vocal part is the center of the mix and the breath is very loud.

For these specific cases a debreath is very useful, and the one in the pic, the Waves Debreath, is probably the best plugin for the task, since it finds and isolates the breathing parts, and lets you even hear only those parts, to tweak the treshold to perfection.

Even if this plugin is great, though, it's not the only way to eliminate breath, since you can (by putting a little more work into it) use either a gate or a multiband compressor.
The gate is good when the singer is singing quite loud, because the breathing part will be obviously much lower in volume, so by putting a gate exactly to the breathing level will eliminate only that, but if the singer is not singing loud or the breathing parts are as loud as the singing ones this solution won't cut it.

In this case, when in terms of volume the breath is at the same level of the singing, we cannot operate with a gate so we need to be more surgical.
We can move 2 ways:

- By editing the track, literally cutting away all the parts in which the singer is breathing in.

- By using a Multiband Compressor, trying to isolate as much as we can only the narrow frequency area in which the breathing happens, and by applying on it a healthy amount of gain reduction.
In this case we're not aiming to kill the frequencies but just to lower them a little bit, so they are less noticeable.

And you? Do you remove breathing from your vocal mixes?


Become fan of this blog on Facebook! Share it and contact us to collaborate!!
Saturday, July 18, 2020

Free VST guitar amp sims article updated with 23 new plugins!


Hello and welcome to this week's article!

Today I have reviewed and updated one of our most popular articles: the one about free amp simulators, adding 23 new free Vst amps (all of which sound very good).

You can check out the updated article here!

Let us know what you think about it and whether are there more good free Guitar Amp VSTs we haven't mentioned yet!

Saturday, June 13, 2020

How to use the marquee tool (or smart tool) for editing and automating


Hello everyone and welcome to this week's article!

Today we are talking about an useful tool for editing and doing automations that can make our workflow faster, which in some daw is called "marquee tool", in some other "smart tool", but it's the same thing, and we're going to show it through the Presonus Studio One interface.

Let's start with the editing: usually to edit a track we select the cut tool, click with the cursor in the beginning and ending part of the section we want to cut and then we drag it around wherever we need.
With the smart tool we need to select the symbol in the red square in the image, and to keep selected the arrow tool. This way if we click in the upper half of our audio track it will become a select tool, so we can highlight a certain part of the track, then we just double click on the selection and it will automatically be cut at the beginning and the end of the selection. If you sum up the time saved using this tool when editing a whole song, it will add up to minutes, or sometimes hours.
By dragging vertically the selected part from the lower half of the audio track, we can also automatically move it to another audio track, and all these things works also with multiple selections at the same time.

Moving to the automations, usually we open up our automations panel and start drawing points wherever we need, for example to raise and lower the volume of certain parts of our track.
In order to do the automations via the smart tool first we enable the automation we need, then we select the area we want to automate (we can do it also with multiple tracks at the same time), hover with the mouse in the upper part of the track until it turns into the shape of a bracket like this l-l and then simply drag the automation up and down in the selected area, it will automatically move it without the need of drawing points.

This marquee tool is very useful and time saving, give it a try!


Become fan of this blog on Facebook! Share it and contact us to collaborate!!

Saturday, May 16, 2020

is it better to use guitar plugins in mono or in stereo?


Hello and welcome to this week's article!

Today I have come to this question because I was mixing a project which was quite cpu intensive, lots of plugins involved, and on each guitar track there is a gate, a booster, an amp simulator and a cabinet simulator, then both tracks (left and right) are routed into a stereo buss with eq and compression.

I was looking at the cpu struggling and I have decided to make some trial: to see the difference in cpu load when loading 2 mono instances of a plugin in 2 tracks, or 1 stereo instance into a stereo track.
The logic would suggest that by loading the stereo plugin into the stereo track and routing on it 2 or 4 d.i. tracks there would be less cpu stress, but not always is like this!

I have tried Ignite Amps ProFET, the Tyrant Screamer and Pulse, both in mono and in stereo, and I have seen for example that they respond very well: 2 mono instances are not too heavy on the cpu, 1 stereo instance is even lighter (this means it's good code!), but with other amp simulators (one of which is one of the most praised in the forums) I have noticed a 20% cpu usage per each mono instance, which skyrocketed to a 50% for a stereo one, basically jeopardazing my project.
Needless to say, I couldn't use that plugin in my project (even if my pc is not that bad).

What is the lesson to learn from this?

That we cannot tell how much a plugin is cpu intensive until we load it, and that sometimes there is no correlation between how heavy it is in mono or in stereo.
We just need to test it ourselves.

If the plugin drains in stereo as much as the sum of the single instances or less, then it's suggestable to run it in stereo, so that we can control the various rhythm guitar tracks faster and all with one fader (if we have an impulse loader that lets us load 2 impulses and use them as dual mono we can also use different irs for the 2 sides), but if the stereo instance of the plugin drains more cpu than the sum of the individual mono ones, then let's stick to the mono ones.

And let's note that it's not a good plugin to be run in stereo.

I hope this was helpful!


Become fan of this blog on Facebook! Share it and contact us to collaborate!!