Labels
BASS
(50)
COMPRESSION
(32)
DRUMS
(45)
EFFECTS
(49)
EQUALIZATION
(30)
GUITAR
(112)
HOME RECORDING
(95)
IMPULSES
(21)
INTERVIEWS
(19)
KARAOKE
(1)
LIVE
(10)
MASTERING
(61)
MIDI
(21)
MIXING
(179)
REVIEWS
(156)
SAMPLES
(69)
SONGWRITING
(19)
SYNTH
(3)
VOCALS
(31)
Saturday, March 28, 2020
Review: Fender Princeton 112 Plus
Hello and welcome to this week's article!
Today we have another legacy review, of one of the most popular practice amps of the years in which I have started playing guitar (early/mid 90s): the Fender Princeton 112 plus!
The Princeton 112 was the Fender entry level solid state amp of the '90s (it has been produced from 1993 to 1997), and it was a 40w solid state guitar combo which featured the classic "Blackface" styling and 2 channels with separate eq, but the version that was most popular around young guitarists was the 65w version, called Princeton 112 Plus, which allowed the players to have enough volume also for small gigs with a live drumset.
The layout is quite simple: 2 channels with separate eq, effects loop, spring reverb and headphone out, while in the back the combo is "open back" and features a Fender 12 inches speaker.
The sound is not very tube-like, a bit because of the lack of technology in the early '90s, a bit because it didn't even try, it was boldly a solid state amp, but the timbre of the tone is actually very "Fenderish": the cleans are very bright, with a strong accent to the top end and very well defined, while the overdrive channel is designed to be able to achieve also heavy metal tones without the need of an external overdrive, it also features a "countour" control to scoop the mids.
The amp actually gives its best with the clean channel, which has a lot of headroom and a pleasant "Fender" vibe which still today is very usable, but the distorted one has unfortunately quite some noise and it's equally high oriented, ending up sounding a bit like a razor.
Does it still deserve today to be played?
Maybe if you find it in good conditions and for less than 100$, otherwise there are today a lot of good cheap alternatives.
Thumbs down!
Specs:
- 65 watt
- 2 channels with separate eq
- 1x12" Fender speaker
- Open back
- FX Loop
- Headphone out
- Size: 48 x 43 x 23 cm
- Weight: 8kg
- Spring reverb
Become fan of this blog on Facebook! Share it and contact us to collaborate!!
Saturday, March 21, 2020
How to master a song with free plugins part 3/3: finalizing the track!
Now that we have our track nice and pumping we need to check just few little things before exporting in any format we want (for example mp3 with a bitrate of minimum 192khz up, or a wave track at 16bit and 44.1khz to be burned into a cd): we need to make sure the sound it's not too squashed, and to do this we need to monitor the RMS levels.
The RMS level (click here for a dedicated article) is the average loudness of the master, and it's a value that we need to monitor how pleasant or ear fatiguing our master is; keep this in great consideration because it's a make or break rule that can be possibly considered the single most important thing to not screw up everything when mastering.
The discussion about RMS levels bring us to a broader discussion about the Loudness War (click here for a dedicated article): it has been a "war" among mastering engineers between the '90s and the early 2000s, in which noone won and music just sounded worse and worse.
Mastering engineers were pushing the limiter harder and harder to make their songs stand out among the others in the radio, and this led to a point in which many of the top radio songs were distorting.
Luckily this bad period seems to be coming to an end: most of the music today is listened through streaming services such as Spotify, Youtube or Apple Music, and these platforms all features a form of audio compensation of the loudness of the tracks, ending up with lowering the volume of the loudest ones in order to make them coherent, with the results that the tracks that won the loudness wars 20 years ago now sound less loud than the others.
It's important to master knowing the final source in which our song will be played the most or to make different masterings according to the platform, here is an article with the correct mastering levels for the various streaming services, for CDs and for Club play.
Now that we have the right track for the right source it's the time of the trial by fire: listen to your track from as many sources as possible (car stereo, smartphone headphones, expensive speakers, laptop speakers, etc): you fill find out several little corrections to make which are essential to smoothe out the final bumps before releasing the song, and don't forget to compare it to some of your favourite masters: this way you can spot very easily whether there is some unbalance in your track.
I hope this was helpful!
CLICK HERE FOR PART 1/3
CLICK HERE FOR PART 2/3
Become fan of this blog on Facebook! Share it and contact us to collaborate!!
Saturday, March 14, 2020
Review: Esp Ltd MH-1007 ET with video sample
Hello and welcome to this week's article!
Today we are reviewing the Ltd MH-1007 ET, which is a more premium version of a guitar I used to own for about 6 years and loved: the Ltd MH-417.
During these last 6 years the MH-417 has been my main 7 strings guitar, I have gotten acquainted to its neck (which is slightly thicker than an Ibanez but thinner than a Gibson or Fender) and I have used it to play live and record in studio, even if I had to change the pickups with others which would enhance the top end, because the overall tone with the Emg-707 was a bit dark, probably also because of the wood and the coating.
During these years as I said I have learned to love this guitar shape and playability, but then recently I wanted to try an Evertune bridge (Click here for a dedicated article), therefore after having tried other brands, I have decided to stay with this model and buy the 1007 ET version.
The Ltd MH-1007 is a made in Korea set through guitar, meaning that the neck is glued to the body but somewhere in the middle, making it a halfway between a set neck and a neck through body; the wood is mahogany with maple cap (therefore a bit brighter than a mahogany-only body), and it features an ebony fingerboard (Macassar Ebony, which is the Indonesian variety).
Size and shape are the same of the other versions of the MH line, so 25.5 inches scale, same radius, nut width etc, but the tuners here are Grover, there are Emg 81-7H and 85-7H pickups, 24 extra Jumbo frets, and binding both in the body and in the fretboard.
About the Evertune, it is really magical: it takes some time to set it up properly, let's say if to make a complete setup of fixed bridge guitar takes around 30 minutes, with the Evertune bridge it takes about twice as much if you want to fine tune perfectly the intonation, but once it's done it's really done, and it doesn't need any mantainance, even if you change the strings (as long as they are the same gauge, obviously).
The Evertune gives its best in studio, when also a note that is slightly flat or sharp by few decimals of tone can have a big impact in the final song, and even if I admit that it makes the guitar a bit heavier and has an impact on the bendings (after all there is always a spring pulling against your strenght), the upside in terms of tuning precision and stability outshines any minor setback, so I really suggest anyone to give it a chance.
In terms of tone it is very balanced, the 2 Emg 81 and 85 -7H (H stands for Hum Cap, which is the classic, not-soapbar shape) are basically the same of the regular 81 and 85, although the eq on paper is slightly different:
81-7
Resonant Frequency (KHz) 1.45
Output Voltage (String) 2.00
Output Voltage (Strum) 4.50
Output Noise (60 Hz) -106
81-7H
Resonant Frequency (KHz) 1.63
Output Voltage (String) 3.00
Output Voltage (Strum) 4.50
Output Noise (60 Hz) -100
The tone is very aggressive and classically metal, the Emg 81 doesn't really need introductions, but in general this is a full featured professional guitar, one of the best I have ever owned, and I suggest anyone to check it out.
Thumbs up!
Specs taken from the website:
- CONSTRUCTION: Set-Thru
- SCALE: 25.5"
- BODY: Mahogany w/ Maple Cap
- NECK: 3Pc Maple
- FINGERBOARD: Macassar Ebony
- FINGERBOARD RADIUS: 350mm
- FINISH: BLACK
- NUT WIDTH: 48mm
- NUT TYPE: Molded
- NECK CONTOUR_ Thin U
- FRETS/TYPE: 24 XJ
- HARDWARE COLOR: Black
- STRAP BUTTON: Standard
- TUNERS: Grover
- BRIDGE: Evertune (F model)
- NECK PU: EMG 85-7H
- BRIDGE PU: EMG 81-7H
- ELECTRONICS: Active
- ELECTRONICS LAYOUT: Vol/Tone/3-Way Switch
- STRINGS: D'Addario XL110-7 (.010/.013/.017/.026/.036/.046/.059)
Become fan of this blog on Facebook! Share it and contact us to collaborate!!
Saturday, March 7, 2020
How to master a song with free plugins part 2/3: the core of mastering!
Once we have our mastering project open and with a minimum knowledge of which are the tools required for each individual task, you will find that it's a rabbit hole as deep as the mixing itself, and different to the point that there are mastering engineers that earns a living just by doing that.
That's how different it is, and in the most expensive studios mastering engineers have whole outboards of hardware processors dedicated just for that.
Since you are reading this, though, I assume you are not one of these mastering engineers, so here's our article with the Best 5 free mastering plugins 2019, which should already give you a nice array of new tools, if you're not satisfied with what you can find bundled in your DAW.
What matters here, in the core of mastering, it's the subtlety: we don't want to modify the complex and delicate balance of our mix, so what we need is to make the sound just a bit more stable, smooth and euphonic before pushing the signal with the limiter, that's why many prefers, instead of a regular broadband compressor, to use a multiband compressor (click here for a dedicated article) in order to keep things in place without coloring or altering the whole spectrum.
If we see that through these subtle modifications and corrections still the mix is unstable or unbalanced, we will have to go back to the mixing project, fix it from there and re-export the track.
Now it's time to create the song metadata (click here for a dedicated article), which will be the information hard coded in the song, such as the song title, the name of the band, the year and so on.
These informations once were optional, but today are essential since they will be the criteria based on which your song will be indexed in the computer, in your mp3 player or in your smartphone.
Pass this phase and the track will become completely impossible to find.
Now to see more in detail the mastering project it's time to check out our second mastering article: the Minimal Mastering Chain, which will explore furthermore which are the most important tools to be loaded into a master track: if in the first part of this article we went through a very broad article with ALL the tools, this one focuses just on those that are really useful, the others are all situational.
CLICK HERE FOR PART 1/3
CLICK HERE FOR PART 3/3
Become fan of this blog on Facebook! Share it and contact us to collaborate!!
Saturday, February 29, 2020
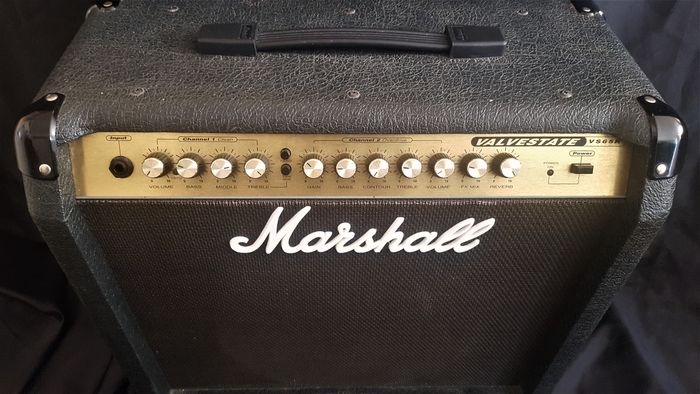
Review: Marshall Valvestate VS65R
Hello and welcome to this week's article!
Today we are going to review another legacy piece of gear: the Marshall Valvestate VS65R combo, which came out in the mid '90s!
Marshall is the soul of british rock amplifiers, and from the '60s (Jimi Hendrix) all the way up to the '80s (Guns n'Roses) the sound of its amplifiers has been the absolute standard in most of the rock records ever made (and not only rock, also metal, pop, punk...).
Since the 80s the brand pioneered, besides their classic tube amplifiers, also alternative technologies, trying to recreate a sound that is as similar as possible to the "real one", but without the need of high volume and high production (and sale) costs.
This has led to several series of solid state, hybrid and digital amps which have surfaced the marked, sometimes with success, sometimes not.
The Valvestate serie is part of the "hybrid" ones, meaning that they unite a preamp with a tube (an ECC83) to a solid state power amp, which allows us to play also at bedroom volume without big differences in tone (which are one of the biggest problems with their 100w tube heads like the Jcm800).
The result? It's a very good practice amp, probably in the mid '90s was the best one (and for this reason it wasn't cheap, it was sold at around 500$, and today it can be found at around 100): the build quality was incredibly solid, this was my first amp and I have used it in all the most extreme conditions imaginable, playing it outdoors, cranking it full volume at the school concerts, banging it around in a van, and it never had a problem, a lesson all amp maker of today should learn from, since they all save in build quality today.
The combo is open back, quite heavy (around 15/20kg), and features 2 channels with independent eq, fx loop, spring reverb and headphone out.
It digests very well also external processors, such as multieffect pedal boards and so on, althought in 10years (at least) I had it around I have used it mostly with its own preamp.
The sound is what I would call "typical solid state Marshall", meaning that it has a timbre which is recurrent in this type of Marshall amps: very bright, with a lot of attack and more gain than most of the tube Marshall amps: with it, by scooping the mids it's possible to play thrash metal with good palm mutings without the need of an exteral booster, to the point that also Chuck Schuldiner of Death has used Valvestate amps in his records (even in the legendary In Flames' "Clayman" album there is a layer of Valvestate!).
The tone is somehow clearly colder than its tube counterparts, but it compensates with a lot of presence and bite and a decent volume, which is (barely) enough to stand above a live metal drummer without microphoning it.
Today there are a lot of beginner amps which have more features than this, but if you come across this workhorse for 100 bucks, it can still be a good bedroom practice amp and it will much probably outlast any other cheap combo you might buy today.
Thumbs up!
Specs:
- 12 inches "Marshall Gold Black" speaker
- 1 x ECC83 tube in the preamp
- 65watt RMS
- spring reverb
- FX Loop
- Headphone out
Become fan of this blog on Facebook! Share it and contact us to collaborate!!
Saturday, February 22, 2020
How to master a song with free plugins part: 1/3 the basics!
Hello and welcome to this week's article!
Today we go on with our serie "Start from here!" of omnicomprehensive articles, from which you will be able to find all the essential links of this blog organized as in a coherent way, to be used as starting point to begin browing the articles (but there are many more! Use the tags and the search engine).
Once we have done all the necessary steps, which means recording and mixing our project, it's time to tick the final boxes in our mixing project before exporting the mixed track for mastering, which is the phase in music production in which we take our track and make it loud enough to be at the level of a commercial one, and to be reproduced correctly from all devices.
In order to prepare this final track we can either just use the regular mixing tools or use a more recent approach, which is the so-called "top down mastering" (click here for a dedicated article), which consists in putting basic mastering plugins in our stereo out chain in order to know in advance how the final track will sound like, so that we will mix keeping also this additional processing part in mind, just don't forget to disable these plugins when exporting the track for the final mastering!
In addition to that it's important to fix all the little things that could be harmful to the mastering process, for example an excessive dynamic range that would damage our headroom, incorrect gain staging and so on, so make sure to read carefully our 5 tips to prepare your track for mastering!
Now we're ready to export our track, which doesn't peak above -12 to -10db, at 24 bit and that has a sample rate from 48khz up.
What we should do now is to create a new project, and import this mixed track into a stereo track.
From now, all our processing must happen in the master bus.
What do we put in the chain?
There is a wide range of processors that we can apply, which can be seen in depth in our Basic Mastering Chain article, our main article about mastering which analyzes each plugin in detail, explains how to use them and has free downloads, just remember that you don't need to use the full chain, just use the plugins you really need to give your project the right icing on the cake, or you risk to ruin your whole work!
CLICK HERE FOR PART 2/3
CLICK HERE FOR PART 3/3
Become fan of this blog on Facebook! Share it and contact us to collaborate!!
Saturday, February 15, 2020
Review: Zoom 505
Hello and welcome to this week's article!
Today we go on with our legacy gear of my upbringing, and I couldn't skip a compact multi effect which has been the entry level of basically every single guitar student in the '90s: the legendary Zoom 505!
The Zoom 505 was the smallest, least expensive multi effect in the market in the mid '90s, when I started learning how to play, and usually all the kids buying a guitar were also buying a cheap combo and this unit to add some colour to their tone palette: needless to say, it was one of these tools that shortly after were parked in some shelf, replaced by better gear.
This micro multi effect had a big impact in the scene when it came out for a couple of reasons: it was working either with batteries or with the DC adaptor and it was so small to fit in any gigbag, so for many it was the first way to add some delay or reverb in their tone, plus it had many banks to store the presets, which is a good thing since the original ones were quite bad.
The Zoom 505 features only 2 switches, which means that playing live is quite hard if we want to move between presets that are not in sequence, but the Zoom engineers were clever enough to create the "direct load" mode, which allows to program two sequential patches one after the other, even if in theory they are far away in the patch list.
The sound... Wasn't the best: we're talking about an era before the POD, in which digital processors were considered basically toys, because their preamps couldn't replicate decently the sound of a real amp: the tone was thin, glassy, and the distortions were like nails on a blackboard.
On the other hand this unit was doing a decent job with the effects, so many guitarists were using it just for the effects part, using the preamp of a real amp and obtaining listenable results, plus it had several creative effects which were not common in multi effects back then, like octave, fade-in volume, and some sort of arpeggiator.
It's worth also mentioning that few year later, a version 2.0 was released (Zoom 505 II), with a new chassis and more sounds, but this first one remains in our hearts as the archetype of the beginner guitarist multieffect.
Thumbs down for the sound, up for the memory!
Specs:
- 24 user editable presets
- Compressor, limiter, auto wah
- Acoustic, Rhythm, Overdrive, Distortion, blues, fuzz, lead, and metal distortion settings
- Zoom Noise Reduction
- EQ (4 band) phaser
- Chorus, Flanger, Doubler, Stepper (auto appregio), Pitch shifter
- Delay, Hall, And room reverbs.
- Optional expression pedal and bank switch
Become fan of this blog on Facebook! Share it and contact us to collaborate!!
Subscribe to:
Posts (Atom)


