Labels

BASS (50) COMPRESSION (32) DRUMS (45) EFFECTS (49) EQUALIZATION (30) GUITAR (112) HOME RECORDING (95) IMPULSES (21) INTERVIEWS (19) KARAOKE (1) LIVE (10) MASTERING (61) MIDI (21) MIXING (179) REVIEWS (156) SAMPLES (69) SONGWRITING (19) SYNTH (3) VOCALS (31)

Saturday, November 26, 2022

Audio Assault - Bulldog (with video sample)


Hello everyone and welcome to this week's article!

Today we are going to review the latest virtual amplifier by Audio Assault: the Bulldog!

The Bulldog is the amp sim of a VHT Pitbull, a 3 channel hi-gain tube head famous for being very tight and aggressive (and also very expensive).

This virtual amp is quite a faithful representation of the original one and offers several solutions to make it a very flexible suite: a tuner, 3 stompboxes (gate, booster and a Tube Screamer emulation), a rack with 3 effects (a graphic eq, a delay and a reverb), a preset manager, the function "my amp" which modifies slightly the tone in a way that is unique for every purchase (like it happens with real amps, which usually never sounds exactly the same among them) and a handful of IRs made just for this amp.
The fact that there are few IRs compared to other Audio Assault amp sims can be due to the fact the one I'm trying it's a beta version, but if it's not, I consider this a good thing anyway, since they clearly took time to pick the IRs that sounds the best with this amp rather than put hundreds of them and forcing the player to navigate for hours between them before finding one that suits the head.

Among the other features it's worth to mention the resizable UI and the double track emulation, which doubles the track you are recording in order to make it sound like there is a second layer, and it can be a good songwriting tool, to put down ideas faster and that already have that "wall of sound" feeling.

How does it sound?

This is clearly one of the best and most usable Audio Assault amps, they have improved constantly through time and in this specific one I must say (also thanks to a good choice of impulses) the low end is very present and in focus (which is something not very common in amp sims, realistic low mids that doesn't sound muddy) and the highs are very clear and defined, making this a very usable amp simulator.

This plugin is good not only for high-gain metal tones (in terms of pure metal sound Sigma is still superior), but also for clean and crunchy ones, which sound very warm and credible, and I can only suggest anyone interested to check it out.

Thumbs up!


Specs taken from the website:


- 3 channels

- 3 stompboxes: gate, booster and Tube Screamer

- Fx rack with eq, delay and reverb

- Tuner

- L, R and Stereo Routing

- 2x, 4x, 8x, 16x Oversampling options

- 2 Graphics engine

- My Amp Feature for an unique tone

- Double track emulation

- Presets system


Become fan of this blog on Facebook! Share it and contact us to collaborate!!

Saturday, November 19, 2022

Track Grouping Cheatsheet


Hello everyone and welcome to this week's article!
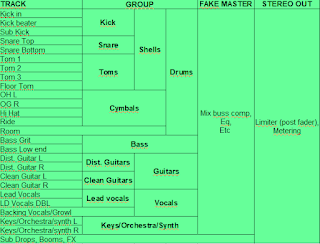
Today we're going to check out a visual representation of the track grouping of an average project, I have borrowed the idea from a similar cheatsheet I've found posted from a user (thank you, Toby!) on the URM Academy Facebook page, but I have modified it a bit according to my workflow and naming conventions.
I consider this visual representation an useful tool because it tidies up the concepts we have been already analyzing in detail in our home recording main article, and in our project preparation one.

Let's start by saying that this picture is by no mean a fixed rule, you can modify it according to your workflow, remove and add all the tracks/groups you need etc, but it could be considered as a solid starting point if you're new in mixing a project with with a full rock band and don't know where to start. 

Let's begin from the left, here you have all the individual tracks: almost all of them are routed into subgroups and/or groups, this is made to make you process the tracks in groups, if possible, thus saving time and computer resources (as opposed to processing them individually), and when you have your sounds right and the relative balance within the group, you can literally just move the group faders to balance the main parts of the mix among them (eventually balancing only the drums, bass, guitars, vocals, synths and fx groups, just 6 faders, is much easier and gives us a much better perspective once the ground work is done).

Why the Sub Drops etc... track is alone and goes straight into the Stereo Out? Because we don't want it to be part of the "Fake Master", we don't want all the low end of these tracks to hijack completely the buss comp creating a horrible pump effect. Eventually some pump effect can still appear when this track will reach the limiter, and we will have to be good in finding the right volume for it to arrive to the limiter without creating problems.

I hope this was helpful!


Become fan of this blog on Facebook! Share it and contact us to collaborate!!
 

Saturday, November 12, 2022

Review: Fender '65 Deluxe Reverb


Hello everyone and welcome to this week's article!

Today we're going to review one of the most historical guitar amps of all times: the Fender '65 Deluxe Reverb!

The '65 Deluxe Reverb is one of the most iconic amps ever produced by Fender, and its latest reissue is still on sale today from the producer, hand assembled in the USA with premium components.
This amp, historically, is suited for Country, Blues, Classic Rock, but in general its clean tones have been loved and used by guitarists from all genres.

The amp features 4 inputs: 2 for the normal channel and 2 for the vibrato one (the difference between the 2 inputs is that input 1 is 6db louder, so you should use it fwith lower output guitars, while input 2 should be used with high output ones).
Instead of the usual overdrive channel, channel 2 is a vibrato channel, meaning that has a vibrato effect always on, and there is also (only for this second channel) a reverb, with the knob in the amp acting as dry/wet mix control. 
Finally, to be noted that in the eq section there is no mid control, only bass and treble.

How does it sound? Let's start by saying that like all amps of this type, even if it's a small 22w combo, this amp is LOUD, and the more you crank it towards the breakup, the more the sound becomes harmonically rich (althought a bit noisy) and it can enter also into mild overdrive territories.
The basic clean channel is the definition of Fender clean: squeaky clean, with a lot of attack and top end but at the same time with deep bass, a combination that makes it sound almost like a piano, while the vibrato channel is similar to the clean one but with an adjustable vibrato effect, which can be useful in certain genres, and a very good reverb.
If you need only the reverb you can lower the vibrato settings to the minimum, until it basically disappears, and you will remain with another normal channel to which you can apply the reverb.

Regardless of the genre you play, this is an amp I suggest anyone to try, because it's the history of guitar and because it's featured in countless records, from the '60s up to now, and it lets us peek into a time in which in the amps there were different features, and maybe guitarists also had different needs.

Thumbs up!


Specs:


- 2 Channels

- Power 22 W

- Equipped with: 1x 12" Jensen C12K speaker, 8 Ohm

- Controls for: Volume, treble, bass, reverb, speed, intensity

- 4 Inputs - 2 per channel

- Speaker out

- Spring reverb

- Tube Vibrato

- 4 Preamp tubes: 12AX7

- 2 Preamp tubes: 12AT7

- 2 Power tubes: 6V6

- Dimensions (D x W x H): 24.1 x 62.2 x 44.5 cm

Saturday, November 5, 2022

All the types of eq explained

Hello everyone and welcome to this week's article!

Today we're going to deep dive in a subject already touched in our main equalization article, but explaining more the differences between the various types of equalization and which one to use according to the needs.


Shelving eq and Filter eq: those are the simplest of all, and can be either with an analog interface (with knobs) or with some graphic representation, but they all recreate the fact that you can choose an eq shape (in this case a filter or a shelf), choose the frequency range where to put it and dial in how many dB to add or subtract to that area (if you are filtering, obviously you're bringing to zero db the sound from a certain point up or down). By concept, for shelf we mean that for example from a certain area (for example 1khz) up (or down) we will start adding or removing gain, and this usually happens with a not too steep curve, to not make the change too unnatural.


Graphic eq: this is a way to intervene in the frequency areas with more precision, and also this type of eq comes from the analog world. Initially the spectrum was split in just few areas, like 4, then they started adding more and more faders to the units up to 30 bands or more. You can intervene with the individual bands (the more the number of faders, the smaller the frequency range for each band), and the models with more bands obviously allow much more surgical correction, to the point that the most precise ones are used mostly for room correction, meaning to clean up specific resonance areas of a sound. When you have plugin recreation of those old units, usually they try also to recreate the way they used to colour the sound, for example adding some harmonic content or some saturation.


Parametric eq: the way those equalizer works is an evolution of the shelving ones, basically they work the same way but they let you choose among more shapes (for example a bell shape), decide the Q (which is the width of the shape) and add usually many of those shapes, also making them interact-overlap among each other (this is a specific more of the digital ones, like the Fabfilter pro Q). This type of eq allows much more control and by consequence also much more possibility to make mistakes, but it's one of the few that for example allows you to make a wide boost in a frequency area and then, in that same area create several very narrow cuts to tame the resonances.
The most feature-rich digital ones allows also to make corrections only in the part of the sound panned in the middle or only to the one on the sides (MID-SIDE eq) or to affect only one of the 2 sides of the stereo field.


Dynamic eq: this is much closer to a multiband compressor than to an equalization, meaning that it's dependent on the level of the input. With a dynamic eq you can for example choose an eq bell and decide to reduce the gain on a certain area: the gain reduction in that area will be higher when the gain is higher in that specific area and vice versa. This is used to tame certain frequencies that spike only every now and then like the sibilant consonants in a vocal track.

Note that all these types of eq mentioned are "archetypes", but in the reality of today, especially in the digital domain, you will find equalizers which offers a combination of those functions (for example there can be an eq which can also offer dynamic eq functions, or a graphic eq which offers also a frequency analyzer and mid-side features, and so on).


Become fan of this blog on Facebook! Share it and contact us to collaborate!!