Labels

BASS (50) COMPRESSION (32) DRUMS (45) EFFECTS (49) EQUALIZATION (30) GUITAR (112) HOME RECORDING (95) IMPULSES (21) INTERVIEWS (19) KARAOKE (1) LIVE (10) MASTERING (61) MIDI (21) MIXING (179) REVIEWS (156) SAMPLES (69) SONGWRITING (19) SYNTH (3) VOCALS (31)

Saturday, February 29, 2020

Review: Marshall Valvestate VS65R


Hello and welcome to this week's article!
Today we are going to review another legacy piece of gear: the Marshall Valvestate VS65R combo, which came out in the mid '90s!

Marshall is the soul of british rock amplifiers, and from the '60s (Jimi Hendrix) all the way up to the '80s (Guns n'Roses) the sound of its amplifiers has been the absolute standard in most of the rock records ever made (and not only rock, also metal, pop, punk...).

Since the 80s the brand pioneered, besides their classic tube amplifiers, also alternative technologies, trying to recreate a sound that is as similar as possible to the "real one", but without the need of high volume and high production (and sale) costs.

This has led to several series of solid state, hybrid and digital amps which have surfaced the marked, sometimes with success, sometimes not.

The Valvestate serie is part of the "hybrid" ones, meaning that they unite a preamp with a tube (an ECC83) to a solid state power amp, which allows us to play also at bedroom volume without big differences in tone (which are one of the biggest problems with their 100w tube heads like the Jcm800).
The result? It's a very good practice amp, probably in the mid '90s was the best one (and for this reason it wasn't cheap, it was sold at around 500$, and today it can be found at around 100): the build quality was incredibly solid, this was my first amp and I have used it in all the most extreme conditions imaginable, playing it outdoors, cranking it full volume at the school concerts, banging it around in a van, and it never had a problem, a lesson all amp maker of today should learn from, since they all save in build quality today.

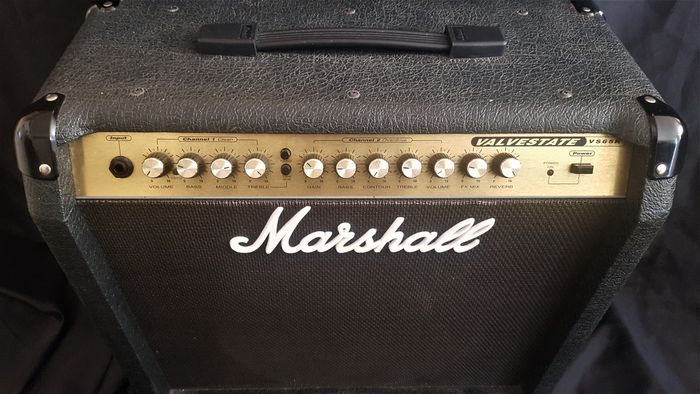
The combo is open back, quite heavy (around 15/20kg), and features 2 channels with independent eq, fx loop, spring reverb and headphone out.
It digests very well also external processors, such as multieffect pedal boards and so on, althought in 10years (at least) I had it around I have used it mostly with its own preamp.
The sound is what I would call "typical solid state Marshall", meaning that it has a timbre which is recurrent in this type of Marshall amps: very bright, with a lot of attack and more gain than most of the tube Marshall amps: with it, by scooping the mids it's possible to play thrash metal with good palm mutings without the need of an exteral booster, to the point that also Chuck Schuldiner of Death has used Valvestate amps in his records (even in the legendary In Flames' "Clayman" album there is a layer of Valvestate!).

The tone is somehow clearly colder than its tube counterparts, but it compensates with a lot of presence and bite and a decent volume, which is (barely) enough to stand above a live metal drummer without microphoning it.
Today there are a lot of beginner amps which have more features than this, but if you come across this workhorse for 100 bucks, it can still be a good bedroom practice amp and it will much probably outlast any other cheap combo you might buy today.

Thumbs up!


Specs:


- 12 inches "Marshall Gold Black" speaker

- 1 x ECC83 tube in the preamp

- 65watt RMS

- spring reverb

- FX Loop

- Headphone out


Become fan of this blog on Facebook! Share it and contact us to collaborate!!

Saturday, February 22, 2020

How to master a song with free plugins part: 1/3 the basics!


Hello and welcome to this week's article!

Today we go on with our serie "Start from here!" of omnicomprehensive articles, from which you will be able to find all the essential links of this blog organized as in a coherent way, to be used as starting point to begin browing the articles (but there are many more! Use the tags and the search engine).

Once we have done all the necessary steps, which means recording and mixing our project, it's time to tick the final boxes in our mixing project before exporting the mixed track for mastering, which is the phase in music production in which we take our track and make it loud enough to be at the level of a commercial one, and to be reproduced correctly from all devices.

In order to prepare this final track we can either just use the regular mixing tools or use a more recent approach, which is the so-called "top down mastering" (click here for a dedicated article), which consists in putting basic mastering plugins in our stereo out chain in order to know in advance how the final track will sound like, so that we will mix keeping also this additional processing part in mind, just don't forget to disable these plugins when exporting the track for the final mastering!

In addition to that it's important to fix all the little things that could be harmful to the mastering process, for example an excessive dynamic range that would damage our headroom, incorrect gain staging and so on, so make sure to read carefully our 5 tips to prepare your track for mastering!

Now we're ready to export our track, which doesn't peak above -12 to -10db, at 24 bit and that has a sample rate from 48khz up.

What we should do now is to create a new project, and import this mixed track into a stereo track.
From now, all our processing must happen in the master bus.

What do we put in the chain?
There is a wide range of processors that we can apply, which can be seen in depth in our Basic Mastering Chain article, our main article about mastering which analyzes each plugin in detail, explains how to use them and has free downloads, just remember that you don't need to use the full chain, just use the plugins you really need to give your project the right icing on the cake, or you risk to ruin your whole work!


CLICK HERE FOR PART 2/3

CLICK HERE FOR PART 3/3


Become fan of this blog on Facebook! Share it and contact us to collaborate!!

Saturday, February 15, 2020

Review: Zoom 505


Hello and welcome to this week's article!
Today we go on with our legacy gear of my upbringing, and I couldn't skip a compact multi effect which has been the entry level of basically every single guitar student in the '90s: the legendary Zoom 505!

The Zoom 505 was the smallest, least expensive multi effect in the market in the mid '90s, when I started learning how to play, and usually all the kids buying a guitar were also buying a cheap combo and this unit to add some colour to their tone palette: needless to say, it was one of these tools that shortly after were parked in some shelf, replaced by better gear.

This micro multi effect had a big impact in the scene when it came out for a couple of reasons: it was working either with batteries or with the DC adaptor and it was so small to fit in any gigbag, so for many it was the first way to add some delay or reverb in their tone, plus it had many banks to store the presets, which is a good thing since the original ones were quite bad.

The Zoom 505 features only 2 switches, which means that playing live is quite hard if we want to move between presets that are not in sequence, but the Zoom engineers were clever enough to create the "direct load" mode, which allows to program two sequential patches one after the other, even if in theory they are far away in the patch list.

The sound... Wasn't the best: we're talking about an era before the POD, in which digital processors were considered basically toys, because their preamps couldn't replicate decently the sound of a real amp: the tone was thin, glassy, and the distortions were like nails on a blackboard.
On the other hand this unit was doing a decent job with the effects, so many guitarists were using it just for the effects part, using the preamp of a real amp and obtaining listenable results, plus it had several creative effects which were not common in multi effects back then, like octave, fade-in volume, and some sort of arpeggiator.

It's worth also mentioning that few year later, a version 2.0 was released (Zoom 505 II), with a new chassis and more sounds, but this first one remains in our hearts as the archetype of the beginner guitarist multieffect.


Thumbs down for the sound, up for the memory!


Specs:


- 24 user editable presets

- Compressor, limiter, auto wah

- Acoustic, Rhythm, Overdrive, Distortion, blues, fuzz, lead, and metal distortion settings

- Zoom Noise Reduction

- EQ (4 band) phaser

- Chorus, Flanger, Doubler, Stepper (auto appregio), Pitch shifter

- Delay, Hall, And room reverbs.

- Optional expression pedal and bank switch


Become fan of this blog on Facebook! Share it and contact us to collaborate!!

Saturday, February 8, 2020

Top down mastering: is it a good idea?


Hello and welcome to this week's article!

Today we are talking about a mastering technique that is becoming more and more prominent in these recent years (click here for a dedicated article about mastering), with the increase in Cpu performance that are allowing us to fill our projects with plugins without resource problems.

Usually mix engineers use a project in which they import their edited tracks, and there they perform the mix, which involves often a big number of tracks and plugins, then they export the song into a stereo track, re-import it in a new project and perform the mastering there.

If during the mastering phase they spot a problem, they need to re-open the mixing project, fix it, re-export everything and re-import it in the mastering one.

Why do they do this extra step?
Because this way they can edit better the final tracks, and more importantly they have the cpu completely free and they can use it exclusively for the mastering plugins.

This workflow has been the rule for the latest 20 years, but now, with the most recent processors and ram, the computational power has become fast enough to try to blend the 2 steps.
This way we can directly export the mastered song from the mixing project, or, at least, perform the mix with the already mastered sound, in order to avoid surprises when mastering.
This approach is called Top down mastering, and it consists in loading the mastering chain directly in the stereo out of our mixing project.

Which plugins do we load in the stereo out? I suggest to try with those in our Minimal Mastering Chain (click here to check it out), and from there remove and add according to our needs, trying anyway to be conservative, because usually mastering plugins are a bit heavier than the mixing ones.

Did you ever try this technique?
I personally like to use it when mixing to know what to expect in terms of sound when I will arrive to mastering, but when I'm done with mixing I remove the mastering plugins and export the track, then I re-import it in a new project and re-apply them again because I prefer to have more control when editing the final tracks.

I hope this was helpful!


Become fan of this blog on Facebook! Share it and contact us to collaborate!!

Saturday, February 1, 2020

Review: Hughes & Kettner Attax 80 combo


Hello and welcome to this week's article!

Today we're going to review a very interesting combo produced from 1998 (then after five years the serie got revamped with the name Vortex), now discontinued but that still can be found easily and for dirt cheap in the street market: the Hughes & Kettner Attax 80 combo!

This amp was in the rehearsal's room where I was practicing with my band few years ago, and in the same room there was a Marshall Valvestate 65w: the Attax was just so much more powerful and with more low end than the Marshall that in the room it was always the fist choice.

Why was it (and still is) better?
Because of several reasons: the fact that it's half closed back, which makes the sound much darker and "bigger" for such a small combo compared to an open back one like the Marshall, the fact that it's 100w transistor instead of 65, and the fact that it features a tight, high gain lead channel that offers a decent, "solid state thrash metal" tone without the need of extra overdrive pedals, which is very good.

The combo features a Celestion RockDriver Vintage speaker, which has a voicing oriented towards the low mids similar to a Vintage 30, 2 channels (Clean and Lead, with the lead one that can switch between a "British" voicing and a more "American" one), fx loop, a speaker emulated output (which was not very common back then) and a pretty compact size, compared with other combos of the era (but it's not particularly light).

Sound wise this amp comes from an era in which the tube amp modeling was still not very advanced, so it has some of the downsides typical of the 90s transistor amps: the clean is super clean but not particularly warm (even if by raising the gain above 12 o'clock it can be turned basically into a crunch), and the distortion is very tight (something similar to the 80's Anthrax sound) but doesn't have a lot of harmonic richness.
On the other hand, both channels sounds quite good, there are good tone shaping possibilities (the 2 voicings of the lead channel), it sounds nice and it's very usable, both in studio (especially for metal) and live, since it's more than capable of cutting through a live drumset and it can also be connected to an external speaker.

I consider this amp one of the best rehearsal rooms workhorses, because it's extremely solid and reliable and can take countless hours of stress without any problem, and for this reason I give to it my:

Thumbs up!


Specs:


- PREAMP SECTION: CLEAN + LEAD solid state channels

- INPUT: -10 dBV/ 1M ohms

- FX-RETURN: -10dBV/ 47 k ohms

- FX-SEND: 0 dBV/ 2.2 k ohms

- REC.OUT: 0 dBV/ 800 ohms

- POWERAMP SECTION:

- 'CURRENT FEEDBACK' solid state power amp

- Output Power: 80 W rms into 8 ohms

- 100 W rms into 4 ohms

- PHONES: 0,5 W, 600 ohms

- Frequency response: 20 Hz - 40 kHz (into 4 ohms)

- Speakers:  CELESTION RockDriver Vintage, 12“, 8 ohms

- Dimensions: 556 x 480 x 280 mm (W x H x D)

- Weight: approx. 38 Lbs./ 17 kg


Become fan of this blog on Facebook! Share it and contact us to collaborate!!