Labels

BASS (50) COMPRESSION (32) DRUMS (45) EFFECTS (49) EQUALIZATION (30) GUITAR (112) HOME RECORDING (95) IMPULSES (21) INTERVIEWS (19) KARAOKE (1) LIVE (10) MASTERING (61) MIDI (21) MIXING (179) REVIEWS (156) SAMPLES (69) SONGWRITING (19) SYNTH (3) VOCALS (31)

Saturday, April 1, 2023

NAM: Neural Amp Modeler, what is it and how does it work.


Hello everyone and welcome to this week's article!

This time we're going to talk about a free amp profiler that's being developed by Steven Adkinson, and it's a software that is currently under development but it can already work decently and has seen the birth of a huge internet community (here).

NAM is an amp simulator which features the most common controls and an IR loader, but that bases its uniqueness on the fact that you can load into it models which are snapshots of real rigs (in a way similar to what IK Multimedia Tonex and Kemper profiling amp do).

Which are the differences between NAM and the other profilers? The difference is the fact that this one is in beta, is has a less polished interface and still needs some refinment, but the fact that it's free and that has a sound quality that has nothing to envy to the other profilers makes up for everything!

What's the different from an amp simulator and an amp profiler? An amp simulator emulates the way a circuit reacts, while a profiler takes a test tone and makes it pass through a real rig (which can be an amp, or a pedal, or even hardware mixing outboard) and tries to recreate how the hardware reacts adapting these cues to its structure, with results usually more true-to-life than the regular simulators. 
I am not sure if I have explained it with the correct words, but the result is that profilers are in the last few months disrupting the amp sim scene which has been dominating the last 20 years, and in the case for example of NAM there is a large community online which is sharing its captures (hundreds!) and you can download them freely and try them out: some are good, some are bad, but it's really amazing to see all this ferment around this tool, and really all you need to do is to install the Vst (which can be downloaded here), load it in your DAW, add a cabinet simulator, load the model you want from those you downloaded and treat it like any other amp sim.

Now let's see toghether if you have a real amp, for example a tube head, and you want to create a profile of it, what to do (you can see more also on this video):  

- first off setup your computer for reamping (you'll need to connect your audio interface to the input of your amp via a reamp box, click here for a dedicated guide).

- download the training wav file here, create a new project in your DAW at 24bit 48khz and load this file into a mono track.

- reamp the training file through your rig and record the resulting output file into a new mono track, which will basically be the training file which has passed through your amp and has acquired all the characteristics, for example of the overdrive channel.

- Normalize and export the reamped file (exactly of the same lenght of the training file) in mono at 24bit and 48khz and rename it "output.wav".

- go to this page and upload the output.wav file and the training wav file in the root folder on the left as per the image in the point of the arrow 1 (click on the pic to enlarge it):
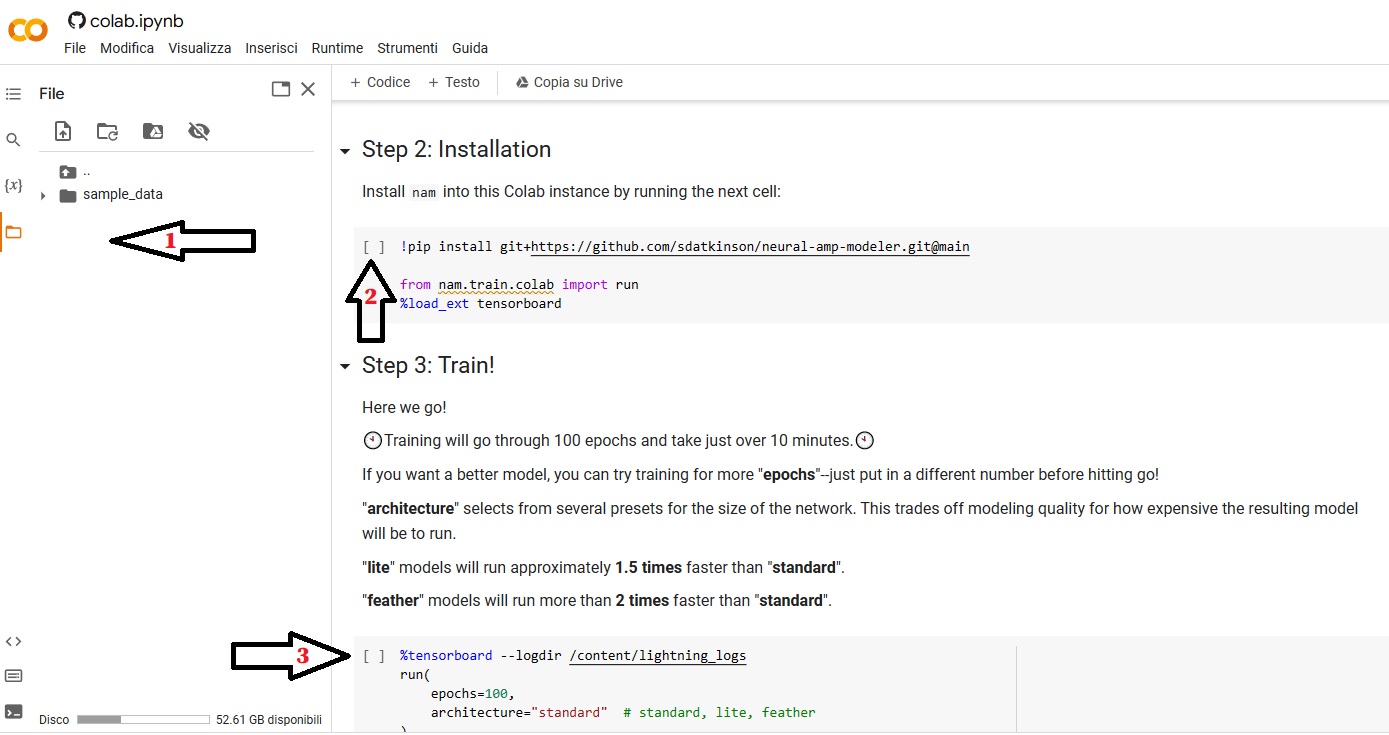

- once the files are uploaded click on the space between the brackets pointed by the arrow 2, it will start loading and this will take around 10 seconds.

- once the loading part is completed click on the space between the brackets pointed by the arrow 3, and it will start loading again. This process can take some time, around 10 minutes, but at the end if everything went according to the plan you will receive an output file into a folder indicated at the end of the process. You can download this output file (with the extension .NAM) and load it directly into the plugin, and if everything went well you will have a faithful replica of your amp!

What do you think of this plugin? Do you think amp profilers will completely replace the amp sim world?

Let us know in the comments below!


Become fan of this blog on Facebook! Share it and contact us to collaborate!!

Saturday, February 18, 2023

How to mic a drumkit with snare top and bottom (part 2/2)


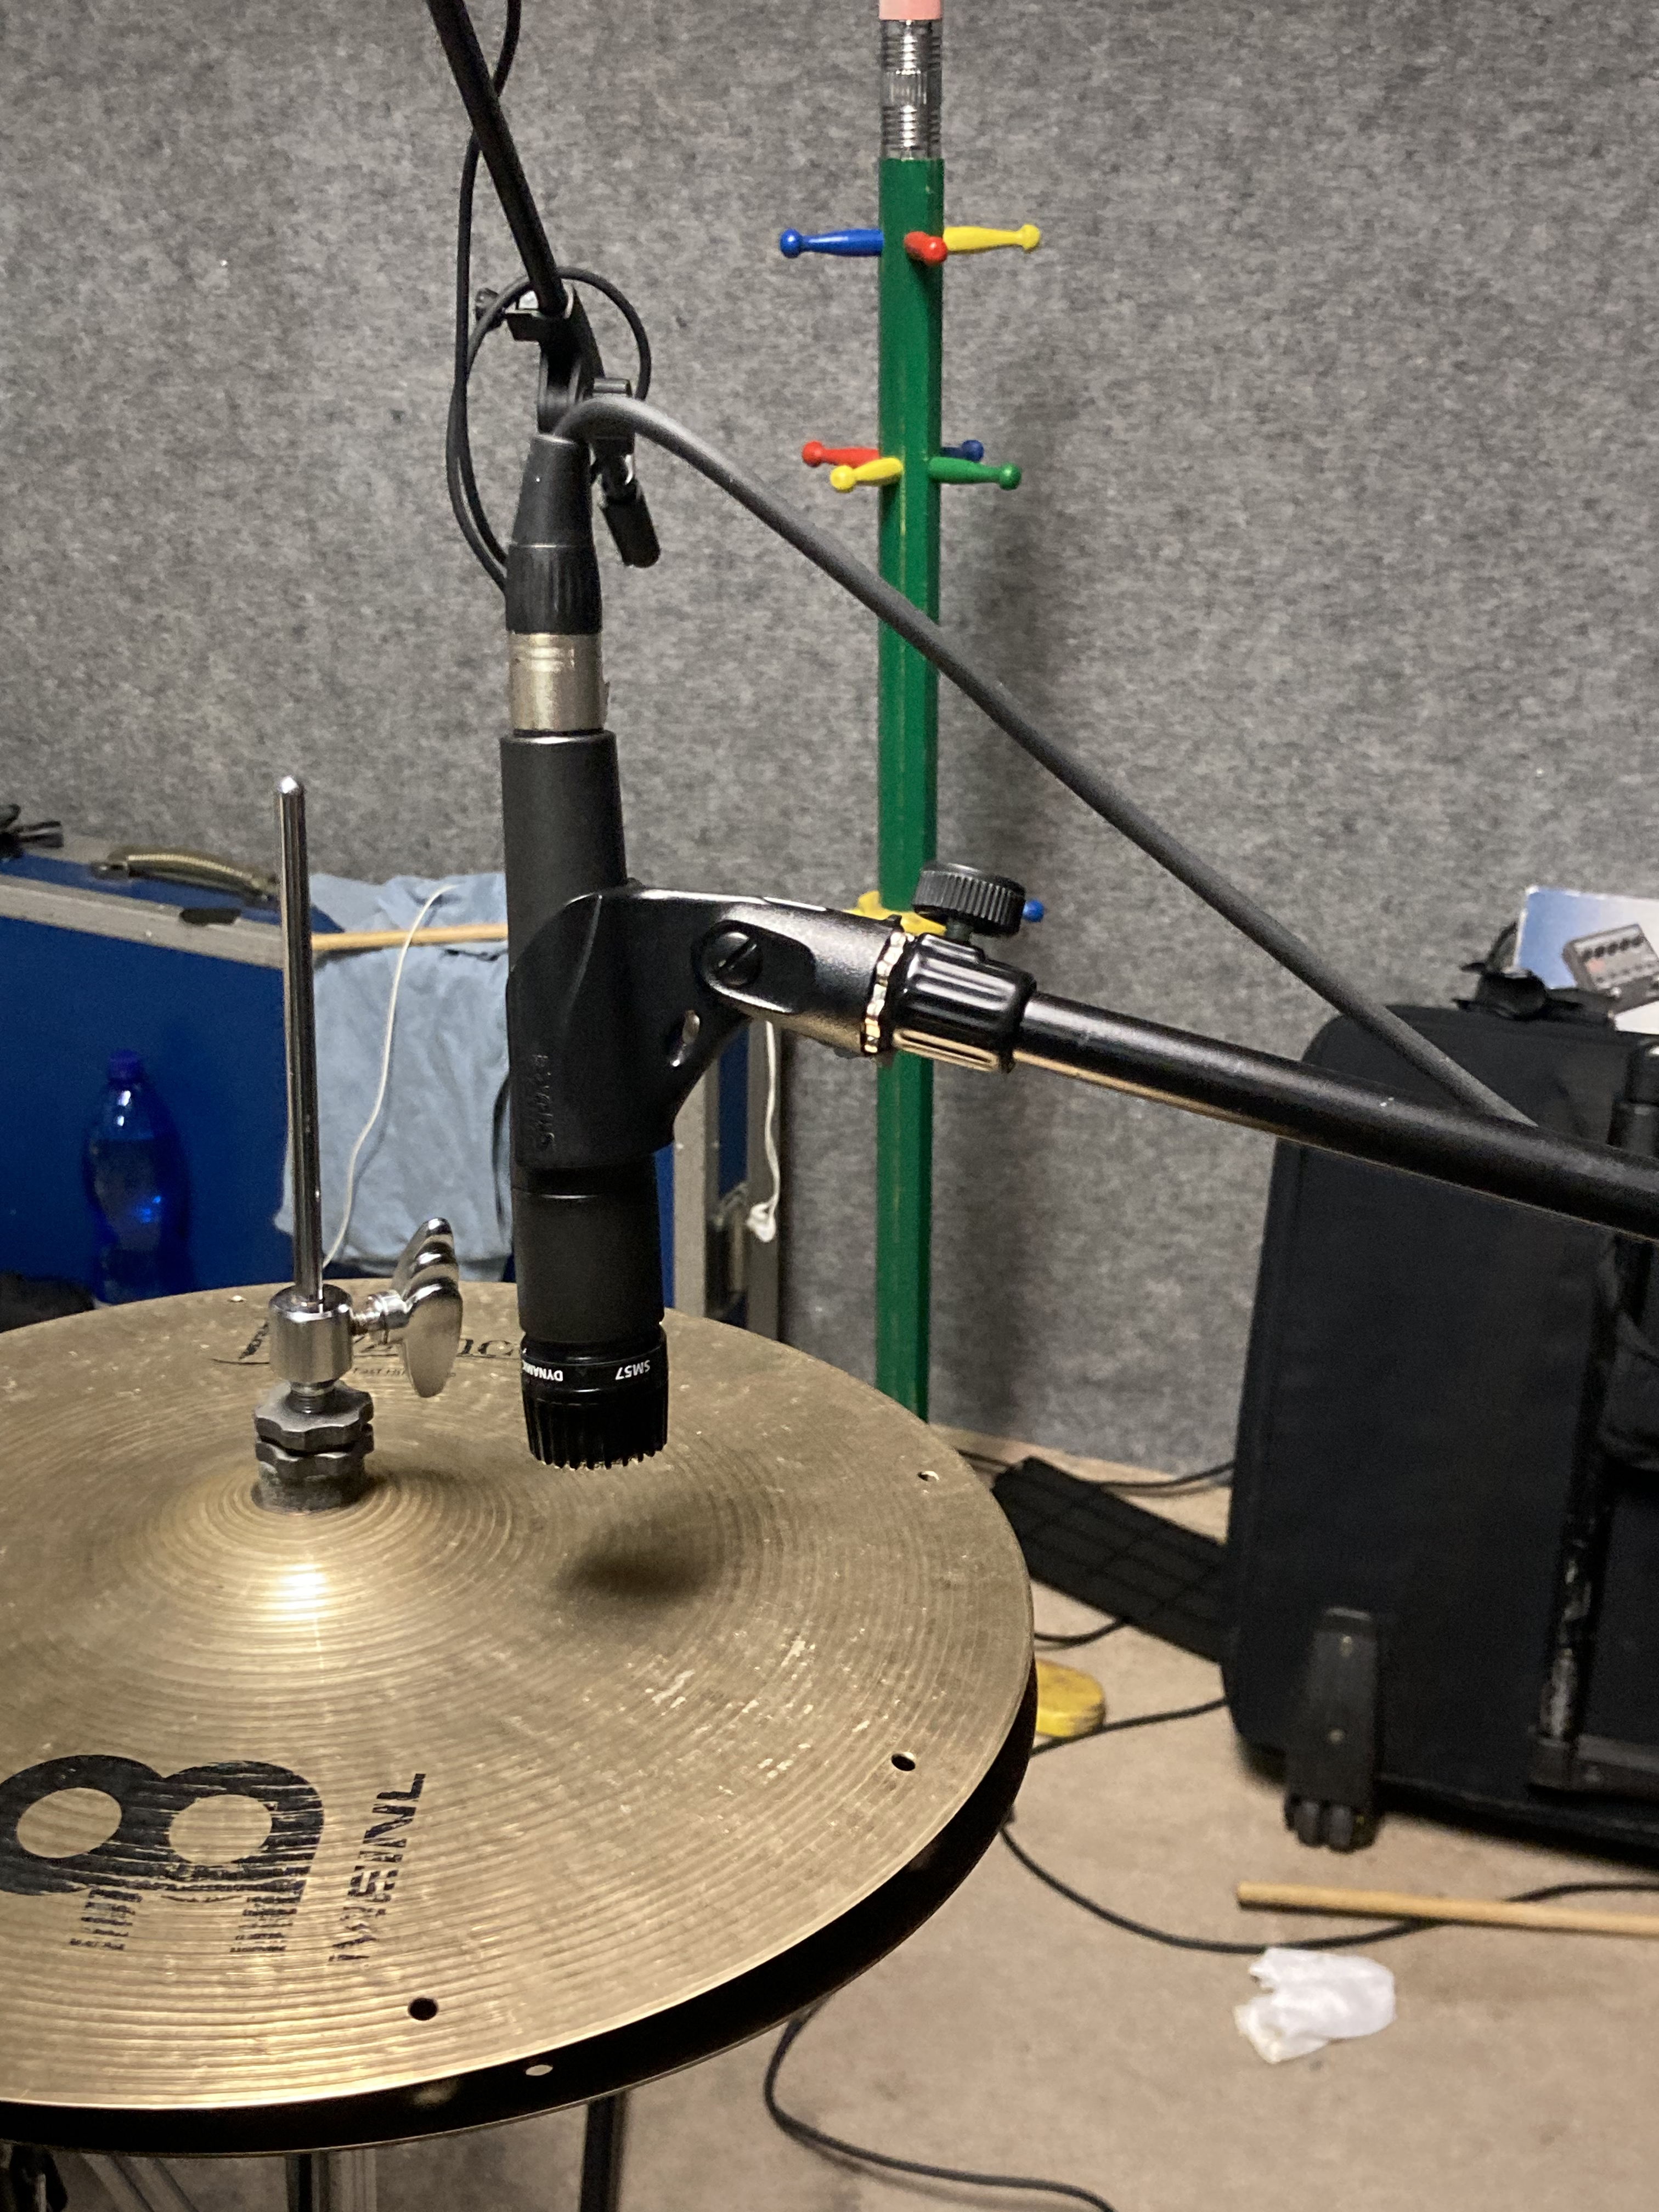
Moving to the cymbals, let's start from the hi-hat: I have used a dynamic mike (a Shure SM57), but in other occasions I've used also a microcondenser: the microcondenser sounds even better, but it has more bleed issues, so it depends on the genre, on how strong the drummer hits it and so on. 
For the positioning, I have chosen to place it on the opposite side of the snare and in vertical, to try to reduce the bleed. 


These last 3 pics are all for the last element: the overhead microphones. I have used those 2 microcondenser mikes to pick up the cymbals in the 2 sides of the drumkit, pointing left and right according to the position of the drummer, and directing them towards the center of the cymbal group, with the right microphone that picks up also the ride.

The final result was quite clean, and it offered me some good material to work on, especially the snare.

Let me know what do you think about this microphoning technique in the comments below! 

Thanks to my friend Zoltan for the pics!


CLICK HERE FOR PART 1/2


Become fan of this blog on Facebook! Share it and contact us to collaborate!!
Saturday, February 11, 2023

How to mic a drumkit with snare top and bottom (part 1/2)


Hello everyone and welcome to this week's article!

Today we're going to see a method to record a drumkit slightly different from the version proposed in our main "How to mic a drumkit" article, and somehow this can be considered also a more advanced version of it: we're going to see how to microphone a drumkit with 8 mikes, but with 2 toms instead of 3 (including the floor tom) and using 2 microphones for the snare: one for the top and one for the bottom. In this article I will elaborate also a bit more regarding the mic positioning.


Let's start with the kick: this time I did not push the mic too deep, trying to get close to the beater: I've realized that the low end generated by the proximity effect is higher than the "click" of the beater I wanted to catch, so I backed the microphone leaving it half inside the hole and half out (yes, it sounds like a horrible pun, but there's nothing I can do about it :D): this way the lows are under control and the microphone picks up better also the top end, the result is a more balanced and usable tone.


Moving to the toms, this is something I've tried to apply the same principle to the toms and to the snare: to try to aim the mike towards a point close to the border of the shell, because pointing towards the center makes the tone too dark, but if you aim too much to the border you get too much ring, so you need to try until you find the right balance between the ring and a nice, full but bright tom sound (this applies also to the floor tom). Also, don't forget that since usually dynamic microphones are cardioids, it's good to point the back of the microphone towards the loudest cymbals, because the back of the microphone is the part that picks up less sound, so it will limit the bleed.


Finally, talking about the snare, as you can see from the pic, I've decided to use a Shure Beta58a for the top and a Shure SM57 for the bottom, trying to create a 90 degrees angle. 
Both microphones were pointing towards a similar spot, like the one for the toms: close to the border, but not to the point that it picks up too much ring note, if the ring was too strong, I was moving the snare top mike 1cm more towards the center, until eventually I've found the sweet spot.
In this case the snare top mike takes the body of the snare sound and some ring, while the snare bottom one is aimed to pick up the top end, the grainier, more explosive part of the tone. 
This way we have a lot of flexibility when creating our snare tone during the mixing phase.


CLICK HERE FOR PART 2/2


Become fan of this blog on Facebook! Share it and contact us to collaborate!!

Saturday, January 21, 2023

REAMPING: How to reamp a guitar track (part 2/2)

 CLICK HERE FOR PART 1/2

Following the instructions of the first part of the article, the setup should be ready: we should have a nice DI track, recorded at the right level, and all the routing in the DAW and in the sound interface software should be correctly set up: our guitar track is ready to be reamped!


4) Now we need to go from the audio interface output we have chosen for the DI track (in our example we have choosen the output n.3) into a REAMP BOX. What is a reamp box? It's a box that does exactly the opposite of a DI box: it takes a balanced signal (the one that comes out from the audio interface) and turns into an unbalanced one, meaning one at the right level to be fed into a guitar amp input (if you want you can also pass through pedals etc. before entering the amp, but remember that the signal comes out from the reamp box usually with more noise compared to if it would come straight from a guitar). Once the reamp box is plugged into the amp, we need to adjust the output level of the box in order to be the as loud as if it would be coming directly from a guitar.

5) Once the cables are plugged, it's time to press play on the DAW and let the song go: if we have done everything correctly, from the DAW monitors (or headphones) we should be able to hear the whole song, and from the amp we should be hearing only the correct guitar track. 
This is the moment in which we find the right tone in the amp, so let's take our time in finding the right gain, eq, effects etc.


6) The last step is obviously the microphonation one: once we have a tone we like, we can start having fun, trying out all the microphones we have until we find the best combination and positioning among them (click here for some ideas), and the only remaining thing to do is to press record and enjoy our reamped track!

I hope this was helpful!


CLICK HERE FOR PART 1/2


Become fan of this blog on Facebook! Share it and contact us to collaborate!!

Saturday, January 14, 2023

REAMPING: How to reamp a guitar track (part 1/2)

 Hello and welcome to this week's article!

Few years ago we have done an article about reamping (click here for the main article): now it's time to see in detail, step by step, how to reamp a guitar track.

The first thing to lear is how to route your channels to make sure that from the output channel of your audio interface only the guitar di signal comes out, while from your headphones or monitors you can keep listening to the whole project.

First off: you need to have in your project a DI guitar track, then, since usually all the tracks go to the stereo out, we need to steer this one away from there and make it go to a separate exit of our DAW and audio interface, an exit in which only our guitar track will be.

Today we're using the Presonus Studio One interface, but it should work more or less like this in every DAW: 

1) Go to song setup -> inputs and outputs and create a new mono output besides the standard stereo one (I've called it reamp, and the M there stands for Mono).


I have chosen "LINE 3", which means that when I assign the DI track to the output named "reamp" it will be listenable only by plugging the headphones to the output n.3 of my audio interface.

2) While all the tracks are assigned by default to the main out, meaning they will all end up into the stereo out buss (in the pic it's called "principale", because my interface is in Italian), I have changed the out for my DI track into "reamp", the new output we have created.


3) now we need to assign this "reamp" out to the physical out n.3 in my audio interface (you can assign it obviously to any out you want, just make sure the DAW and the output you're using in your interface are matching), and in order to do this we need to open the control panel of our audio interface, in my case it's the Saffire Mix Control from Focusrite.


In this case I assign "DAW 3" (which means the output to which we have routed our DI track in the DAW, which as you can see in the first picture is the out called "line 3") and we assign it in the "line output 3" slot (red arrow in the bottom of the pic), and we also assign it to a channel in the virtual mixer (red arrow in the top).

Now if everything went according to the plan, if we plug the headphones to the main headphone out of the audio interface we should be able to hear all the tracks going into the stereo buss EXCEPT the guitar DI one, while if we plug them into the out n.3 we should be able to hear only our DI track.

Once this complex preparation phase is done, it's TIME TO REAMP!


CLICK HERE FOR PART 2/2


Become fan of this blog on Facebook! Share it and contact us to collaborate!!
 

Saturday, January 7, 2023

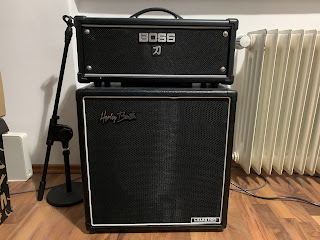
Review: Harley Benton G112 Vintage


Hello everyone and welcome to this week's article!

I was looking for a small 1x12 cabinet for my travel setup (which consists in a Boss Katana 100 head), and my idea was to look for one with a Celestion Vintage 30 speaker, which is a standard for rock and metal.
The V30 speaker is particularly good for hard music because it can handle high wattages (60w nominal power rating) and because it provides a strong low-mid thump and mid range, which is particularly suited for lower tunings and palm muting.

While browsing around for cabinets, I've stumbled upon the Harley Benton G112 Vintage, a cabinet made in China and imported from the German Shop/Distributor Thomann, and given the surprisingly low price (lower than the price of the speaker itself if bought separately!) I have decided to give it a try.

The cabinet is black, of the size of the average 1x12 combo amp, not particularly light nor heavy, and with a half-open back to retain a bit more low end, which is useful since it's quite small.
On the back there is only one input, 8 ohm mono, which makes it not very flexible but it's the most common choice and it's supported by basically every amp, and in general this cabinet has a pleasant look and feels solid in build quality. 

How does it sound?
It sounds quite well! The speaker has the unmistakable V30 tone, and the Katana head roars through it with no problems, plus this setup makes also a very good companion for home recording, because the Katana head can be used also at lower wattages, and the cabinet lends itself nicely for any type of microphoning, also at low volumes.

Do I suggest it? Hell yeah! At this price it has basically no competitors, and I don't see any reason not to buy one.

Thumbs up! 


Specs taken from the website:


- Equipment: 1x12" Celestion Vintage 30 speaker

- Power rating: 60 W

- Impedance: 8 Ohm

- 18 mm Poplar plywood housing

- Half-open rear wall

- Rearloaded

- Trim strip

- Carrying handle

- Dimensions (W x H x D): 460 x 470 x 299 mm

Saturday, December 31, 2022

Different types of microphones for guitar and common combinations among them


Hello everyone and welcome to this week's article!

This time we're going to check out the various types of microphones we can use to mic a guitar amp, and this article can be considered as a supplement to the basic one "how to mic a guitar amp".

Assuming that you have read our basic article and you are familiar with how the horizontal distance from the dustcap of the speaker can make the tone brighter or darker, here are 3 common mic combinations that you can try, it doesn't matter the exact microphone model you have (for example whether the condenser one is small or large diaphragm: the sound will be different, but the basic concept stays the same). 

First off: why to combine two microphones? Because every type of microphone has a different eq curve, curve that changes also according to the position from the speaker, so it happens often that one single microphone is not capable of capturing a tone that is full and has for example a detailed high end and a full low-mid area: most of the times trying to make everything with one mike leads to a compromise that can be good, but that rarely can be perfect in every aspect.
Using two microphones therefore allows us to use one for the low-mid area and one for the high end, and we can also use the faders in the DAW to choose the right balance.

Second note: every microphone type has different requirements, for example a ribbon microphone is fragile if left in front of high sound pressure, the ribbon can bend or break due to the air movement, so you need to use a volume that is not too high if you are using it for close miking, or a condenser microphone needs phantom power, but you need to make sure that the phantom is deactivated in the channel of the ribbon one, otherwise the ribbon microphone will break.
It's a good idea in the studio, when using condenser and/or ribbon microphones not to crank the amp volume too much, it's sufficient to arrive to see a little bit of movement in the speaker.


Dynamic + Condenser = this is a popular choice both in modern music and in the '70s one: the dynamic microphone should be placed straight or angled, mid way between the dustcap and the edge of the speaker and its role is to pick up the mids and low-end: the more it's pointed towards the edge of the speaker, the darker it will get. The distance should be a couple of centimeters from the grill cloth. 
The Condenser microphone instead will take high end, so it should be pointing towards the center of the dustcap, and its distance should be regulated according to the mic sensitivity: if it's very sensitive it's better to keep it 20-30cm from the speaker, maybe even 50, while if it sounds too thin or you hear that there is too much room in the track (and if the amp volume is not too high), it can be put as close as 5-10cm. If you feel like the tone capture by the condenser mic is clipping, lower the gain in the audio interface and/or back it off a few cm. 

Dynamic + Ribbon = this tone was used a lot in the '80s and produces a warm tone with a nasal mid-range (for example imagine a Guns'n Roses type of mid-range), the most classic technique is to put the ribbon microphone 2 to 10cm from the grill cloth pointing towards the dust cap, and the dynamic one right on the side, so that it points towards the edge of the dustcap, at around 2 cm from the grill cloth. This will create 2 complementary tones, with the ribbon microphone that is more dark and nasal to provide the body (but also part of the high end) and the dynamic one to bring more detail in the high end. 

Condenser + Ribbon = this is a less used technique but it's pretty interesting: the ribbon microphone placed as in the Dynamic + Ribbon technique, but pointing a bit more towards the edge of the dustcap (so the sound is even meatier), and the condenser one placed like described in the Dynamic + Condenser technique, to take all the detail in the top end. This technique is a bit more complicated but if handled well it can create very good results.


Finally, it's important when doing mic placement to check the phase coherence in order to avoid cancellations! Click here for a dedicated article.


And you? Do you know other good microphoning techniques? Let us know in the comments!


Become fan of this blog on Facebook! Share it and contact us to collaborate!!

Saturday, December 24, 2022

Ribbon microphones: what are they and how they work


Hello everyone and welcome to this week's article!

Today were going to talk about ribbon microphones.
Ribbon microphones are a a particular type of microphone that use a thin ribbon of a conductive material (for example aluminum) between the poles of a magnet to record the sound, and this particular construction allows it to sound very pleasant, round and sensitive to certain frequencies, but at the same time makes it quite fragile, therefore it needs to be handled with more attention than a regular dynamic mike.

Ribbon microphones were first introduced in the early '20s of the past century, and they were praised to be the type of microphone more suited to reproduce the whole spectrum of human hearing (20hz to 20khz), and with the time, as per the other types of microphones, technology evolved and today we can count on microphones that are less fragile than before (although it's still importato to observe caution when handling them), made with more solid and durable materials, with various types of sensitivity pattern (cardioid, hypercardioid, variable, uni-directional, bi-directional and so on), active and passive.

The active ones work more like condenser microphones, meaning that they need an energy source in order to work (never use the phantom power on a passive ribbon microphone or some internal component will break!!), while the passive ones work like dynamic mikes, and are used often to microphone brass instruments and guitar amplifiers.

Speaking of guitar amplifiers, there are 2 main techniques which are very popular in recording studios, and that involve both a ribbon microphone (such as the famous Royer R-121) and the omnipresent Shure SM57: the most famous is the one in which the ribbon microphone is in vertical in front of the center of the dustcap, next to the speaker grill (to take the high end of the tone, since it doesn't sound too brittle or harsh), and with the SM57 pointing towards the edge of the dustcap, so it's slightly off the center and this way it captures a bit more the body of the tone.

The second technique is the other way around: the SM57 points towards the center of the speaker, essentially capturing the high end of the amp, and the ribbon mike is slightly away from the speaker grill (we're talking around 15cm) and off-center, so it will take more the low-mids part of the guitar tone.

Either way, it's essential to check out the position between the two microphones to minimize phase cancellation, so if you notice there are a lot of phase issues try moving one of the 2 microphones in order to align the phase, plus if the guitar amp volume is extremely high, it could be also a good idea to tilt slightly the ribbon mike off axis in order to prevent the sound pressure to hit the ribbon too frontally.

Obviously these are just a couple of the thousands of possible mic placements, but they are a good starting point when trying out a ribbon microphone.


Become fan of this blog on Facebook! Share it and contact us to collaborate!!

Saturday, December 17, 2022

How to randomize the velocity of a drum sampler to make it more realistic


Hello and welcome to this week's article!

Today we're talking a bit more in depth about a topic we have already mentioned in our article about MIDI dynamics: the fastest way to make more realistic a MIDI drum track, by randomizing the velocity.

One of the many parameters you can assign to a MIDI note is the Velocity: it's a value from 0 to 127 (like the other MIDI parameters) and it is meant to mimic the natural strength variations in our playing; 
basically it represents how soft or hard we hit a note, that can be a keyboard or any other instrument.

Now, when talking about virtual drumkits, nowadays there are on the market very extensive drum libraries, that arrive to dozens of Gb in size, and the larger is the library the more samples there are, also for a single drum part: a single snare, for example, can have 15, or even 25 velocity layers, that represent various intensities a drummer can hit it.

The more the velocity layers the more the sampler will sound realistic when playing it live, but even if we are writing down the drum MIDI parts note by note with the mouse, modifying the velocity it's quite important to make the drums sound less robotic, to the point that some drum sampler have also a "humanizer" function inside that randomizes a bit the dynamic variations in strenght of the hits.

Some DAW have directly the humanize function, for example in Studio One you just highlight the MIDI part you want to make more realistic, right click and you can choose "Humanize" or "Humanize Less" to reduce the effect, but the humanize function will also slightly move the MIDI notes in timing, so if you want only to randomize the velocity you need, while the same notes are still selected, to pull down the Action menu again and select Restore Timing.

In other DAW, where no humanize function is available instead, you can usually choose the MIDI part and under the Velocity section there should be a randomize velocity function that lets you dial in a minimum and maximum value, and the notes will be with a randomized velocity within that range.
What range to choose? It depends on 2 things: the genre (if the dynamic excursion is huge, like there are press roll parts, it's better to randomize them separately or write them note by note) and the number of velocity layers in the sampler. If you have some pre-made MIDI groove for that specific sampler you can load some and take note of the minimum and maximum velocity of each drum part, so you can be sure that the range you enter will have samples available, otherwise you can be conservative and choose quite a narrow range, in the area that sounds better to your ears (for example 70 to 90, or 80 to 100).


Become fan of this blog on Facebook! Share it and contact us to collaborate!!

Saturday, December 10, 2022

Review: Audio Assault Blacksun (with video sample)


Hello and welcome to this week's article!
Today we're going to review an amp sim from Audio Assault that is currently free if you are member of the AA mailing list: the BlackSun!

The BlackSun is an emulation of a Blackstar head, probably an HT Club 50 (even if it's not explicitly stated), which is a 2 channel tube head with EL34 tubes.
Among the other features, this plugin has a preset manager with several presets ranging from clean to hi gain, a "double track sim" which emulates recording 2 layers of the same riff, the "my amp" function which generates some slight hardware variation unique for every registered plugin, and it has a knob that is typical for Blackstar amps, (in the original amps is called ISF, in this plugin it's called Mode), which lets you choose between a "Marshall" and a "Mesa Boogie" voicing and all the gradients in between;
a "Marshall" voicing will mean a tone with more pronounced upper mid range, slightly more nasal and twangy, while a "Mesa Boogie" one will be a with a stronger low-end and more scooped mids, that lets out more high end than upper mids.

As per the other recent Audio Assault amp sims, also this one features a very nice, resizable GUI, 3 stompboxes (Gate, Booster and Tube Screamer), an FX Rack in the loop with Graphic EQ, Delay, Reverb and Chorus, a Dual Cab Loader which lets you also move around the microphones with any ir (thanks to a system of eq and envelope filters I imagine), and many other features.

How does it sound? It sounds very well, in my opinion, especially with the "mode" knob in the "Marshall" side, because a problem that I have found in some Audio Assault amp sim is the fact that they are all very "American sounding", for modern metal, while this one can replicate very well a British tone that is also hi-gain, tight and defined, and that it has that nice clear upper midrange.

This makes Blacksun one of the most versatile Audio Assault amp simulators, because the original head itself is extremely versatile, it has a lot of gain and tonal possibilities and I think anyone should definitely try it, also because they just released a pack with '80s style presets which adds a lot of fun to this amp.

Thumbs up!


Specs:

- 2 channels

- 3 stompboxes (gate, boost and screamer)

- Dual Cab loader with IRs created by Seacow cabs

- FX rack with eq, delay, reverb and chorus

- preset manager

- mode knob to change the flavor of the amp


Become fan of this blog on Facebook! Share it and contact us to collaborate!!

Saturday, December 3, 2022

Using a wah in fixed position to boost a solo


Hello everyone and welcome to this week's article!

Today we're going to talk about a particular way to make a solo cut through, which is used by many musicians: to emphasize only a certain mid range area which is obtained by using a wah in fixed position.

Let's start by reminding what is a wah (click here for a dedicated article with free vst plugins): it's an envelope filter, which means basically an equalization filter that can be fixed or controllable in real time via a pedal control and that according to its settings will emphasize a certain area of the midrange of the guitar tone adding gain and harmonics.

A wah boosts and cuts a certain area of the midrange of a guitar to make it cut more through the mix, and when it's used with the foot control in a tasteful way it can really make the guitar almost talk, or cry like a baby (the famous Dunlop CryBaby is called like that for this reason).
This mid range boost, which is usually a rather narrow range between the 300 and the 3000hz makes the sound from dark to very bright and harmonic rich, but the most usual application when doing distorted solos is usually when it's kept around the central position, which means a boost around 1000-1500hz, which makes the tone very honky and recognizable.

This nasal tone is the core of the solos of many famous guitarists, which sometimes just set the wah in a certain way without even moving it, just to have that distincitve mid range, boxy boost when doing solos, and the tone obtained can be heard for example in many QueenIn Flames or Blind Guardian songs, bands very different among themselves which make extensive use of the wah both moving the filter in real time or leaving it in a fixed position according to the song, and this use of the wah also just in a fixed position as mid boost has led to the creation of several stompboxes which replicate just that: a wah with a fixed setting (for example the Dunlop CryBaby Q-Zone or the Magnetic Effects Midphoria).

When trying to recreate this type of effect in the studio when we don't have a wah at hand we can start with a not too steep high pass and low pass filter, between 300 and 3000hz, then we can draw a bell quite wide, around 1200hz and add some db in this area according to taste.
Obviously these settings are just a starting point, feel free to play with the filters amplitude and the position of the bell according to the tone you are looking for, and if you feel like you lose a bit too much sparkle try to be less aggressive with the high end roll-off or maybe to add a harmonic exciter.

I hope this was helpful!


Become fan of this blog on Facebook! Share it and contact us to collaborate!!

Saturday, November 26, 2022

Audio Assault - Bulldog (with video sample)


Hello everyone and welcome to this week's article!

Today we are going to review the latest virtual amplifier by Audio Assault: the Bulldog!

The Bulldog is the amp sim of a VHT Pitbull, a 3 channel hi-gain tube head famous for being very tight and aggressive (and also very expensive).

This virtual amp is quite a faithful representation of the original one and offers several solutions to make it a very flexible suite: a tuner, 3 stompboxes (gate, booster and a Tube Screamer emulation), a rack with 3 effects (a graphic eq, a delay and a reverb), a preset manager, the function "my amp" which modifies slightly the tone in a way that is unique for every purchase (like it happens with real amps, which usually never sounds exactly the same among them) and a handful of IRs made just for this amp.
The fact that there are few IRs compared to other Audio Assault amp sims can be due to the fact the one I'm trying it's a beta version, but if it's not, I consider this a good thing anyway, since they clearly took time to pick the IRs that sounds the best with this amp rather than put hundreds of them and forcing the player to navigate for hours between them before finding one that suits the head.

Among the other features it's worth to mention the resizable UI and the double track emulation, which doubles the track you are recording in order to make it sound like there is a second layer, and it can be a good songwriting tool, to put down ideas faster and that already have that "wall of sound" feeling.

How does it sound?

This is clearly one of the best and most usable Audio Assault amps, they have improved constantly through time and in this specific one I must say (also thanks to a good choice of impulses) the low end is very present and in focus (which is something not very common in amp sims, realistic low mids that doesn't sound muddy) and the highs are very clear and defined, making this a very usable amp simulator.

This plugin is good not only for high-gain metal tones (in terms of pure metal sound Sigma is still superior), but also for clean and crunchy ones, which sound very warm and credible, and I can only suggest anyone interested to check it out.

Thumbs up!


Specs taken from the website:


- 3 channels

- 3 stompboxes: gate, booster and Tube Screamer

- Fx rack with eq, delay and reverb

- Tuner

- L, R and Stereo Routing

- 2x, 4x, 8x, 16x Oversampling options

- 2 Graphics engine

- My Amp Feature for an unique tone

- Double track emulation

- Presets system


Become fan of this blog on Facebook! Share it and contact us to collaborate!!

Saturday, November 19, 2022

Track Grouping Cheatsheet


Hello everyone and welcome to this week's article!
Today we're going to check out a visual representation of the track grouping of an average project, I have borrowed the idea from a similar cheatsheet I've found posted from a user (thank you, Toby!) on the URM Academy Facebook page, but I have modified it a bit according to my workflow and naming conventions.
I consider this visual representation an useful tool because it tidies up the concepts we have been already analyzing in detail in our home recording main article, and in our project preparation one.

Let's start by saying that this picture is by no mean a fixed rule, you can modify it according to your workflow, remove and add all the tracks/groups you need etc, but it could be considered as a solid starting point if you're new in mixing a project with with a full rock band and don't know where to start. 

Let's begin from the left, here you have all the individual tracks: almost all of them are routed into subgroups and/or groups, this is made to make you process the tracks in groups, if possible, thus saving time and computer resources (as opposed to processing them individually), and when you have your sounds right and the relative balance within the group, you can literally just move the group faders to balance the main parts of the mix among them (eventually balancing only the drums, bass, guitars, vocals, synths and fx groups, just 6 faders, is much easier and gives us a much better perspective once the ground work is done).

Why the Sub Drops etc... track is alone and goes straight into the Stereo Out? Because we don't want it to be part of the "Fake Master", we don't want all the low end of these tracks to hijack completely the buss comp creating a horrible pump effect. Eventually some pump effect can still appear when this track will reach the limiter, and we will have to be good in finding the right volume for it to arrive to the limiter without creating problems.

I hope this was helpful!


Become fan of this blog on Facebook! Share it and contact us to collaborate!!
 

Saturday, November 12, 2022

Review: Fender '65 Deluxe Reverb


Hello everyone and welcome to this week's article!

Today we're going to review one of the most historical guitar amps of all times: the Fender '65 Deluxe Reverb!

The '65 Deluxe Reverb is one of the most iconic amps ever produced by Fender, and its latest reissue is still on sale today from the producer, hand assembled in the USA with premium components.
This amp, historically, is suited for Country, Blues, Classic Rock, but in general its clean tones have been loved and used by guitarists from all genres.

The amp features 4 inputs: 2 for the normal channel and 2 for the vibrato one (the difference between the 2 inputs is that input 1 is 6db louder, so you should use it fwith lower output guitars, while input 2 should be used with high output ones).
Instead of the usual overdrive channel, channel 2 is a vibrato channel, meaning that has a vibrato effect always on, and there is also (only for this second channel) a reverb, with the knob in the amp acting as dry/wet mix control. 
Finally, to be noted that in the eq section there is no mid control, only bass and treble.

How does it sound? Let's start by saying that like all amps of this type, even if it's a small 22w combo, this amp is LOUD, and the more you crank it towards the breakup, the more the sound becomes harmonically rich (althought a bit noisy) and it can enter also into mild overdrive territories.
The basic clean channel is the definition of Fender clean: squeaky clean, with a lot of attack and top end but at the same time with deep bass, a combination that makes it sound almost like a piano, while the vibrato channel is similar to the clean one but with an adjustable vibrato effect, which can be useful in certain genres, and a very good reverb.
If you need only the reverb you can lower the vibrato settings to the minimum, until it basically disappears, and you will remain with another normal channel to which you can apply the reverb.

Regardless of the genre you play, this is an amp I suggest anyone to try, because it's the history of guitar and because it's featured in countless records, from the '60s up to now, and it lets us peek into a time in which in the amps there were different features, and maybe guitarists also had different needs.

Thumbs up!


Specs:


- 2 Channels

- Power 22 W

- Equipped with: 1x 12" Jensen C12K speaker, 8 Ohm

- Controls for: Volume, treble, bass, reverb, speed, intensity

- 4 Inputs - 2 per channel

- Speaker out

- Spring reverb

- Tube Vibrato

- 4 Preamp tubes: 12AX7

- 2 Preamp tubes: 12AT7

- 2 Power tubes: 6V6

- Dimensions (D x W x H): 24.1 x 62.2 x 44.5 cm

Saturday, November 5, 2022

All the types of eq explained

Hello everyone and welcome to this week's article!

Today we're going to deep dive in a subject already touched in our main equalization article, but explaining more the differences between the various types of equalization and which one to use according to the needs.


Shelving eq and Filter eq: those are the simplest of all, and can be either with an analog interface (with knobs) or with some graphic representation, but they all recreate the fact that you can choose an eq shape (in this case a filter or a shelf), choose the frequency range where to put it and dial in how many dB to add or subtract to that area (if you are filtering, obviously you're bringing to zero db the sound from a certain point up or down). By concept, for shelf we mean that for example from a certain area (for example 1khz) up (or down) we will start adding or removing gain, and this usually happens with a not too steep curve, to not make the change too unnatural.


Graphic eq: this is a way to intervene in the frequency areas with more precision, and also this type of eq comes from the analog world. Initially the spectrum was split in just few areas, like 4, then they started adding more and more faders to the units up to 30 bands or more. You can intervene with the individual bands (the more the number of faders, the smaller the frequency range for each band), and the models with more bands obviously allow much more surgical correction, to the point that the most precise ones are used mostly for room correction, meaning to clean up specific resonance areas of a sound. When you have plugin recreation of those old units, usually they try also to recreate the way they used to colour the sound, for example adding some harmonic content or some saturation.


Parametric eq: the way those equalizer works is an evolution of the shelving ones, basically they work the same way but they let you choose among more shapes (for example a bell shape), decide the Q (which is the width of the shape) and add usually many of those shapes, also making them interact-overlap among each other (this is a specific more of the digital ones, like the Fabfilter pro Q). This type of eq allows much more control and by consequence also much more possibility to make mistakes, but it's one of the few that for example allows you to make a wide boost in a frequency area and then, in that same area create several very narrow cuts to tame the resonances.
The most feature-rich digital ones allows also to make corrections only in the part of the sound panned in the middle or only to the one on the sides (MID-SIDE eq) or to affect only one of the 2 sides of the stereo field.


Dynamic eq: this is much closer to a multiband compressor than to an equalization, meaning that it's dependent on the level of the input. With a dynamic eq you can for example choose an eq bell and decide to reduce the gain on a certain area: the gain reduction in that area will be higher when the gain is higher in that specific area and vice versa. This is used to tame certain frequencies that spike only every now and then like the sibilant consonants in a vocal track.

Note that all these types of eq mentioned are "archetypes", but in the reality of today, especially in the digital domain, you will find equalizers which offers a combination of those functions (for example there can be an eq which can also offer dynamic eq functions, or a graphic eq which offers also a frequency analyzer and mid-side features, and so on).


Become fan of this blog on Facebook! Share it and contact us to collaborate!! 

Saturday, October 29, 2022

Review: Blackstar ID:Core Stereo 100


Hello and welcome to this week's article!

Today we're going to review a very interesting digital combo, which is an evolution of the smaller ID Core range (which are up to 40w, while these 2 larger ones are 100 and 150w) and which have as main difference the fact that instead of having small full range speakers, these ones have 2x10 guitar speakers: the Blackstar ID:Core Stereo 100!

The choice of full range speakers or 10 inches speakers may set somebody off, since the standard for guitar is a 12 inches one, but this is a compromise solution to fit 2 speakers in a smaller, lightweight package (which is almost as small as the size of a regular 1x12 combo) and allowing the player to take full advantage of the "Super Wide Stereo" technology, which lets us playback an mp3 (via Aux) and practice along with it listening in stereo, while most of the practice combo amps, having just 1 speaker, lets you playback only in mono.
This speaker choice targets the amp towards practicing musicians which play more at home along with mp3s than for live musicians, since live there is usually more need of a 12 inch speaker to have all the low end thump, which is less strong in a 10 inch one, but at the same time with 100w there is enough power to stay on top of a live drumkit, also for rehearsals.

Besides the speaker, the amp offers 6 voicing controls, which range from clean to the most extreme hi-gain, a looper up to 30 seconds, 12 effects, a software suite for in-depth editing, usb recording, speaker emulated out and so on, making the ID:Core a Swiss army knife for the practicing musician, and the 100 and 150w versions have enough power to play live with no problems, all in a convenient 12.5kg package.

How does it sound? It sounds quite well! Blackstar Amps, especially for high gain, are some of the best sounding practicing amps, with musical mids and the proprietary ISF, Infinite shape feature, which is a knob that lets you pass from a US type of gain to a British one and everything in between.
The cleans are good and the distortions sounds almost "produced"; in this the amp the tone in general is less raw and "in your face" than a Boss Katana, but it sounds brighter (maybe also because of the speaker choice) and very pleasant, it just has a different grain and you'll have to compare them to find which one is more suited for you.

Thumbs up!


Specs taken from the website:


- 100W (SUPER WIDE STEREO 2x50W)

- 6 Blackstar voices

- Looper with 30 seconds record time and infinite overdubs

- Patented ISF control

- 12 vintage style effects including Octaver

- Store up to 36 sounds

- USB Audio

- FREE INSIDER software

- Stereo MP3/Line In

Saturday, October 22, 2022

Pre-count, Pre-roll and auto punch! What are they and why you should use them.


Hello everyone and welcome to this week's article!

Today we're going to talk about three functions, present in basically any DAW, which are fundamental when recording any instrument, and that sometimes gets overlooked: pre-count, pre-roll and the auto punch.

Pre-roll is something that comes from the analog world, it means that the track would start playing, making you hear what you have already recorded, and then the engineer would, by pressing a button, start recording you on the fly.
Today we can automate this function, and order to enable it in Studio One you need to press the O hotkey, or click on the pre-roll icon (the first arrow in the pic).
Then, by clicking on the wench icon (the second arrow in the pic), which brings us to the metronome setup menu, we can simply tick on or off the pre-roll and/enter the number of bars to play before starting recording. 
This way, once you will hit record, first it will make you listen to the previous 2 bars, so you can start already playing along with them, and then it will start recording automatically at the right point.

From that same menu you can activate also the Pre-count, which means that before playing or recording it will first play a set amount of metronome bars, to be ready with the right tempo before starting recording.
This function is used if you're starting your track from zero, so you don't have any part to play as pre-roll.

How does the computer know exactly, especially if it starts from 2 bars before, where to start recording and where to stop?
You need to select the area with the mouse, the recording will start and stop exactly within the selected part of the track.

Auto punch instead is another function that puts you in and out of record, as the track is playing back, meaning that you need to have the record button assigned to a hotkey (in Studio One is by default the NumPad * button), and as you play a track you can press the * key in real time to start recording, and press it again to stop recording, all without stopping the track from playback, which can be useful especially when tracking vocals, if you want to re-do just a word here and there without interrupting too much the flow.

I hope this was helpful!


Become fan of this blog on Facebook! Share it and contact us to collaborate!! 

Saturday, October 15, 2022

Review: Rivera Clubster 25 112


Hello everyone and welcome to this week's article!
Today we're going to talk about a legendary combo produced by Rivera amps in 2009, of which the latest version is still today on sale: the Rivera Clubster 25 112!

Rivera Amplifiers comes from the mind of Paul Rivera, a technician which worked also for Fender before opening his own brand, and today Rivera amps offers a full lineup of tube amplifiers which are known for their uncompromised sound and build quality.

The Clubster serie has several versions, 25w, 40w, with a 10 inches speaker and a 12 one, and the one I'm reviewing today is the 25w, 12" one.
The Rivera Clubster is a 2 channels tube amp, with several push-pull knobs in the eq to shape it furthermore and a spring reverb, but the most surprising thing is the volume and headroom: thanks to its oversized transformer, even the 25w version is more than capable of staying well above a rock drumkit, both in rehearsals room and live, all in a compact combo format.
The amp features 2 preamp tubes and 2 6V6 power amp ones, and immediately after switching it on you can feel the tube tone, which is loud, mid rangey, in your face and full of harmonics. 
The clean channel is really clean and chimey, and it has quite a lot of headroom considering it's 25w (obviously if you need even more headroom you must switch to the 40w version), and the high gain one has a very credible tone: balanced, pleasant and that it sounds almost "mix ready".
The overdrive channel can easily deliver heavier tones for genres such as hard rock without the need of a booster; a booster is necessary if you need the type of tightness used in death or thrash metal, though.
This said, I have seen a band using it also to play Dream Theater style (without a booster), with a 7 strings, and the tone was very similar to the Mesa one used by Petrucci: mid rangey, creamy and with a very loud power-amp roar.

The version currently on sale is the Clubster Royale Recording, which features also a loadbox integrated and speaker emulated output, so that you can record also bypassing the speaker, among the other new features, but the original Clubster soul is still there.

Still today a great, uncompromise sounding amp! Thumbs up!


Specs taken from the website:


- Channel 1 controls: Volume, bass (pull switch for boost), middle, treble, master

- Channel 2 controls: Volume (pull switch for channel selection), treble (pull switch for bright), bass

- Common front-panel inputs and controls: 1/4″ High Gain input, 1/4″ footswitch input, reverb control, presence control, power on/off switch

- Rear-panel inputs and outputs: 1/4″ effects loop send, 1/4″ effects loop return, 1/4″ line output, 1/4″ 

- external speaker output

- Preamp tubes: Two 12AX7A

- Output tubes: Two 6V6GT

- Output power: 25 watts RMS into 8 ohms

- Speaker: 12” Celestion 70/80

- Footswitch functions: Channel switching, reverb on/off (footswitch is included)

- Reverb: Accutronics® 3-spring reverb

- Height: 19.25″ (w/feet)

- Width: 18.25″

- Depth: 12″

- Weight: 38 lbs

- Cabinet material: 5/8″-thick plywood

- Construction: Dadoed joints

Saturday, October 8, 2022

Pre fader listen vs post fader listen


Hello and welcome to this week's article!

Today we're going to check out an important concept which is part of a proper gain staging setup, a simple check that will save us from having unwanted distortion into our tracks, the pre fader listen!.

By default, all the DAWS are set on post fader metering, meaning that if we are moving the volume fader in one channel, the meter of that channel (and the stereo buss) will rise or reduce accordingly.

The problem is that if the volume fader has as consequence the rise of the volume until a track clips, we don't know whether that channel, that recorded track with all the plugins processing it, is really already in distortion (or if it's too low in volume) BEFORE moving the volume fader (in that case we will have to check out whether there is some plugin that is clipping the signal or if the actual track is clipping).

To solve this problem we can choose in the DAW options (basically in every DAW) pre fader listen (something that is present also in many physical mixers), which swaps the position of the volume fader and the meter in single tracks or in the whole mixer.

What does this mean practically? It means that the volume fader still does its job, raising and lowering the volume, but the meter will keep showing us, regardless of the volume we decided, how hot is the audio track before entering in the volume fader, and whether the signal is already in clip or not (sometimes for example it's already in clip because the track is passing through some plugin, like some Compressor which maybe has a little too much make up gain).

By verifying the input and output level of all tracks (and therefore of all plugins on each track) we can make sure no track is clipping, and this is essential to perform a proper gain staging, thus having a perfeclty clear song.

One final note: press only one PFL button at a time, otherwise the meter will show the combination of all the active channels and plugins (in the stereo buss) and you won't know which one is too high or too low.

I hope this was helpful!


Become fan of this blog on Facebook! Share it and contact us to collaborate!! 

Saturday, October 1, 2022

Review: Fender Mustang GTX50


Hello and welcome to this week's article!

Today we're going to review a combo amp which came out in 2020, but that actually is (along with the LT50) the latest iteration of Fender's take on digital combos, with presets, amp simulators, effects etc all in the box, all at an affordable price: the Mustang GTX50.

The Mustang serie is the low price digital serie of amps produced by Fender and aimed to the beginners, and even if I don't remember the year the first amp of this serie was produced, I think it was 2010 max, I know several updated versions have been put in the market, and this GTX keeps on building on top of the original one.

In 2020 Fender proposed 2 versions of the Mustang: the LT ones, (25 and 50w), which cost around 100$ less than the GTX and offer a stripped down software with less editing possibilities and it's aimed to the beginner guitarists and the GTX one, which offers a full range of in-depth parameter editing, and many more presets and tools to carve your sound.

I had the chance of trying the GTX (unfortunately without using the app Fender TONE, which is new for this version and allows the player to edit the presets and download new ones from the cloud), and I must say I have been impressed by the amount of bells and whistles this small amp features: bluetooth, fx loop, lcd color screen, 200 presets, usb to turn the amp into an audio interface, aux, headphone out, wi-fi, Celestion speaker and so on, plus the design is quite cute.

How does it sound? Well, it depends on the genre you need: if you like the typical Fender cleans, which are ringing, chimey, with emphasis on the high frequencies, this amp is quite good in recreating them. Moving towards more crunch territories though, the amp starts showing its flaws, which makes it (and its previous iterations) more similar to the Line6 Spider: the distortions sound quite digital, meaning compressed, scooped, scratchy, and the higher the gain, the more the problem is noticeable.

The conclusion is that this is a good bang for the buck if you like clean tones or slightly overdriven, but if you're looking for high gain simulations, there are much better candidates around, for example the Boss Katana or the Blackstar ones, unless you are in for a long and deep tone editing session.


Thumbs down!


Specs taken from the website:


- New models include: Fender classics like the Blues Jr and Vibro King, as well as other amplifers including JC Clean and Silver Jubilee

- New effects include: Models of classic Overdrive, Fuzz, Delay and Pitch Shift effects

- Newly-designed stage-ready cabinet and cosmetics

- 12-inch Celestion® guitar speaker

- 200 onboard user presets that can be modified for any style of music

- All-new Fender TONE 3.0 for iOS and Android for deep editing, preset browsing from the Fender Tone community, preset back-up and restore, and more

- Upgraded seven-button footswitch (optional) features individual bank up and down functions and easy effects selection, as well as a tap tempo and 60-second looper


Become fan of this blog on Facebook! Share it and contact us to collaborate!!