Labels

BASS (50) COMPRESSION (32) DRUMS (45) EFFECTS (49) EQUALIZATION (30) GUITAR (112) HOME RECORDING (95) IMPULSES (21) INTERVIEWS (19) KARAOKE (1) LIVE (10) MASTERING (61) MIDI (21) MIXING (179) REVIEWS (156) SAMPLES (69) SONGWRITING (19) SYNTH (3) VOCALS (31)

Saturday, August 8, 2020

Review: Seymour Duncan Distortion (with video sample)


Hello and welcome to this week's article!
Today we're going to review one of the most iconic passive humbucking pickups (click here for a dedicated article) from Seymour Duncan: the SH-6 Distortion.

The Duncan Distortion (that you can hear on a Stratocaster in the song linked above) is a High Output humbucker with a large Ceramic magnet, which grants the guitar a high gain tone but with tight and controlled low end (something harder to achieve with an Alnico one, in which the low frequencies are usually less focused with high gain).

This pickup is used/has been used by several famous guitarists, such as Max Cavalera from Sepultura and Soulfly, Wayne Static from Static X, Karl Sanders from Nile, Ola Englund, Phil X from Bon Jovi, Adam Jones from Tool, many other bands as Papa Roach, Limp Bizkit, Dokken and countless other musicians, and it's considered from many a standard for rock and metal, especially for a certain type of '90s distortion.

The pickup is used mostly in the bridge position, but someone uses it also in the neck position to give clarity to the solos, and there is also some guitar that comes straight from the factory with a dual Distortion setup.

My take on this pickup is this: the pickup sounds quite bright, it doesn't have a huge amount of low end and it's quite high-mid focused, which is good, but it's one of those types of pickups that needs to be balanced with a dark sounding guitar, like a Les Paul or some other with a thick mahogany body, because on a light guitar (such as a Stratocaster or a Randy Rhoads) the highs can become "ice picky", meaning that the attack of the distorted tone when using a palm muting sounds very prominent, like an ice-pick.
To solve this is necessary to intervene with the eq, introducing some of low pass filter or using the treble control, but in general it's a positive thing to have a fast, chugging attack, because on the pickups that doesn't have enough of it, it's impossible to introduce it later with the eq.

The conclusion is that this pickup is quite situational: if you're looking for a nice (slightly scooped) mid range, a good (but not super high) output, a raspy attack and a controlled low end to play hard rock, grunge, punk and a lot of '90s metal, this pickup is for you.
If you are instead looking for something beefier, more modern and with more body (or more output), there are also many other pickups to try, even remaining in the Seymour Duncan lineup.

Thumbs 45° up!


Become fan of this blog on Facebook! Share it and contact us to collaborate!!

Saturday, August 1, 2020

What specs to check out before buying an audio interface


Hello and welcome to this week's article!

This article is to be considered as an expansion of our article about audio interfaces (click here to check it out), and this time we're going to check out a bit more in depth the tech specs.

As per every other tech product, also audio interfaces are placed in the market in various price ranges, which can go from 60 bucks to well over one thousand (or more), and yet they all promise the same thing: to record an input signal, convert it from analog to digital and send it to your computer, usually letting you also plug an output device such as monitors or headphones.

Why the price difference then?
Because of two things: the specs and the support.
Let's start from the support: when choosing an audio interface support gets often overlooked, but it actually is even more important than the specs themselves.
You should thing about keeping the interface for several years, and if the support is not good, if there are bugs they will not get solved (and often in the first release of the drivers there is something to be fixed), or if you change your os (for example to a newer version of windows) and the support is not good, it's very likey that they will not relese the drivers for the new version, making the interface unusable (and this happens more often than you think with cheaper brands, which is infuriating).

Moving to the specs, here are some to check out when choosing an interface (obviously there are many more than these, but these are the most important ones):


Sample rate: this number tells you how often the device checks out the audio signal and records its amplitude, so it's basically the speed at which the analog sound is rendered into a digital signal.
The most common sample rates are 44.1 khz, 48 khz, 96 khz, 192 khz.
In case of 96khz for example, the interface "photographs" the incoming sound 96'000 times per second. 
These sample rates also tell us the maximum frequency the interface can record, which is the half of the sample rate number (for example in the case of 44.1 khz is 22.05 khz, which is still more than the usual human hearing, which ranges from 20 hz to 20 khz).
When recording music, it's suggestable to have an interface capable of recording at least at 48 khz.

Frequency response: this shows you the sensitivity of the device, and tells you the range on which it operates, for example 20 hz to 20 khz. This number is also modified from other factors, for example microphones, which can create a funnel effect.

Bit depth: it tells you how many bits are used for each sample recorded, and this influences the dynamic range of the interface. Having more bits means being able to record with higher dynamic ranges (therefore with a lower noise floor). 
16 bit: it's possible to achieve a dynamic range (theoretical) of 96 db
24 bit: it's possible to achieve a dynamic range (theoretical) of 144 db

Dynamic range: it's the ratio between the loudest signal that can be recorded by the interface and the noise floor, and it's measured in dbA (decibel A-weighted). 
The more dynamic range there is, the lesser the risk (when for example compressing the signal) to raise the noise floor to a point that will ruin our sound. 
In order to avoid these problems, it's suggested to use an interface with a dynamic range of 100 or more dbA.

Gain: often in the interface specs there is written something like "Gain 0-60db", which means that the gain knob can amplify the incoming audio signal up to 60db. If the preamp applies a minimum of +10db to a maximum of +60db, the Gain Range (the distance between the minimum and the maximum) is 50db.

EIN: it's the equivalent input noise, a way of stating the preamplifier noise of a recording device. When recording from a source such a microphone, the signal needs to pass through a preamp in order to raise to the desired gain level, and each preamp has a certain amount of intrinsic noise, which should be as low as possible.
Ein is measured in dbU (which are always negative numbers), and the lower the number, the lower the noise.
EIN is a good system to compare the noise level of two different interfaces, to see which one is better (for example -130 dbu is considered a very low noise preamp, while from -120 dbu up the noise starts becoming noticeable).

I hope this was helpful!


Saturday, July 25, 2020

Review: Audio Assault aIR Impulse Rack (with video sample)


Hello everyone and welcome to this week's article!
Today we're going to check out a new cabinet simulator (click here for a dedicated article about them) that loads impulse responses: Audio Assault aIR Impulse Rack!

aIr Impulse Rack is a nice little stereo plugin that acts as a Swiss army knife for impulse responses: it lets you load as many IRs as you want and mix them through a mix knob, then modify them through a serie of rack modules (an Equalizer, a High Shelf and a Low Shelf module, a Cab focus unit, a Phase/delay, a Volume/Pan unit, a Frequency analyzer, a Hi/Lo pass filter and a Normalizer).

The amazing thing of this plugin, that sets it aside from all the other similar products, it's the fact that you can create your stereo chain freely, save it in the internal preset manager, and even export your own custom ir with all the processing applied.
This is a feature that almost no other cabinet simulator has and that actually opens to an infinite landscape of possibilities: instead of having to load your favourite IRs and having to mix them, eq  them etc, you can export all the chain already processed into a single impulse and save your cpu and time for the following sessions.

I had a lot of fun experimenting with this plugin, and considering also that it comes already with a set of good impulse responses (those present also in other Audio Assault amp simulators), in few minutes I've been able to come up with the tone in the sample you can hear (only using free plugins: NaLex Gerbert and Ignite TSB-1).
Considering the features and the price, which is very good, I can only suggest you to try it out and have some fun.

Thumbs up!


- Unlimited IR Slots

- Fully Parametric EQ

- Serial/Parallel IR Processing

- 10 IR Processing Modules

- IR Export Function

- IR Folder Shortcuts

- Presets store any IRs used

Saturday, July 18, 2020

Free VST guitar amp sims article updated with 23 new plugins!


Hello and welcome to this week's article!

Today I have reviewed and updated one of our most popular articles: the one about free amp simulators, adding 23 new free Vst amps (all of which sound very good).

You can check out the updated article here!

Let us know what you think about it and whether are there more good free Guitar Amp VSTs we haven't mentioned yet!

Saturday, July 11, 2020

The history of Korg Pandora


Hello and welcome to this week's article!
Today we're going to make another review of a legacy product that is on its way of blowing 25 candles and that yet is still on the market in its latest version: the legendary Korg Pandora!

During the '90s digital effects for guitar were seen like something almost exoteric, something that belonged to the complicated racks of the guitar heroes and that costed a fortune, but then Zoom came and started offering digital multi effects for dirt cheap (and very low sound quality), and basically revolutionized the market letting anyone have all the most common tones and effects in the world.

Korg is a Japanese brand famous for making music instruments since the '60s, but it's today most known for being one of the main producers of synths and samplers (they even invented the synth+sampler hybrids in 1988), and in 1996 they decided to propose a small tool that in some way revolutionized the concept of playing guitar: the Pandora.

The Pandora is a small device, more or less of the size of a smartphone, battery powered, that offered 60 effects (up to 4 at the same time), various amp tones (from clean to extremely high gain), cab simulator, a guitar input, a volume knob, some control and a headphone out.
This little thingy was so small, light and revolutionary that became hugely popular, every guitarist imagined himself rehearsing on the headphones in some public transport, or the night in the bedroom, and the price was not particularly high.

Sure, the sounds were bad, even worse than the ones in the cheaper Zoom 505, but the size and weight were surpassing any logical reasoning.
The following year a second version, the Pandora PX-2 came out, featuring 32 drum patters with adjustable tempo, and this one was the real killer application, the ultimate guitar exercising machine.

Three years later, in the year 2000, Korg expanded its amp simulator array launching a serie called Toneworks (click here for the review of the Korg Ampworks), which was intended to be a large family of products for guitarists and bassists, and that featured the Pandora PX-3, a version for guitar and one for bass.
The only problem of this serie was the timing: the Toneworks serie was still sounding like in the '90s, when in 1998 the Line6 POD came out, changing the game forever.

In the following years there have been even more iterations of the Pandora, such as the PX-4 and then they started incorporating the Pandora tones and effects in their portable recording stations.

The current version, which is still on sale on their website, is the 2011 iteration, the Pandora Mini, which is even smaller, lighter and features 200 presets (some also for bass), 158 effects and tones (7 of which usable at the same time), 100 drum patterns, tuner and so on, and it's still today a great idea if you want to have an awesome little practice gadget always in the pocket of your guitar!!

Thumbs up (if you don't care too much about the sound quality)!


Become fan of this blog on Facebook! Share it and contact us to collaborate!!

Saturday, July 4, 2020

Everything you need to know about effects part 4/4: Distortions!


CLICK HERE FOR PART 1/4: Fx routing, in studio and live!

CLICK HERE FOR PART 2/4: Reverb and Modulations 1

CLICK HERE FOR PART 3/4: Reverb and Modulations 2


Once we have gone through all the most common application of modulation effects, it's time to pass to what is considerable the most important type of effect that we can apply to a tone, an effect which has taken an instrument, the electric guitar, and made it the most important, influential and beloved one of the 20th century: the distortion, in all of its forms.

The overdriven guitar tone is born by mistake: bands were using tube amps in the '50s and '60s, and back then there wasn't even a real PA to amplify them, so guitarists, especially those that were playing in big arenas, had to crank them at the maximum volume.
The signal passing through the tube circuits ended up saturating them, and the result was a distorted tone, with lots of additional harmonics and some compression that the guitarists found out to be exciting, to make the tone edgier and even easier to play: the tube overdrive sound was born.
The audio enhancement provided by tubes is still today often used in studios, to add a track, especially if digital, the liveliness typical of the vintage hardware.

Not too long after the discovery of the tube overdriven sound, guitarists (especially the pioneer Jimi Hendrix) started to ask themselves "where do we go from here? How can I make my tone ever more extreme?", and producers started working tirelessly to replicate the distorted sound of a tube amp full volume in a stompbox, and came up with an infinity of solutions, which can be divided in 3 macro groups: fuzz, overdrive and distortion.

The first models to hit the market (end of the '50s/early '60s) was the fuzz: it is a type of pedal that takes the original sound and distorts it, but in a very unique and specific way, by taking the sinusoidal wave and turning it into a squared one.
The result is a gritty tone with lots of sustain, impossible to obtain with a regular amp, and it was the staple of riffs that made the history of rock, such as Rolling Stones' (I can't get no) Satisfaction and most of the Jimi Hendrix and Pink Floyd solos, just to name a few.

An overdrive is a pedal that recreates (sometimes also by using a tube) the saturation of a tube amp full volume without the need of pushing it (thus without ruining the tubes): the effect is a slight distortion, more attack, less low mids, lots of extra harmonics and some extra compression; this is a great pedal to boost our amp and even out its frequencies, and it's often a solution used when recording.

Another effect that can be considered a more extreme evolution of the overdrive is the distortion.
The distortion is a pedal aimed not to boost an overdrive channel of an amplifier but to replace it, going directly into the clean one, since it's capable of producing high levels of gain, or bypassing the preamp altogether and going direcly into the power amp.
Distortions have seen their moment of maximum popularity in the '80s, with many guitar heroes (such as Steve Vai) and classic heavy metal bands (like Judas Priest) using them regularly, and still today they are very popular in certain genres such as grunge or alternative rock.

Finally, a sound can be further degraded or modified creatively in an infinite amount of other ways, and there are today pedals to do practically everything, but there are still a couple of effects that are worth to be mentioned here: the harmonic exciters, which takes certain harmonics of our tone and emphasizes them, which is a cool way for example to add brightness to a sound without messing too much with the eq (click here for an article about harmonic exciters with free VST plugins) and the bit crusher, which on the other hand takes a sound (usually vocals, or drums, or a bass) and degrades it by reducing the bit depth, creating the feeling that the sound comes through some vintage gear.

Saturday, June 27, 2020

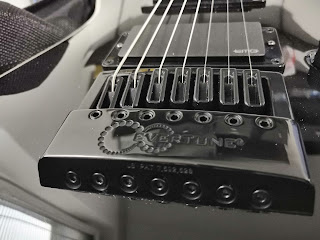
Review: Evertune Bridge


Hello and welcome to this week's article!

The Evertune bridge is a type of bridge that requires a specific casing from the guitar, which consists in a wide hole on both sides (similar to the one for a Floyd Rose but larger) and even by removing quite a lot of wood it adds a large amount of weight to the guitar. 
Said like this it sounds quite bad, but the truth is that if you go to see the guitars that are actually used on stage or in studio from many of the most famous professional guitarists of today, odds are there is an Evertune.

Why? Because this type of bridge delivers an impossible promise: to not having to tune your guitar (almost) ever again.
This magic is achieved by a system that uses a concept similar to the one of the Floyd Rose but that reverses it: with a Floyd Rose you move the bridge to alter the pitch of the strings, and then a set of springs placed in the back of the guitar tries to put the bridge back into its original position, while with an Evertune, once you set perfectly everything, there will be a spring that will pull independently each string, forcing it to stay to its original tuning.

The result is a guitar that takes around 60/90minutes to set up perfectly (instead of the 15/30 of a normal one), but that stays in perfect tune indefinitely, and that even by changing strings, as long as the gauge doesn't change, doesn't need any additional mantainance.


What are the practical outcomes of this? Is it worthy? It is, definitely: in my case, even if my guitars are usually set up and intonated by a luthier or by myself after every string change (because I like to use different gauges every now and then), I had the feeling (and you notice it mostly when recording) that for the first time I have used a guitar without any micro-pitch alteration throughout the whole fretboard (I have it in my LTD MH-1007 ET).

How does it work? It's easier done practically than explained, and for the details I suggest you to check out the videos in the Evertune website, but the concept is this: for each string there is a saddle in the bridge, and the saddle can be in 3 positions: Zone 1 (when there is not enough tension), Zone 2 (when the string is in tune but not bendable, because every bending is compensated), and Zone 3 (when the note starts to become sharp and the string is bendable). 
After you have found the right pitch and intonation, you should turn the peg in the headstock until the string arrives to Zone 3, and then loosen it a bit until it goes back to the perfect pitch: this way you will have the ideal pitch AND the string will be bendable, it's called "the sweet spot".

You can even decide which string can be bent and which not, for example you can set it so that the lower strings are unbendable, and that are basically used only for rhythm part with perfect pitch, while the higher strings will be freely bendable (you can even adjust the bending sensitivity!), and this versatility is really stunning, so my bottom line is that this bridge is probably the first real useful guitar innovation since decades.


Become fan of this blog on Facebook! Share it and contact us to collaborate!!