Saturday, June 27, 2020

Review: Evertune Bridge


Hello and welcome to this week's article!

The Evertune bridge is a type of bridge that requires a specific casing from the guitar, which consists in a wide hole on both sides (similar to the one for a Floyd Rose but larger) and even by removing quite a lot of wood it adds a large amount of weight to the guitar. 
Said like this it sounds quite bad, but the truth is that if you go to see the guitars that are actually used on stage or in studio from many of the most famous professional guitarists of today, odds are there is an Evertune.

Why? Because this type of bridge delivers an impossible promise: to not having to tune your guitar (almost) ever again.
This magic is achieved by a system that uses a concept similar to the one of the Floyd Rose but that reverses it: with a Floyd Rose you move the bridge to alter the pitch of the strings, and then a set of springs placed in the back of the guitar tries to put the bridge back into its original position, while with an Evertune, once you set perfectly everything, there will be a spring that will pull independently each string, forcing it to stay to its original tuning.

The result is a guitar that takes around 60/90minutes to set up perfectly (instead of the 15/30 of a normal one), but that stays in perfect tune indefinitely, and that even by changing strings, as long as the gauge doesn't change, doesn't need any additional mantainance.


What are the practical outcomes of this? Is it worthy? It is, definitely: in my case, even if my guitars are usually set up and intonated by a luthier or by myself after every string change (because I like to use different gauges every now and then), I had the feeling (and you notice it mostly when recording) that for the first time I have used a guitar without any micro-pitch alteration throughout the whole fretboard (I have it in my LTD MH-1007 ET).

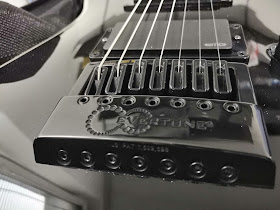
How does it work? It's easier done practically than explained, and for the details I suggest you to check out the videos in the Evertune website, but the concept is this: for each string there is a saddle in the bridge, and the saddle can be in 3 positions: Zone 1 (when there is not enough tension), Zone 2 (when the string is in tune but not bendable, because every bending is compensated), and Zone 3 (when the note starts to become sharp and the string is bendable). 
After you have found the right pitch and intonation, you should turn the peg in the headstock until the string arrives to Zone 3, and then loosen it a bit until it goes back to the perfect pitch: this way you will have the ideal pitch AND the string will be bendable, it's called "the sweet spot".

You can even decide which string can be bent and which not, for example you can set it so that the lower strings are unbendable, and that are basically used only for rhythm part with perfect pitch, while the higher strings will be freely bendable (you can even adjust the bending sensitivity!), and this versatility is really stunning, so my bottom line is that this bridge is probably the first real useful guitar innovation since decades.


Become fan of this blog on Facebook! Share it and contact us to collaborate!!

Saturday, June 20, 2020

Everything you need to know about effects part 3/4: Reverb and Modulations 2


CLICK HERE FOR PART 1/4: Fx routing, in studio and live!

CLICK HERE FOR PART 2/4: Reverb and Modulations 1

CLICK HERE FOR PART 4/4: Distortions!


We have started digging into the modulation world, but the reality is that it's a rabbit hole with infinite variants, so what we're going to do today is to finish covering the modulation macro areas that are most known and used.

Let's start today with the one that can be considered probably the king of all modulations, the most used and in my opinion more useful and pleasant sounding: the delay.
In the '50s sound engineers were looking for a way to recreate the echo effect that one would obtain by yelling for example inside of a cave, with the soundwave bouncing around and coming back after a certain amount of time: the voice gets reflected and comes back to the listener summing up to the original one.

This effect is called echo, but with time the use of this echo in music became more and more creative, stemming many different types of echo, and today we refer as this type of effect as delay because we refer to the time distance from the original source and its reflection. 

One of the coolest ways to use a delay when mixing is the so-called "slapback" delay, which is a delay with just one repetition of the original sound: this type of delay is particularly cool because it lends itself to being used in creative ways with the stereo field, for example sending one repetition left and one right in 2 slightly different moments or following 2 different time signatures, and this creates a sense of depth and 3d-like sound which can make our vocal or solo tracks really stand out.

Finally, delay is one of the most beloved guitar effects because it can seamlessly give depth and atmosphere to a clean guitar part or smoothness to a hi-gain solo, and countless pedal producers have put in the market their interpretation of this effect.

Proceeding with our walk in the world of modulations, the more we dig the more we can find interesting uses, and in this the guitarists of the '60s (for example Jimi Hendrix) have been exceptional innovators, looking always for new and creative ways to play with their sound. 
A classic example of this research is the tremolo, which emulates a fast, rhytmical opening and closure of the guitar volume knob, or the vibrato, which is a fast, rhytmical alteration of the sound pitch, or the rotary effect (also known as Leslie, from the name of its inventor), which consist into passing the sound through an actual speaker which rotates inside a box.

Now it's time to move to another group of modulation effects which are a bit less common, because they are more particular sounding and are used for quite specific purposes.
Let's start from the ring modulator: this effect would deserve a lot of space because its actual uses are infinite, but let's just define it broadly, by saying that it takes two different sounds (for example a guitar and a voice) and puts them in correlation, producing a sound that is the result of the interaction between the two (for example the famous "talking guitar" of Peter Frampton).
Then we have the huge world of pitch shifters, which are the processors that take one sound and produce a copy in a different pitch; among these, the most used are the octave, which creates a copy of the original tone shifted one octave below, and the harmonizer, which creates a harmony of the original tone, and usually it features an intelligent system which respects the right interval between the notes to make it musical.

One last modulation that is worth to be mentioned is the vocoder, which is a tool that takes a sound, usually a vocal track, and "passes it through a synth": this was a very popular effect in the '70s and '80s, used for example by Earth, Wind and Fire, but also more recently by Daft Punk (e.g. in the song Harder, Better, Faster.   

Saturday, June 13, 2020

How to use the marquee tool (or smart tool) for editing and automating


Hello everyone and welcome to this week's article!

Today we are talking about an useful tool for editing and doing automations that can make our workflow faster, which in some daw is called "marquee tool", in some other "smart tool", but it's the same thing, and we're going to show it through the Presonus Studio One interface.

Let's start with the editing: usually to edit a track we select the cut tool, click with the cursor in the beginning and ending part of the section we want to cut and then we drag it around wherever we need.
With the smart tool we need to select the symbol in the red square in the image, and to keep selected the arrow tool. This way if we click in the upper half of our audio track it will become a select tool, so we can highlight a certain part of the track, then we just double click on the selection and it will automatically be cut at the beginning and the end of the selection. If you sum up the time saved using this tool when editing a whole song, it will add up to minutes, or sometimes hours.
By dragging vertically the selected part from the lower half of the audio track, we can also automatically move it to another audio track, and all these things works also with multiple selections at the same time.

Moving to the automations, usually we open up our automations panel and start drawing points wherever we need, for example to raise and lower the volume of certain parts of our track.
In order to do the automations via the smart tool first we enable the automation we need, then we select the area we want to automate (we can do it also with multiple tracks at the same time), hover with the mouse in the upper part of the track until it turns into the shape of a bracket like this l-l and then simply drag the automation up and down in the selected area, it will automatically move it without the need of drawing points.

This marquee tool is very useful and time saving, give it a try!


Become fan of this blog on Facebook! Share it and contact us to collaborate!!

Saturday, June 6, 2020

Everything you need to know about effects part 2/4: Reverb and Modulations 1


CLICK HERE FOR PART 1/4: Fx routing, in studio and live!

CLICK HERE FOR PART 3/4: Reverb and Modulations 2

CLICK HERE FOR PART 4/4: Distortions!


Now that we have seen the basic rules of how effects work is time to start talking about some of the most important of them.
Let's start talking about envelope filters: those are basically a creative form of equalization that can be controlled in real time, moving through the spectrum while the sound is playing and creating a very interesting effect which shows one of its most famous uses in the Wah, a classic guitar effect, click here for a dedicated article with free vst plugins.

Besides the eq-based effects, it's definitely worth mentioning the reverb, one of the most important effects of all: it's an effect that mimics the bouncing of a sound in various ambients, which can be from small rooms to huge caves, and it's essential to add smoothness and realism to any tone and to make it less harsh; click here for an in-depth article about reverbs.
Reverb can be used not only to recreate ambience, but also for creative purposes, such as specific effects like a sound that is incoming (the inverse reverb effect, or preverb, like in the horror movies) or even to recreate a very accurate reproduction of the interaction between a cabinet and a microphone (click here for an article about impulse responses).

Moving towards the modulation effects, let's first start with the definition: they are filters that take a given signal and create a copy, with a given delay and pitch modification, to be summed with the original one, creating a wide range of different results.
Said this way it's a very wide definition, but modulations are the core (together with the reverb) of sound effects, and they are many and capable of obtaining very different result.

Let's start with the chorus: the chorus is a type of modulation that doubles the sound creating a slighly delayed (usually around 20ms) copy whose delay will not be stable but will keep on variating, oscillating 5ms more and less, plus the copy's pitch is slighly detuned, giving the impression that the copy is (in case of a Vocal track) another person singing along with the first one: not identical, but very similiar, and this effect is used to make the original sound wider and fatter.

Moving to other types of modulation, other two types which are quite important are flanger and phaser.
These 2 effects starts from the same idea: to split the signal in 2 copies and putting one of the 2 rhytmically out of phase with the other. The fact that this phase changes all the time following a certain tempo creates a very "sci-fi" effect, and the flanger takes this effect one step further by delaying the second sound copy and moving it back and forth in time, creating an even stronger phasing effect.