Saturday, April 30, 2016

Inserts in the FX channel (or "how to effect an effect")


Hello and welcome to this week's article!
This article must be intended as an appendix of our Fx channel track article.

As we have seen there is no need while mixing to load, for example, a reverb on each track we need to effect, first off because it's better to use a reverb with the same settings for all tracks to give the impression that all the instruments are played together in the same room at the same time, and also because good reverbs are very heavy on cpu.

How can we do it?
We can create an Fx Channel track, and feed it (via the SEND function) to the single tracks, so that we have a reverb for every track, and eventually another one specific for voice and/or guitar solos (or for other particular needs).

Now that we have our effect track ready, we might need some improvement on it, for example it may happen that just feeding the reverb on the snare track, it makes the snare too dark, too "80s".
In this case we could set an EQ in the insert of the fx track with a high pass filter up to 1khz, for example: this way the reverb will only work from 1khz up, and not affect the part of the sound below it.

This method of stacking processors in the same effect track may lead to some really creative use, for example we could add a compressor sidechained to the kick, so that it activates the reverb (or anything else) only when the kick is not playing.... The possibilities are really endless.
Please let us know your favourite fx sends inserts in the comments below!


Become fan of this blog on Facebook! Share it and contact us to collaborate!!

Monday, April 25, 2016

How to organize our vst library (a guide for dummies)


Hello and welcome to this week's article!
Today we are covering a topic which is crucial especially when installing a new DAW, because once we have our vst folder already clogged in rubbish it becomes almost impossible to make order.

In order to improve greatly our workflow, we need to be able to find exactly the plugin we need very quickly, and in order to do this we need to keep our vst folder clean and organized.

If you are a mix engineer that likes to experiment and follows websites like this one you will probably have downloaded a million plugins, some free and some paid, to try them out (and then you forgot to uninstall them, even if you'll never use them), because often producers have somehow this sort of software bulimia that makes them amass huge amounts of plugins.
The result is that probably you will have your vst folder full of dodgy .dll downloaded from some vst repository in 1998 with a crack that doesn't even work with your latest version of windows, but you'll never know because you never run it.

Here's a few guidelines that will make your workflow faster, your hard disc cleaner and your vst scan much quicker:

1) Know every plugin that's in your vst folder: this is the toughest: if you have 500 plugins, you will hardly know 10% of them. The others were just downloaded because they were free for a short time, and you never actually tried them. Try to spend a hour into opening all of them and trying them out to see if they will EVER be of any use of if you already have better alternatives (in which case, go to point 2).

2) Delete what you know you will never use: this is crucial. We know you all are serial hoarders, but a daw each time it loads up makes a plugin scan, and the more rubbish we have in our vst folder, the more time it will take. Come on, you use always the same good eq plugin for each track, it makes no sense to have 40 free equalizers programmed in visual basic that you will never use.

3) Organize the plugins in folders: many Daws (like Cubase) creates voices in the insert menu named after the folders you put your plugins into, so it's a good idea, instead of letting your plugins roam free in your vst folder, to create themed folders (like "Guitar Amp Simulators", "Compressors", "Equalizers" and so on), in order to not clog completely your interface and lose time looking for that plugin you didn't remember the name....but it was somewhere....around page 9 of the menu....

4) Know your tools (in advance): this is connected to point 1, and it consists into choosing the best plugins you have and learn how to master them, not more than 1 or 2 for each task, for example one equalizer, one compressor, etc... You have no idea of how a mix can improve, only by using tools that we completely master under every aspect.

5) Watch out for compatibility: We often change computer, or Windows distribution, and just drag and drop the vst folder from one pc to another, forgetting that some plugin only works with 32 bit architectures, others only with 64 bit, some are compatible with Windows Xp but not with Windows 8, and some do the opposite. That's why is a good idea to load each one of them (as suggested in point 1) and see if it works, every time we change operating system, in order to avoid bad surprises right when we need something the most.


Become fan of this blog on Facebook! Share it and contact us to collaborate!!

Sunday, April 17, 2016

Quad Tracking Guitars (a guide for dummies)


Hello and welcome to this week's article!
Today we will talk about an interesting topic concerning guitar recording: quad tracking.

Quad tracking is a technique in which you layer four guitar takes doing the exact same thing in order to increase the wall of sound; this is particularly useful in genres in which the guitar player doesn't need to do particularly articulated riffs, like nu metal or metalcore, and in which the impact is the most important aspect.

There are situations in which this technique is not suggested, such as the bands in which the riffing is particularly fast and precise (therefore the result, unless the guitarists are exceptionally good, can be unpleasantly "hazy"), or when the sound is too crowded, for example when there's an orchestra, or many backing vocals part; this is a technique purely conceived for guitar oriented music in which the musicians wants to maximize the impact.

How to do it: there are many different solutions to try if we want to quad track a guitar part.
First off we need to record the part in four different takes, otherwise just taking one single take and copying it four times would only result in an increase of its volume, and we would lose the layering effect that creates the wall of sound.

Then we would need to spatially place the takes using the PAN knob:  we could put the external guitars pretty wide, for example 90% left and 90% right, and the other 2 closer, for example 50% left and 50% right, but there is no fixed rule: someone prefers to keep the internal ones a bit farther away (like 80%), someone else prefers to keep them a bit closer to the center (like 25%), it really depends on how crowded is the centre of your mix.

Now it's time to listen to the four tracks playing together: are we satisfied of the result? Or maybe now the guitar wall of sound is too predominant in the mix?
If the latter we must obviously lower the volume until it's perfectly balanced, but we can also try to equalize our guitars differently, in a creative way: we could for example try to retain some of the low end in the tracks closer to the center and try to focus the more external tracks on the mids and highs: this could bring the mix to a less dense guitar parts, mantaining the layering effect typical of the quad tracking.

Another technique to make the sound fuller is to use an amp (or amp simulator) for the most external tracks and a different one for the internal ones.

Do you have other interesting quad tracking tips? Let us know in the comment section!


Become fan of this blog on Facebook! Share it and contact us to collaborate!!

Saturday, April 9, 2016

Guitar and bass Tuners! All the different types (with a free one inside!).


Hello and welcome to this week's article!
Today we will talk about a topic that is often overlooked:
Guitar and bass tuners!

A tuner is a device that takes the sound of our strings and determines the pitch, and then tells us what note it is, or how to adjust the tuning until we reach exactly the note we need.
Unless we have an absolute ear that lets us determine with perfect precision what note is our string and how to correct it, we absolutely need a tuner.

There are different types of tuner, but they all do the same job: help us in finding the right pitch for our strings. Let's check them out:


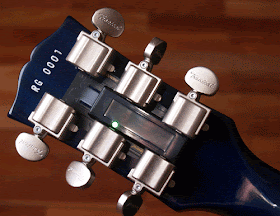
- Compact tuners: these are the most common, and can be both digital (like this one depicted above), or analog (like the one in the picture on top). They can usually receive the sound via jack input, or with an in-built microphone (this one is used to tune acoustic instruments).


- Clip Tuners: these gets attached to the guitar headstock with a clip, and they determine the pitch of the string played using the vibrations on the wood. This is the most compact and lightweight tuner of all, but sometimes it is a bit less accurate than the others, imho.


- Acoustic guitar in built tuner: many recent acoustic guitars feature a small tuner built within the body itself of the guitar, and it is usually paired with a pickup that lets us plug the acoustic guitar into an amp with a jack.


- Stompbox tuner: one of the most classic tuners of all, this one lets us mute the guitar while tuning on stage and it's particularly bright to be seen also in dim light conditions. The best ones are "true bypass", which means that doesn't deteriorate the guitar signal passing through them.


- Vst tuners: today many daw offer a vst tuner, in order to tune our instruments plugged into the audio interface. You can download for example GVST GTune, a good free vst tuner (with also the Hertz calibration, so that if you don't want to tune with the A at 440hz you can modify it, for example at 432hz).


These are the most used technologies so far.
Lately there have been attempt of simplifying the tuning system, but not always they turned out to be succesful:


Gibson experimented the Les Paul Robot, a guitar that can tune iself due to motorized locking tuners, but it didn't have much success due to its extremely high price and the fact that the technology was very fragile, and Peavey presented the Peavey AT serie, that uses a form of Autotune in order to digitally correct the tuning of the strings. 
The downside of this technology is the fact that the strings actually remains out of tune, only the output pitch is digitally corrected, therefore the result is that after a while the string will have, even if it sounds in tune, a weird tension.

Our hope is, looking at it by a real utility point of view, that someday every amp will have a small in built tuner, because that would be really useful and make the guitar and bass player's life easier.


Become fan of this blog on Facebook! Share it and contact us to collaborate!!

Saturday, April 2, 2016

How does compression work (with practical cases)


Hello and welcome to this week's article!
Today we will try to understand how compression work, in a much deeper level than how we've seen before, because the idea is to stop using presets as much as we can, and to do every step of sound sculpting - mixing with a purpose, with the complete awareness and control of what we are doing.

As we can see in the image, that wave (let's imagine it's a snare hit), can be divided in four different moments:


A - Attack: the beginning of the hit, that rises up to the peak of the sound

D - Decay: the initial lowering of from the highest peak to the body of the sound

S - Sustain: a part of the sound (which we can consider the "body") in which the volume remains more or less constant for a certain amount of time

R - Release: the final decay of the sound from the sustain part to the silence


Let's now consider also the four most common controls we have in a compressor:
Attack, Release, Ratio and Make Up gain.

Attack: how fast, when a sound surpasses a certain threshold, the compressor kicks in

Release: how fast the gain reduction goes back to zero

Ratio: how strong the gain reduction must be. If 2:1 means that for every 2db that surpass the threshold, the compressor make them sound as loud as 1db.

Make up gain: helps us keeping the overall level of the sound comparable to its unprocessed version, so we can turn it up or down until it sits well again in the mix,


Practical applications: In order to use compression properly we need to ask ourseves the reason why we should add it to our channel insert (and if there is no good reason, we just shouldn't): does our track need more attack? Does out track need less attack and more body? Does our track need some dynamic control? Here are some examples of practical use of a compressor:

- We need more body on our snare: we can dial in our compressor the attack to be fast, and to find a ratio that reduces the attack part of our wave of some db, so that it is comparable to the sustain part: this way the quieter parts of the sound (namely the sustain and the release) have more headroom to be raised in level, and therefore the snare sound will have a quieter initial crack, but a much longer and fatter body. So by squashing the attack, we increase our sustain.

- We need to give more attack to our bass: if we want to raise the attack on our bass (for example to make the sound of the fingers on the strings to pop out more), what we need is to turn down the sustain part of the sound, so that the attack remains high, and then we raise the overall level with the makeup gain. How do we lower the sustain part? by turning the release on our compressor down. So, by squashing the sustain, we increase our attack.

- We need to make a vocal track with a high dynamic range even: if we have a song in which the vocals have some part in which it's just a whisper and other in which the singer yells from the top of his lungs, we have a huge dynamic range, and we need each part to be audible the same.
First off when tracking, it's important to set the gain properly according to the loudness of the part (adjusting the input knob in order to reduce the dynamic range a bit), then in the project preparation phase we could do some volume automation to reduce further the dynamic range before starting compressing, so that the compression will be less aggressive in evening out the levels, and finally we can compress, using a fast attack and adjusting the ratio in order to tame the peaks and let the quieter parts to be audible as all the rest.


As we have seen the approach that needs to be understood in order to use compression properly is a REVERSE APPROACH:  do we need to boost the sustain because compared to the attack it is too low? We lower the attack and raise the level of the whole wave, instead of trying to raise the sustain part to match it with the attack part.


Become fan of this blog on Facebook! Share it and contact us to collaborate!!