Labels

BASS (50) COMPRESSION (32) DRUMS (45) EFFECTS (49) EQUALIZATION (30) GUITAR (112) HOME RECORDING (95) IMPULSES (21) INTERVIEWS (19) KARAOKE (1) LIVE (10) MASTERING (61) MIDI (21) MIXING (179) REVIEWS (156) SAMPLES (69) SONGWRITING (19) SYNTH (3) VOCALS (31)

Saturday, March 24, 2018

Review: Fabfilter Pro-R


Hello everyone and welcome to this week's article!
Today we're checking out a new plugin by Fabfilter, the Reverb Pro-R!

The panorama of Vst Reverbs is probably the widest of all: the easiest reverb algorithms are teached in many IT college as part of the exams, and it has been probably one of the first effects to have ever been created, to the point that literally every Daw in the market offers some form bundled, plus with the advent of Impulse Responses the offer has become even more various:
with these premises the task of creating a reverb software that can really make the difference in today's crowded panorama seems extremely hard, and yet Fabfilter once again has proven us to be up to the challenge, with its Pro-R.

How did Fabfilter differentiate their reverb from the others?
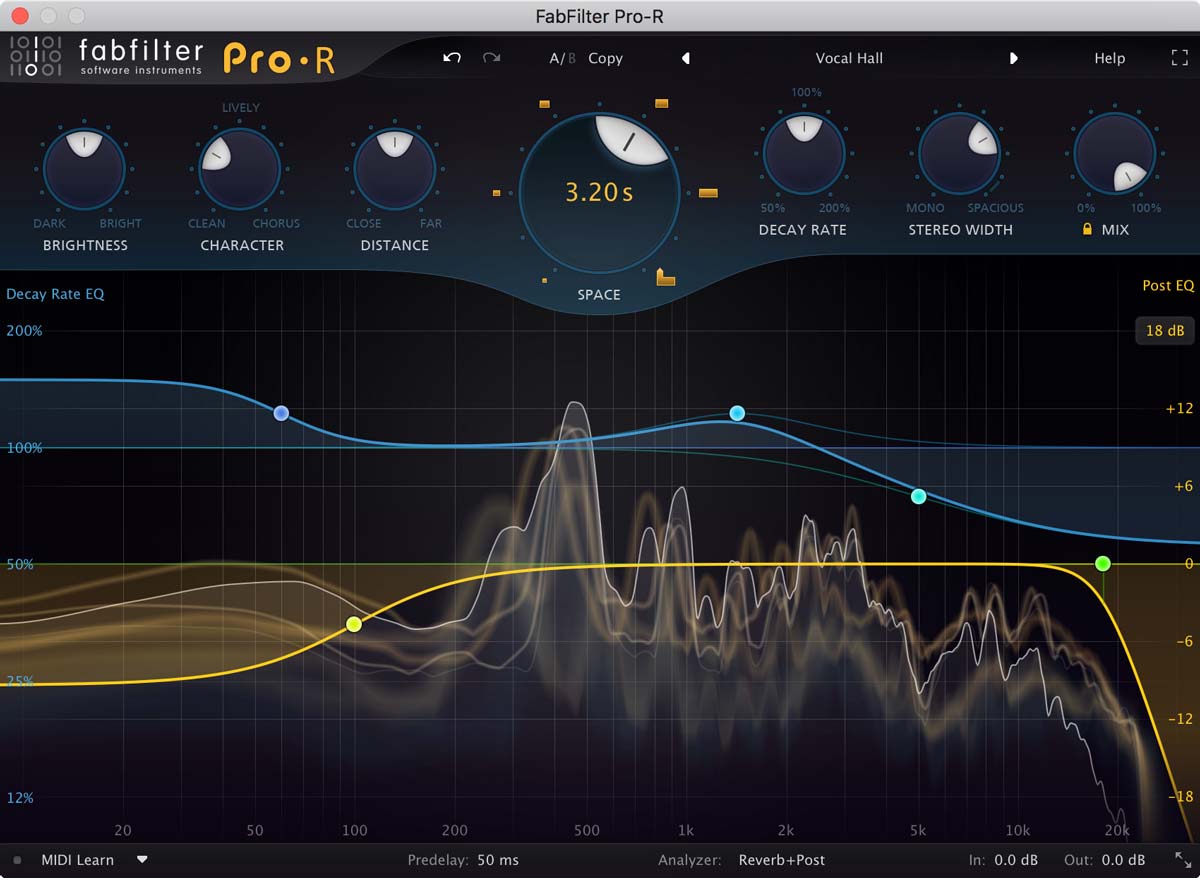
The same way they do with all of their plugins: with a beautiful interface, very intuitive and far from any useless scheumorphism, and with features that almost no other reverb has, starting with an integrated eq with spectrum analyzer to correct real time the way the effect processes the signal (for example filtering out the amount of reverb that affects the low end) and that also lets us modify independently the decay curve, allowing us to shape in detail the reverb tail and also to create some creative effect, to the point that it can be almost used as a transient shaper.

The main knobs are seven: Brightness, that adjust the amount of sparkle in the effect, Character, that affects the effect "colour" by adding some modulation, Distance, that allows us to adjust the perceived distance of the source, Decay rate, that affects the tail of the effect, Stereo width that controls how wide is the sound, Mix, that obviously lets us choose the wet/dry ratio, and the most importan of all: Space, that lets us set the room size.

On top of all these features the plugin features a wide array of presets for every kind of instrument, and they are a great place to begin with, before proceeding with further tweakings.

All in all another very useful plugin that has everything you'd expect and much more from a reverb, in a beautiful interface.
How does it sounds? It sounds extremely well and realistic, and the tools lets you tweak a lot, so that you can have a very transparent reverb, or a very coloured one, with a hint of echo or chorus, and on top of that the plugin is surprisingly light on the cpu compared to other high end reverb units, which usually can be some of the heaviest processors that can be loaded in a Daw.

Thumbs up!


Key Features taken from the website:


- Beautifully designed room models, ranging from small ambiences and rooms to large concert halls and huge cathedrals.

- Carefully developed to easily fit in the mix, without causing undesirable coloration, density or phase problems.Gorgeou Retina interface with large interactive reverb display featuring Decay Rate EQ and Post EQ curves.

- Stepless Space control, which smartly and smoothly combines the room model and decay time of the reverb. You can choose from over a dozen
- carefully designed room models and seamlessly vary between them, without hearing clicks or unwanted artifacts.

- Decay Rate control, changing the overall decay time from 50% to 200% of the current Space setting.

- Intelligent Stereo Width control, ranging from pure mono to true stereo and beyond.

- Distance control to adjust the proximity to the sound source in the selected space.

- The Character control changes the sound from a clean, transparent decay, to a lively reverb with pronounced reflections and echoes, all the way to an over-modulated chorus-like effect.

- Perfectly tuned Brightness knob, affecting not only overall brightness, but also the decay of high frequencies.

- Mix knob with a Lock Mix option, which prevents preset loading from overriding the current mix setting.

- Predelay control via the bottom bar, ranging from 0 to 500 ms, with optional host tempo sync.

- Innovative six-band Decay Rate EQ, giving you full control over the decay rate at different frequencies.

- Six-band Post EQ to equalize the final reverb sound. Together with the Decay Rate EQ, this lets you design reverbs of any style or character.

- Real-time spectrum analyzer that also visualizes the decay time at different frequencies.

- Full Screen mode, offering a large analyzer display and Decay Rate EQ and Post EQ controller.

- Multiple interface sizes: Medium, Large and Extra Large.

- Stereo and mono plug-ins available.

- MIDI Learn.

- Undo/redo and A/B comparison.

- Smart Parameter Interpolation.

- Sample-accurate automation of all parameters.


Become fan of this blog on Facebook! Share it and contact us to collaborate!!

Saturday, March 17, 2018

Best free Vst Plugins / Best Free software for making music 2018


Hello and welcome to this week's article!
Today we're checking out a list of free music software that is partially taken from the Audiosex Forum (with some modification and update), and partially is a compendium of the best software linked in our articles. 
It has literally everything you may need to have fun with home recording, and by clicking on the title of each category you will have a dedicated article for the topic.

I hope it will be useful, enjoy! 


Saturday, March 10, 2018

Review: Ltd Truckster (with video sample and comparison)


Hello everyone and welcome to this week's article!
Today we're going to talk about the Ltd Truckster, the signature singlecut guitar of James Hetfield of Metallica!
As you will probably know, Ltd is the low and mid-range price brand of Esp Guitars, a Japanese guitar manufacturer which produces high end instruments, and that has some of the biggest stars in heavy music as endorsers.

The Truckster is one of the various James Hetfield signature models produced by the company, and it is essentially a Les Paul style guitar with a serie of differences from a Gibson LP model, and that places itself in the highest tier of the Ltd roster, mainly due to its top end hardware.

The build quality is very good, the guitar is surprisingly lightweight (due to a body thinner than a Les Paul and a much thinner neck, more similar to an Ibanez one than to a Gibson one), and the painting tries to recreate the effect of several layers of different paint scratched off the area next to the knobs and where the arm stands, so it's a sort of fake relic style, which you may like or not, but for sure it has character.

The hardware is top-notch: there are Sperzel Locking tuners, Tonepros Tune o'Matic Bridge, Extra Jumbo frets, 2 pick up switch (one of which is inactive, but you can route the cables to go there if you prefer that position) and the pick ups are the Emg Het Set, the set made according to the Hetfield specifications.

Tone wise this guitar is extremely loud: as you can hear from the video comparison with an Epiphone Les Paul Prophecy the output is much higher, it's like playing through a booster, but the tone is brighter and more gnarly than a classic Emg 81, and in general, if well tweaked, this guitar provides a huge tone and it's lighter and more comfortable to use than a classic Les Paul.
The price is around 1100 $/€, which makes it one of the most expensive Ltd on the market, but on the other hand it makes sense, it is basically an Ltd Ec-1000 (the top level of Ltd singlecut, which sells for around 800 $) with 250 $ worth of pickups, locking tuners and a special painting, so you can actually see where the money goes, and all in all the price is quite right.

Give it definitely a try if you see one in a store, you might fall in love with it!


Specs:

- Set-neck construction

- 24-3/4" scale

- Mahogany body

- 3-piece mahogany neck

- 42mm standard nut

- Thin U neck contour

- Rosewood fingerboard

- Flag inlays with LTD at 12th fret

- 22 XJ frets

- EMG Het Set active pickups

- 2 volume and 1 tone control with 2 - 3-way toggles (toggle in upper position is inactive)

- Satin chrome hardware

- Sperzel locking tuners

- TonePros locking Tune-o-matic bridge with stop tailpiece

- White neck binding

Saturday, March 3, 2018

How to send multiple channels from a Vst instrument to separate tracks


Hello and welcome to this week's article!
Today we are going to talk about a very practical topic, that in this case is shown in the Presonus Studio One interface, but that can be applied to any other daw: how to take the various channels of a multi channel Vst instrument and send them to separate tracks in order to process them individually.

Let's imagine we have a drum vst instrument (or an orchestral one, or whatever): we can process the various channels inside the instrument (like in the case of Addictive Drums, in the picture),  or we can send them to separate tracks in the daw, to be able to use our favourite vst plugins.
In order to do that we need to click in the right-pointing arrow in the top of the interface, and it will open us the list of the channels.

By default, all the channels will be routed on track one, which is the vst instrument track, but we can assign each channel to a separate track just by ticking them in the list.
This does not mean we need to always tick all of them and process all of them separately, for example for a drumset we could need a track for the snare, a track for the kick, a track for the hi hat, a track for all the three toms together, a track with all the room and ambience microphones and a track with the rest of the cymbals, this way with six busses we could have enough flexibility to process independently everything without having to rely only on the vst instrument internal mixer, which sometimes has rather poor plugins.

Note that in this case the tracks in the list are called with the same names of the drum parts, but it's not always like that, usually they are called just "out 1, 2, 3..." and so on, so you need to assign each channel to an out to create the corresponding track.
Finally, sometimes, the internal VstI mixer has the various channels all routed into out 1, so before creating the various tracks you will need to assign each mixer channel to an output, and then with the abovementioned method, route these out into separate busses.

I hope this was helpful!


Become fan of this blog on Facebook! Share it and contact us to collaborate!!